Prerequisites - manual installation
To install the Genesis low-code platform on your server, go through the following steps.
- Make sure you have the correct infrastructure for installing the platform.
- Install the Genesis platform.
That is it. Once you have an installed platform in the correct environment, you are ready to start developing. Let's look in more detail.
Installing from an rpm
You must start with a server with the operating system and relevant packages installed. Genesis supplies the rpm to simplify the installation. Everything you need is in the rpm, and nothing is downloaded when you install it. To install the rpm, you need a privileged user account. In our example, the rpm is called genesis-platform-6.0.1-1.x86_64.rpm.
1. Give the user account a name
By default, the installation creates an application user account called genesis. You can change this before you start by editing the file genesis_install.conf. For example, if you want to create a user account called foxtrot, edit it as follows:
echo "genesis_user=foxtrot" >> /tmp/genesis_install.conf
If you want to provide a group other than genesis, then you can pass this on to the installation by adding:
echo “genesis_grp=charlie” >> /tmp/genesis_install.conf
The group (here, this is called charlie) must already be in existence.
By default, genesis code is installed under /data. If you want to install to a different directory, run:
echo “root_dir=opt” /tmp/genesis_install.conf
The folder (here, this is called opt) must already be in existence.
2. Install the rpm
Now you can sudo yum and install the rpm.
sudo yum --nogpgcheck localinstall genesis-platform-6.0.1-1.x86.rpm
This creates the user account and makes all the recommended security settings. Additionally, it creates the required directory structure and unpacks all the zipped files.
When the process has finished, you can go to the root directory and see the user that has been created (foxtrot, in our example).
Installed:
   genesis-platform.x86_64 0:6.0.1-1

Complete!
[centos@genesisserv1 tmp]$ cd
[centos@genesisserv1 ~]$ cd ..
[centos@genesisserv1 home]$ ls
centos  foxtrot
You can switch to that user and view the run directory for the newly installed platform, where you can find auth and genesis ready to be initialized.
[centos@genesisserv1 home]$ sudo su - foxtrot
[gnosis@genesisserv1 ~]$ ls
run
[foxtrot@genesisserv1 ~]$ ls -ls
total 12
drwx------.  2 foxtrot foxtrot  73  Aug21 13:54 .
drwxr-xr-x.  4 root    root     35  Aug21 13:54 ..
-rw-r--r--.  1 foxtrot foxtrot  18  Apr  1 2020 .bash_logout
-rw-r--r--.  1 foxtrot foxtrot 193  Apr  1 2020 .bash_profile
-rw-r--r--.  1 foxtrot foxtrot 351  Aug 21 13:54 .bashrc
lrwxrwxrwx.  1 root    root     34  Aug 21 13:54 run -> /data/foxtrot/server/20210821/run/
[foxtrot@genesisserv1 ~]$ cd run/
[foxtrot@genesisserv1 run]$ ls
auth    genesis
[foxtrot@genesisserv1 run]$
3. Update system definition
We must make a small edit to the system configuration file found at the following URI: site-specific/cfg/genesis-system-definition.kts. Remove the current host configuration items and replace them with the name of your own host.
4. Run genesisInstall
The script does all the hard work for you. Just run genesisInstall.
The initialisation process creates new directories. In addition to auth and genesis, you will see:
- generated
- runtime
- site-specific
The process also creates some useful tools. Most immediately, try mon to see the processes that need to be run.
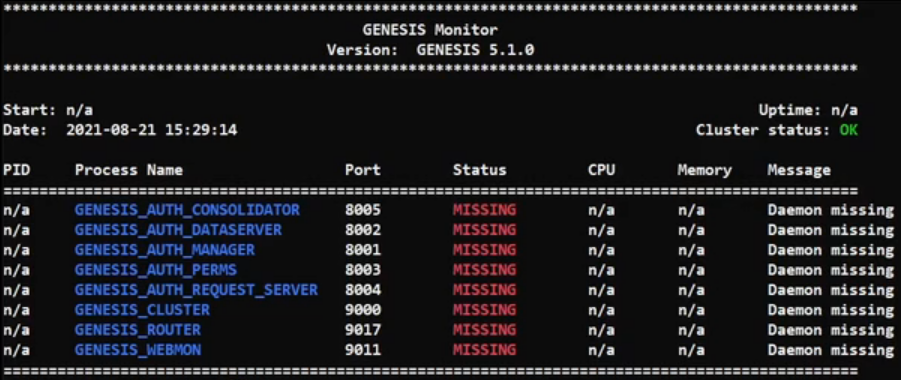
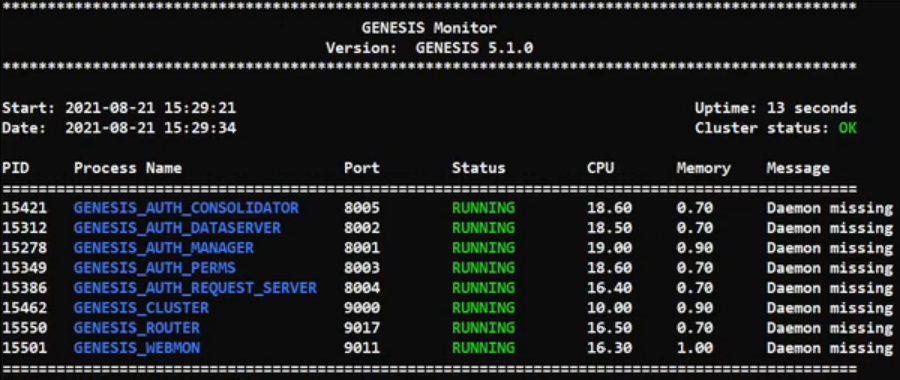
At this point, no processes are running. So, run the command startServer. When it is complete, run mon again. This time, you can see all the processes running.
That’s it. You are now ready to start developing. Congratulations.