ALM app: getting started
To follow this tutorial, you need to have an account for Genesis Launchpad. This site gives you an environment for running Genesis Create, an IDE for looking at the project code, and a plugin that enables you to build and run the app.
If you haven't received this or don't know your details, contact:
dev.support@genesis.global.
Genesis Launchpad
-
Go to Genesis launchpad and sign in.
-
The ALM app is listed as a template in the lower part of the screen. Click on the
Open in Createbutton for the app.
Genesis Create
Genesis Create enables you to create a Genesis application from scratch in a very short space of time, without writing any code.
You can find the JSON file for the app on github if you want to work with the project in your own IDE.
In short, Genesis Create enables you to:
- select the components you need for your app
- create the tables (entities) for your database
- create views that draw data from different tables
- set up queries that provide this data to the front end
- set up Event Handlers that enable you to insert, modify and delete data in the tables
- configure consolidators that aggregate data, such as the value of a set of trades
- create a front end that enables users to view grids of data and charts
These stages are all set out at the top left of the Create window.
You can use the Next and Back buttons to move back and forward through the steps.
Feel free to look into each step and see what has been set up.
Once you have done this, click on the Next until you reach the Summary page.
Running and building
Make sure you are on the Summary page of Genesis Create. Click on the Open in Genesis Cloud Workspace tab, then on the Open in Genesis Cloud Workspace button.
This generates a project and opens an IDE in the Cloud Workspace.
You can browse through the project that has been generated by Genesis Create.
- The
clientsubdirectory contains a fully working web application for the front end of our application. - The
serversubdirectory contains the generated Genesis configuration files for each of the microservices that make up the back end of the application.
You can now build and run the app.
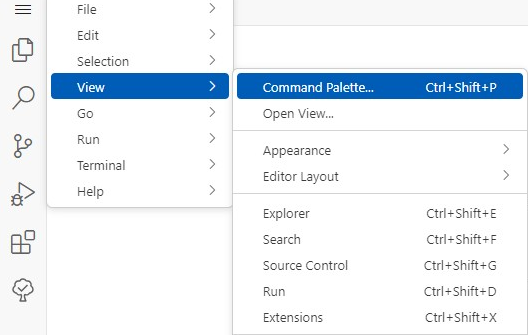
- Click on the menu icon to the left and select
View -> Command Palette.

-
To see the list of available commands, type
Genesis:. Then selectGenesis Build Project. This starts a full build. When this is complete, you will see the messageBUILD SUCCESSFULin the terminal tab at the bottom right of the screen. -
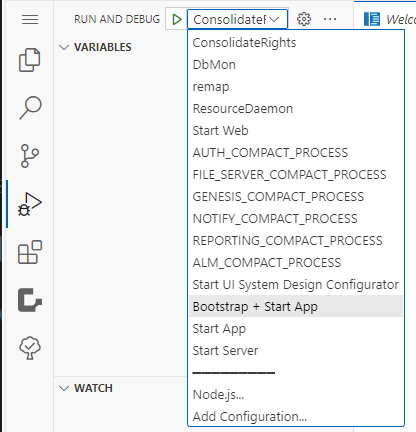
Now you can initialise the database and start our server and client processes. Click the
Run and Debugicon.
![]()
- Select
Bootstrap + Start App, then click on theStartbutton at the left of the selector.

This creates the database, loads some data and applies permissions. It takes a few minutes to complete.
- When all the processes are
UP, switch to thePORTStab at the bottom. Go to theWebline and click on theOpen in Browsericon.

If the web port (6060) has not been displayed in the PORTS tab automatically, you can add it manually:
Select the blue Add Port button and type 6060 in the field that appears. This adds the web port.
When the web application is displayed in your browser, you can login using:
- username: admin
- password: genesis
That's it. Now you can take a look at your working app.