Event Handler - testing
Integration testing
The Genesis Platform provides the AbstractGenesisTestSupport abstract class that enables end-to-end testing of specific areas of your application. In this case, we want to ensure that we have a database, seeded with information, and that our Event Handler configuration is used to create our Event Handler. We also need to add the required packages, genesis home and separately set the "IS_SCRIPT" System Definition property to true (This is required as part of the Event Handler initialisation).
class EventHandlerTest : AbstractGenesisTestSupport<GenesisSet>(
    GenesisTestConfig {
        addPackageName("global.genesis.eventhandler.pal")
        genesisHome = "<genesis-home>"
        parser = { it }
        scriptFileName = "<app-name>-eventhandler.kts"
        initialDataFile = "seed-data.csv"
    }
) {
    override fun systemDefinition(): Map<String, Any> = mapOf("IS_SCRIPT" to "true")
}
For more information about AbstractGenesisTestSupport, see the Testing pages.
Once you have added your config above, you can start writing tests against our Event Handler.
Writing tests
Let's write some tests for this simple Event Handler, defined below
    eventHandler<Trade>(name = "TRADE_INSERT") {
        onCommit { event ->
            val trade = event.details
            val result = entityDb.insert(trade)
            ack(listOf(mapOf("TRADE_ID" to result.record.tradeId)))
        }
    }
Simple test
Below is an example of a simple test.
    @Test
    fun `test insert trade`(): Unit = runBlocking {
        val message = Event(
            details = Trade {
              tradeId = "1"
              counterpartyId = "CP1"
              instrumentId = "I2"
              side = "BUY"
              price = 1.123
              quantity = 1000
            },
            messageType = "EVENT_TRADE_INSERT"
        )

        val result: EventReply? = messageClient.suspendRequest(message)
        result.assertedCast<EventReply.EventAck>()

        val trade = entityDb.get(Trade.ById("1"))
        assertNotNull(trade)
    }
First, create your Event object, setting the event details and specifying the intended Event Handler for the message "EVENT_TRADE_INSERT".
We then send a message to our Event Handler using messageClient.suspendRequest(message). The result is first verified to be an EventAck. Then check that the inserted trade can be retrieved from the database.
Remember to add the runBlocking coroutine scope to the test, as the Genesis platform uses Kotlin coroutines.
Error response test
You may also want to test a negative case, where you expect to receive an error as a response.
You need to modify the previous example Event Handler and add an onValidate block:
eventHandler<Trade>(name = "TRADE_INSERT") {
    onCommit { event ->
        val trade = event.details
        val result = entityDb.insert(trade)
        ack(listOf(mapOf("TRADE_ID" to result.record.tradeId)))
    }
    onValidate { event ->
        val message = event.details
        verify {
            entityDb hasEntry Counterparty.ById(message.counterpartyId)
            entityDb hasEntry Instrument.ById(message.instrumentId)
        }
        ack()
    }
}
In the example below, we expect the response to be of type EventNack, which has a property error containing a list of errors.
    @Test
    fun `test invalid instrument`(): Unit = runBlocking {
        val message = Event(
            details = Trade {
                tradeId = "1"
                counterpartyId = "CP1"
                instrumentId = "DOESNOTEXIST"
                side = "BUY"
                price = 1.213
                quantity = 100
            },
            messageType = "EVENT_TRADE_INSERT"
        )

        val result: EventReply? = messageClient.suspendRequest(message)
        val eventNack: EventReply.EventNack = result.assertedCast()

        assertThat(eventNack.error).containsExactly(
            StandardError(
                "INTERNAL_ERROR",
                "INSTRUMENT ById(instrumentId=DOESNOTEXIST) not found in database"
            )
        )
    }
Testing with authorisation
To test that the Event Handler authorisation works correctly, you need to do some setting up.
First, make sure that your authorisation set-up is designed to behave as follows:
- A user who enters a trade must have an entry in the "ENTITY_VISIBILITY" auth map; the entity code for this user must match the
counterpartyIdof the trade. - The user must have an entry in the "RIGHT_SUMMARY" table with "RIGHT_CODE" as "TRADER".
Second, you need to modify the previous example Event Handler so that only authorised users can insert trades.
You can find a Java event example in our Authorization API pages.
eventHandler<Trade>(name = "TRADE_INSERT") {
    permissioning {
        permissionCodes = listOf("TRADER")
        auth(mapName = "ENTITY_VISIBILITY") {
            field { counterpartyId }
        }
    }
    onValidate { event ->
        val message = event.details
        verify {
            entityDb hasEntry Counterparty.ById(message.counterpartyId)
            entityDb hasEntry Instrument.ById(message.instrumentId)
        }
        ack()
    }
    onCommit { event ->
        val trade = event.details
        val result = entityDb.insert(trade)
        ack(listOf(mapOf("TRADE_ID" to result.record.tradeId)))
    }
}
Third, you need to specify the auth cache override in the GenesisTestConfig:
class EventHandlerTest : AbstractGenesisTestSupport<GenesisSet>(
    GenesisTestConfig {
        addPackageName("global.genesis.eventhandler.pal")
        genesisHome = "/GenesisHome/"
        parser = { it }
        scriptFileName = "your-application-eventhandler.kts"
        initialDataFile = "seed-data.csv"
        addAuthCacheOverride("ENTITY_VISIBILITY")
    }
) {
...
}
Fourth, in your test set-up, let's authorise one user to be able to insert trades and another who is not.
    @Before
    fun setUp() {
        authorise("ENTITY_VISIBILITY", "CP1", "TraderUser")

        val trader = DbRecord.dbRecord("RIGHT_SUMMARY") {
            "USER_NAME" with "TraderUser"
            "RIGHT_CODE" with "TRADER"
        }
        val support = DbRecord.dbRecord("RIGHT_SUMMARY") {
            "USER_NAME" with "SupportUser"
            "RIGHT_CODE" with "SUPPORT"
        }
        rxDb.insert(trader).blockingGet()
        rxDb.insert(support).blockingGet()
    }
For more information on authorisation, see the authorisation docs.
Below is a test that verifies only Traders can enter trades:
    @Test
    fun `test trade inserted by trader`(): Unit = runBlocking {
        val message = Event(
            details = Trade {
                tradeId = "1"
                counterpartyId = "CP1"
                instrumentId = "I2"
                side = "BUY"
                price = 5.0
                quantity = 1
            },
            messageType = "EVENT_TRADE_INSERT",
            userName = "TraderUser"
        )

        val result: EventReply? = messageClient.suspendRequest(message)
        result.assertedCast<EventReply.EventAck>()

        val trade = entityDb.get(Trade.ById("1"))
        assertNotNull(trade)
    }
Following that, we have a test to verify that a trade cannot be entered if the user is not a Trader:
    @Test
    fun `test trade cannot be inserted if not trader`(): Unit = runBlocking {
        val message = Event(
                details = Trade {
                tradeId = "1"
                counterpartyId = "CP1"
                instrumentId = "I2"
                side = "BUY"
                price = 5.0
                quantity = 1
            },
            messageType = "EVENT_TRADE_INSERT",
            userName = "SupportUser"
        )

        val result: EventReply? = messageClient.suspendRequest(message)
        val eventNack = result.assertedCast<EventReply.EventNack>()

        assertThat(eventNack.error).containsExactly(
            StandardError(
                "NOT_AUTHORISED",
                "User SupportUser lacks sufficient permissions"
            )
        )
    }
Manual testing
Testing with Console
If you use Genesis Console, this gives you a simple way of testing components.
- In your browser, go to http://genesislcap.com/console/console-next2/.
- Enter the IP address of your server, in this case localhost. If you get a blank page without any response, then this is probably because you don't have NGINX configured.
- Log in with the username and password of your Genesis user. This starts the Genesis Console, and you will see a list of tabs along the top of the screen.
- Click on the RESOURCES tab.
- Filter the Resource type to show only Event Handlers.
For example:
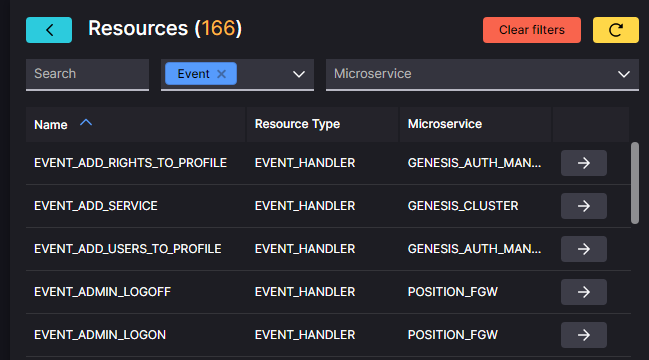
As well as the Event Handlers that you have defined yourself, you will also see other Event Handlers that have been generated automatically by the platform: anything that is a GENESIS_CLUSTER service, for example.
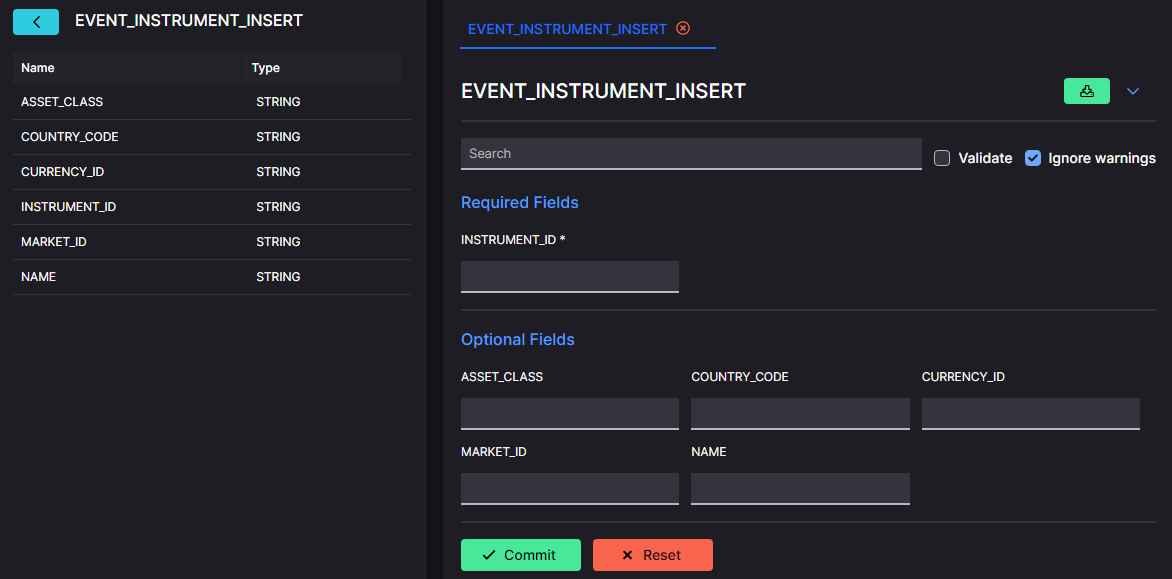
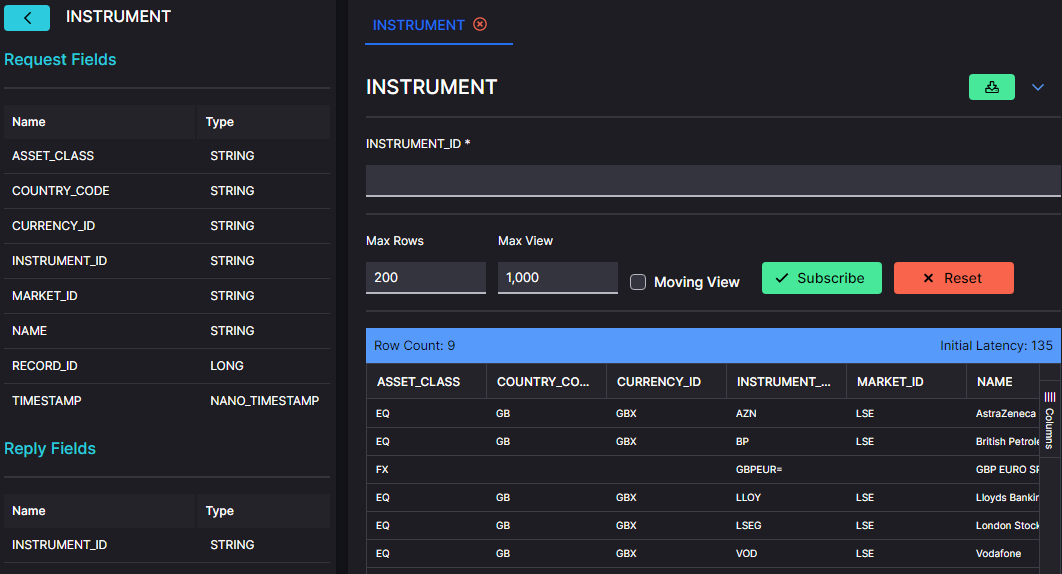
If you click on any Event Handler in the list, the fields relevant to the event are displayed to the right.

Now you need to pick the Event Handler you want to test. in this example, it is called EVENT_INSTRUMENT_INSERT.
- Find the Event Handler in the list, then click on the arrow beside it. On the right, this displays the relevant input fields for the event. Some are mandatory, while others are optional - depending on how the Event Handler was set up.
- Enter the details of the new instrument in the field. In our example, we are going to add the spot rate for trading the British Pound against the Euro. The code for this is GBPEUR=. In the example below, we have added the INSTRUMENT_ID (mandatory), plus the ASSET_CLASS and NAME. Then we click on COMMIT:
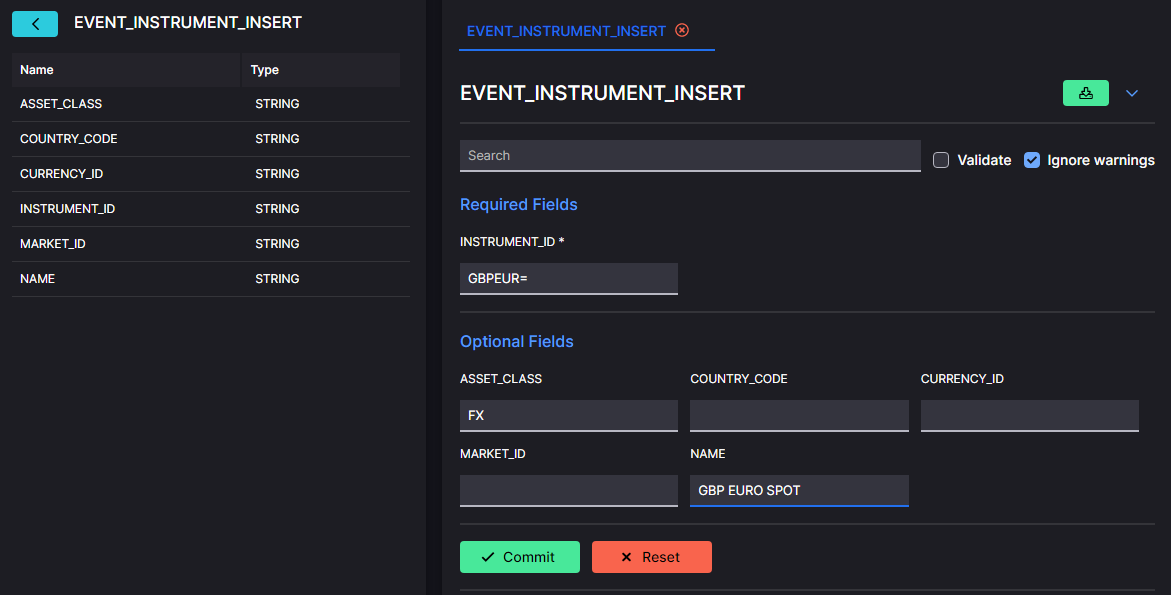
If the Event Handler is working correctly, you will receive an ACK.

Checking the insertion
You can go on to check the INSTRUMENT table to see if your insert is there.
-
Filter the list of services to show only request servers (these are the components that distribute the data).
-
Search for the relevant resource - in our case INSTRUMENT.
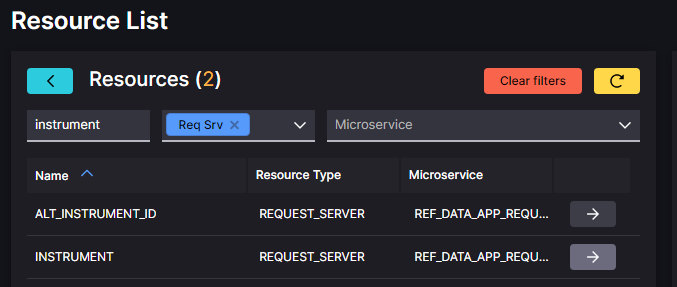
- Click on the arrow beside the relevant resource. You should now see the new instrument in the list displayed on the right.
Testing with an API client
An API client, such as Postman or Insomnia is useful way of testing components. As a client, it is effectively a front end seeking information from the server.
The API client enables you to create calls to the resources in your server - Data Servers, Request Servers and Event Handlers. Then you can just click to run a call and see what response you get.
Before you can make any calls on these resources, you will have to permission yourself by obtaining a SESSION_AUTH_TOKEN. The details of how to do this are on our separate Testing page.
Once you have the SESSION_AUTH_TOKEN, keep a copy that you can paste into each request as you make your test call.
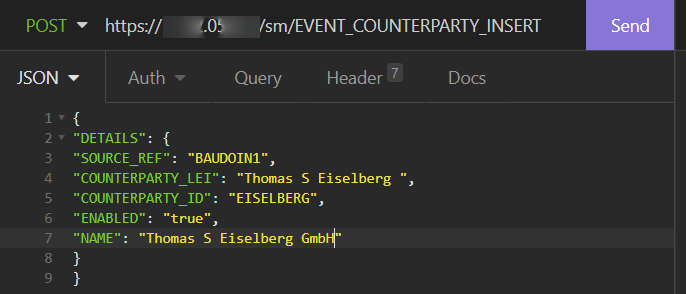
In the example below, we are using Insomnia as the client API. We are going to test the EVENT_COUNTERPARTY_INSERT Event Handler by adding a new counterparty.
url and Body
In front of the url, set the call to POST.
The url consists of:
- the address or hostname of the server
- if necessary, some extra routing; in this case sm uses a proxy to access the server
- the name of the Event Handler
Set the body to JSON. In the body, you need to insert the details of the fields for the new counterparty, as seen below:
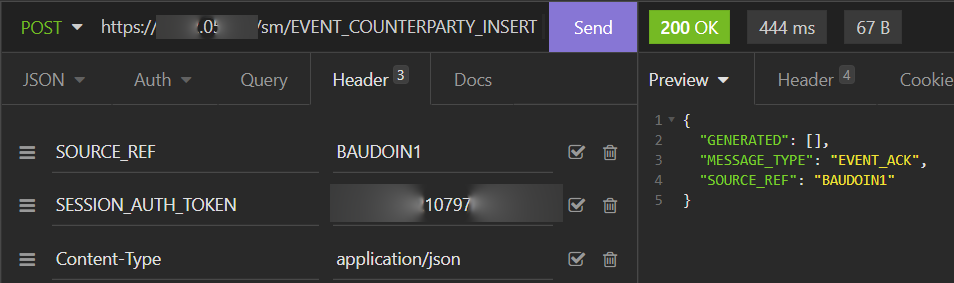
Header
In the header, you need to supply:
- a SOURCE_REF (always), which identifies you; you can use any string value that suits you
- the SESSION_AUTH_TOKEN that permissions you to access the server
When you have all these elements in place, click on Send to make the call. If the event is a success, you will receive an ACK message.
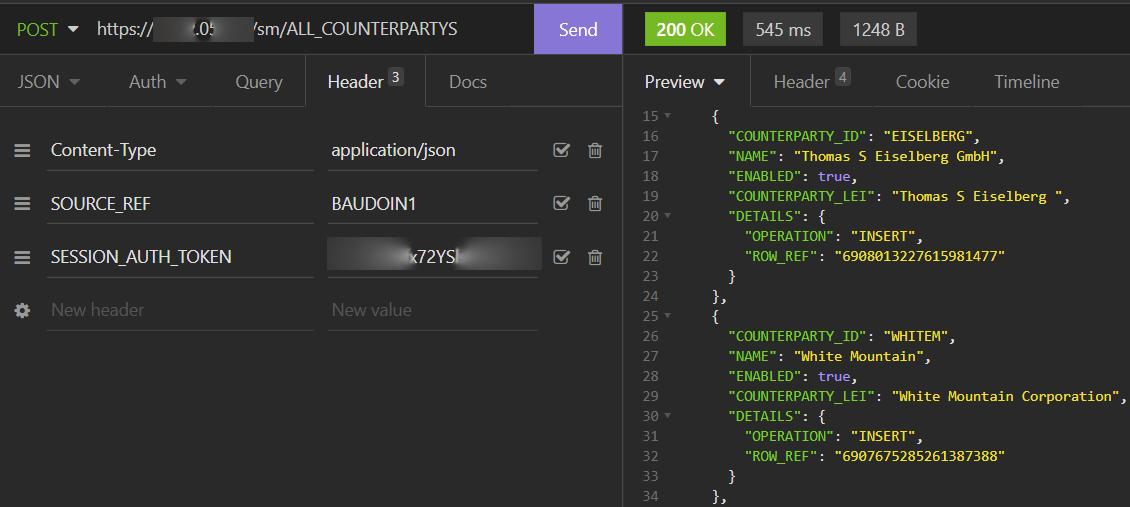
Checking the insertion
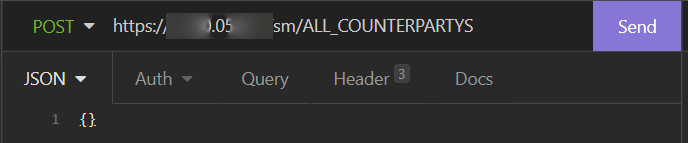
Now you can check that the new counterparty you inserted is in the correct table of the database. The resource you need to check is the Request Server called ALL_COUNTERPARTYS.
In front of the url, set the call to POST.
The url consists of:
- the address or hostname of the server
- if necessary, some extra routing; in this case sm uses a proxy to access the server
- the name of the Request Server
Set the body to JSON. There is no need for any information in the body. Simply insert a pair of curly brackets .
In the header, you need to supply:
- a SOURCE_REF (always), which identifies you; you can use any string value that suits you
- the SESSION_AUTH_TOKEN that permissions you to access the server
When you have this in place, click on Send to make the call. You can see that the fields for the instruments have been returned on the right of the screen.