Request Server - testing
Integration testing
It is good practice to test your Request Servers. This is the best way to prevent any unexpected side effects of changes to your application over time.
The Genesis platform provides the AbstractGenesisTestSupport abstract class that enables end-to-end testing of specific areas of your application. In this case, we want to ensure that we have a database, seeded with information, and that our Request Server configuration is used to create our Request Server. We also need to add the required packages and genesis home.
class ReqRepTests : AbstractGenesisTestSupport<Reply<*>>(
    GenesisTestConfig {
        addPackageName("global.genesis.requestreply.pal")
        genesisHome = "/GenesisHome/"
        scriptFileName = "your-application-reqrep.kts"
        initialDataFile = "seed-data.csv"
    }
) {
    ...
}
For more information about AbstractGenesisTestSupport, see the testing documentation.
Once you have set up your configuration, we can start writing tests against our Request Server. Your tests will look a little different, depending on if you are using the standard approach to Request Servers or using custom Request Servers.
Standard Request Servers
Let's run a very simple example.
Copy the following into a csv file and save as seed-data.csv in the test Resources folder.
#COUNTERPARTY
COUNTERPARTY_ID,COUNTERPARTY_NAME
testID 1,TestName 1
testID 2,TestName 2
We shall send a message to our Genesis application, pointing at the correct Request Server (making sure to add the REQ_ prefix) and wait for the response.
The Genesis platform uses Kotlin coroutines which gives us a degree of non-blocking asynchronous computation. For this reason, we must wrap our tests in a runBlocking coroutine scope as seen below.
class ReqrepTest : AbstractGenesisTestSupport<GenesisSet>(
    GenesisTestConfig {
        addPackageName("global.genesis.requestreply.pal")
        genesisHome = "/GenesisHome/"
        scriptFileName = "positions-app-tutorial-reqrep.kts"
        initialDataFile = "seed-data.csv"
        parser = { it }
    }
) {

    @Test
    fun `can get all counterparty`() = runBlocking {
        val request = GenesisSet.genesisSet {
            MessageType.MESSAGE_TYPE with "REQ_COUNTERPARTY"
        }
        val counterparties = sendMessageAsync(request).getArray<GenesisSet>("REPLY")
        assertNotNull(counterparties)
        assertEquals(2, counterparties.size)
    }
}
In the above example, we are asserting that there are five rows within the response from our Request Server. This is based on the two rows of data that we have in seed-data.csv declared earlier.
Custom Request Servers
For custom Request Servers, we must declare a workflow object that matches the custom Request Server that we have declared. This should match the same input and output types for the custom Request Server.
Given a custom Request Server that takes an input of type Hello and returns type World, we pass the same types into the requestReplyWorkflow. We can optionally pass the name of the Request Server to the builder.
object HelloWorldFlow : RequestReplyWorkflow<Hello, World> by requestReplyWorkflowBuilder("HELLO_WORLD")

@Test
fun `can get hello world`() = runBlocking {
    val reply = sendRequest(HelloWorldFlow, Hello("Peter")).first()

    assert(reply.message == "Hello Peter")
}
If you want to reuse a workflow with the same input and output types, you can use the unary plus overload to change the name of the Request Server being pointed to. In the example below, we reuse HelloWorldFlow and change the Request Server to "HELLO_WORLD_CAPS", a variant of the same Request Server which returns a string in all caps.
@Test
fun `can get hello world`() = runBlocking {
    val reply = sendRequest(HelloWorldFlow + "HELLO_WORLD_CAPS", Hello("Peter")).first()

    assert(reply.message == "HELLO PETER")
}
Manual testing
Testing with Console
If you use Genesis Console, this gives you a simple way of testing components.
- In your browser, go to http://genesislcap.com/console/console-next2/.
- Enter the IP address of your server. If you get a blank page without any response, then this is probably because you don't have NGINX configured.
- Log in with your user name and password. This starts Genesis Console, and you will see a list of tabs along the top of the screen.
- Click on the RESOURCES tab.
- Filter the Resource type to show only Request Servers. Once you click into your Request Server, you will see the current response from the Request Server and any input fields that you have defined. You can change the inputs and verify that the correct behaviour is being seen. Make sure that your database has some data for you to search through.
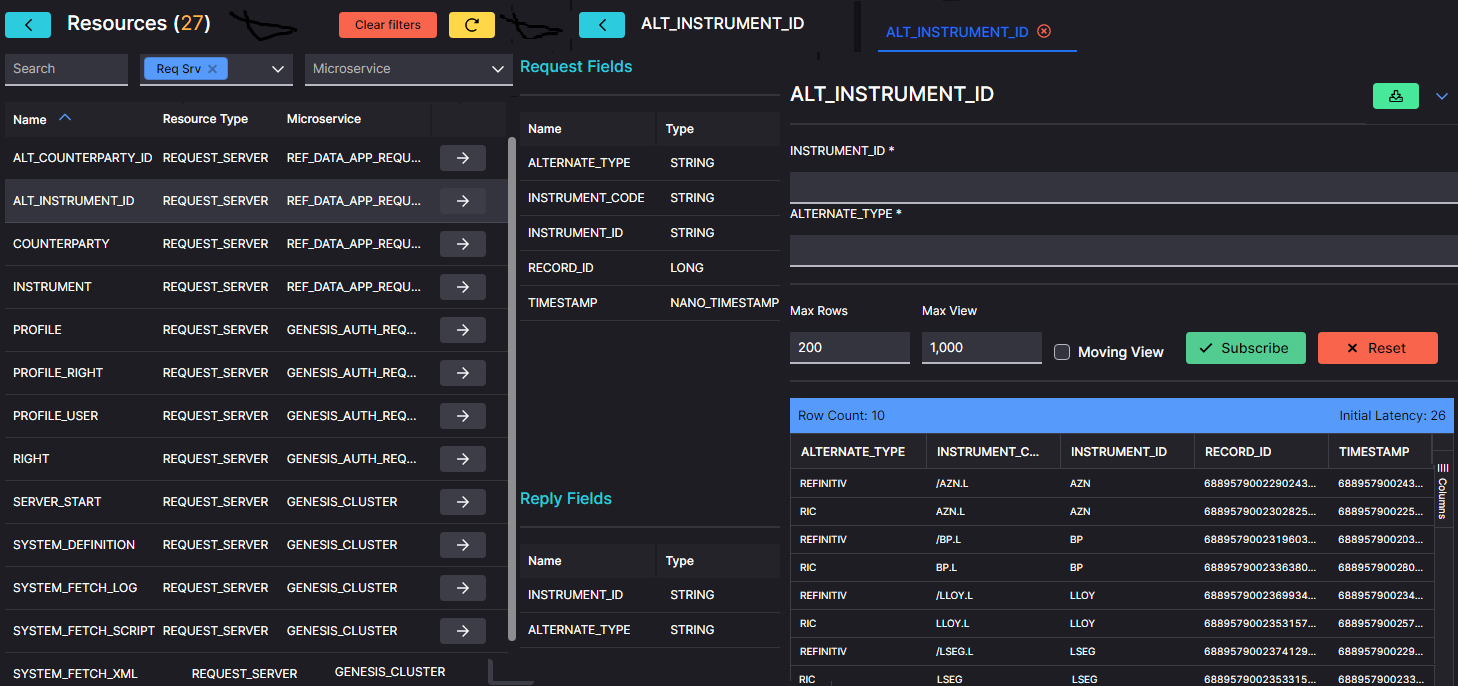
For more detailed information about using Genesis Console for manual testing, go to our testing documentation.
Testing with an API client
An API client is a useful way of testing components. As a client, it is effectively a front end seeking information from the server.
The API client enables you to create calls to the resources in your server - Data Servers, Request Servers and Event Handlers. Then you can just click to run a call and see what response you get.
Before you can make any calls on these resources, you will have to permission yourself by obtaining a SESSION_AUTH_TOKEN. The details of how to do this are on our separate Testing page.
Once you have the SESSION_AUTH_TOKEN, keep a copy that you can paste into each request as you make your test call.
In the example below, we are using Postman as the client API.
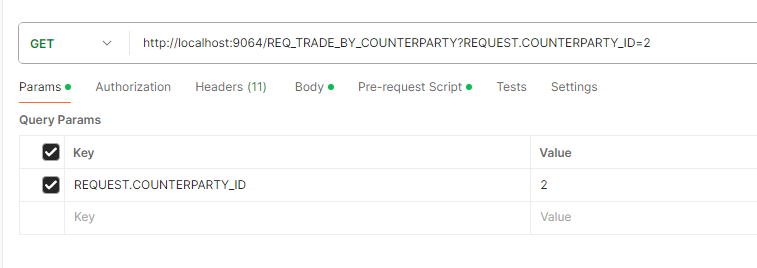
There is no need for any information in the body, as this is a GET request.
In the header, you need to supply:
- a SOURCE_REF (always), which identifies you; you can use any string value that suits you
- the SESSION_AUTH_TOKEN that permissions you to access the server
In front of the url, this has been set to a GET call.
The url consists of:
- the address or hostname of the server
- if necessary, some extra routing;
- the name of the request server, preceded by REQ_
A Request Server requires additional parameters as part of the request. Here we provide the query parameters: REQUEST.{NAME_OF_THE_FIELD}. So your URL would be like this:
.../REQ_{NAME_OF_THE_REQUEST}?REQUEST.{NAME_OF_THE_FIELD1}=1&REQUEST.{NAME_OF_THE_FIELD2}=2
When you have this in place, click on Send to make the call. You can see that the fields for the instruments have been returned on the right of the screen.