Testing API
Integration testing
GenesisJunit is only available from version 8 of the Genesis Server Framework (GSF). If you are testing against previous versions of the framework, see the page on legacy testing
Genesis provides a JUnit 5 extension that helps developers write integration tests.
The extension will create a Genesis microservice for the duration of each test case.
The GenesisJunit functionality is made available via the genesis-testsupport package.
This page describes the GenesisJunit extension in general.
Prefer using @GenesisTest or @GenesisDatabaseTest instead of @ExtendWith(GenesisJunit...).
These annotations implicitly register the JUnit 5 extension and are more concise.
Testing specific services
In addition to general test support, GenesisJunit also provides support for specific services. For more information, have a look at the links below.
A simple example
Let's have a look at a simple test.
We have a TradeProcessor class that takes a trade Id, processes the trade and updates the status.
We want to make sure our trade is marked as processed, once complete.
- Kotlin
- Java
@GenesisTest // 1
@CsvData("my-trades.csv") // 2
class TradeProcessorTest {

    @Inject
    lateinit var db: SyncEntityDb // 3

    @Inject
    lateinit var tradeProcessor: TradeProcessor // 4

    @Test
    fun myTest() {
        tradeProcessor.processTrade("TRADE_1") // 5

        val dbTrade = db.get(Trade.byId("TRADE_1")) // 6

        assert(dbTrade.status == TradeStatus.PROCESSED) // 7
    }
}
@GenesisTest // 1
@CsvData("my-trades.csv") // 2
public class TradeProcessorTest {

    @Inject
    private SyncEntityDb db = null; // 3

    @Inject
    private TradeProcessor tradeProcessor = null; // 4

    @Test
    public void simpleTestExample() {
        tradeProcessor.processTrade("TRADE_1"); // 5

        var dbTrade = db.get(Trade.byId("TRADE_1")); // 6

        assert(dbTrade.status == TradeStatus.PROCESSED); // 7
    }
}
Let's break down what happens here.
@GenesisTest- using this annotation will enable the Genesis JUnit extension. It will manage the Genesis resources during the test.@CsvData("my-trades.csv") - our test relies on trade data existing in the database. Here we specify that data.@InjectandSyncEntityDb- all classes available for injection during runtime are available in our test. Here we're getting a reference to the database.@InjectandTradeProcessor- we can also inject our own classes.TradeProcessorhas a constructor annotated with@Inject, so the dependency injection mechanism knows how to instantiate it.- By the time the test starts, our injected instances are available and we can start testing.
- We can access the database as we would normally to get the updated state of the trade.
- We verify that the trade status has been updated as expected.
GenesisJunit
GenesisJunit will take care of the Genesis side of the test. There are two modes for running GenesisJunit:
- Full microservice
- Database only
The main benefit of using @GenesisTest is full microservice support.
We can use the message client, package scan and process lifecycle.
The main benefit of using @GenesisDatabaseTest is that tests run a lot faster.
It will do the following for each test:
| Function | Database only | Full Micro service |
|---|---|---|
| Annotation to Use | @GenesisDatabaseTest | @GenesisTest |
| Instantiate the database | ✔️ | ✔️ |
| Load csv data | ✔️ | ✔️ |
| Package scan | ❌️ | ✔️ |
| Start a Genesis microservice | ❌️ | ✔️ |
| Inject properties into the test class | ✔️ | ✔️ |
| Run the test | ✔️ | ✔️ |
| Clean up resources | ✔️ | ✔️ |
The @GenesisDatabaseTest and @GenesisTest can be found in the global.genesis.testsupport.jupiter package.
Scenario Testing
You can define and share scenarios for testing.
You can do this by creating a class with genesis test annotations only.
You can then import those scenarios by adding multiple @TestScenario(MyClass::class) or @TestScenario(MyClass.class) to your tests.
Finally, you will need to annotate your test functions with @GenesisTemplateTest.
Your test will now be run against those multiple scenarios.
In the example below, the code is tested with both Flag set to true and false using system definition overrides.
However, the use is not limited to @SysDefOverwrite, you will be able to use any configuration that drives the configuration of the service and or database.
- Kotlin
- Java
@SysDefOverwrite("Flag", "true")
class ScenarioA

@SysDefOverwrite("Flag", "false")
class ScenarioB

@GenesisDatabaseTest
@TestScenario(ScenarioA::class)
@TestScenario(ScenarioB::class)
class ScenarioExample {

    @GenesisTemplateTest
    fun name() {
        // test here...
    }
}
@SysDefOverwrite(key = "Flag", keyValue = "true")
class ScenarioA {}

@SysDefOverwrite(key = "Flag", keyValue = "false")
class ScenarioB {}

@GenesisDatabaseTest
@TestScenario(ScenarioA.class)
@TestScenario(ScenarioB.class)
public class ScenarioExample {

    @GenesisTemplateTest
    void name() {
        // test here...
    }
}
Re-using resources between tests
Often, most test time is spent provisioning and tearing down the microservice or database. However, this is not always strictly necessary. For instance, if you are testing how your trade microservice handles different trades, those tests can likely run without restarting the service in between. Please see the equivalent annotations for microservice and database-only tests below:
| Test Type | Context per test | Shared Context |
|---|---|---|
| Microservice | @GenesisTest | @GenesisSharedContextTest |
| Database only | @GenesisDatabaseTest | @GenesisDatabaseTest(reuseDatabase = true) |
These tests will behave slightly differently.
Microservice shared context
When using @GenesisSharedContextTest, function-level annotations are not supported and your test will fail if any are found.
Additionally, after each test, if the service is no longer healthy or if exit was called, any subsequent test will fail.
Database only shared context
Database tests behave slightly differently. Function level annotations are supported. GenesisJunit will attempt to reuse the database on a best-effort basis. Tests are run in sequence; this sequence is determined by JUnit. Between tests, GenesisJunit will check whether the database configuration is compatible between test functions. If compatible, the database will be reused; otherwise, it will be disregarded and a new database will be initialised.
Annotations
GenesisJunit supports a range of annotations.
You must add @GenesisDatabaseTest or @GenesisTest to your class or function. This is essential.
@GenesisDatabaseTest or @GenesisTest and all the annotations below work on both the class and method level.
Not all annotations are supported when using @GenesisDatabaseTest.
| Annotation | Target | Repeatable | Works with @GenesisDatabaseTest |
|---|---|---|---|
| GenesisTest | Class/ Method | ❌ | ❌ |
| GenesisDatabaseTest | Class/ Method | ❌ | ✔️ |
| CoroutinesDumpOnFailure | Class/ Method | ❌ | ✔️ |
| CsvData | Class/ Method | ✔️ | ✔️ |
| EnableDataDump | Class/ Method | ❌ | ❌ |
| EnableInMemoryTestAuthCache | Class/ Method | ❌ | ❌ |
| EnableLegacyXmlDictionary | Class/ Method | ❌ | ✔️ |
| EnableQuietMode | Class/ Method | ❌ | ✔️ |
| EnableTestClassLoader | Class/ Method | ❌️ | ❌️ |
| ExpectedExitCode | Class/ Method | ❌️ | ❌️ |
| ExpectedProcessStatus | Class/ Method | ❌️ | ❌ |
| FullDumpOnFailure | Class/ Method | ❌ | ✔️ |
| GenesisHome | Class/ Method | ❌ | ✔️ |
| GenesisSharedContextTest | Class | ❌ | ❌ |
| GenesisTemplateTest | Method | ❌ | ✔️ |
| PackageNameScan | Class/ Method | ✔️ | ✔️ |
| PackageScan | Class/ Method | ✔️ | ✔️ |
| ProvidedInstance | Field/ Method | ❌ | ✔️ |
| ProvidedSysDef | Field/ Method | ❌ | ✔️ |
| ResetTableAfterTest | Class/ Method | ✔️ | ✔️ |
| RootLogLevel | Class/ Method | ❌ | ✔️ |
| SysDefOverwrite | Class/ Method | ✔️ | ✔️ |
| TestInject | Method parameter | ✔️ | ✔️ |
| TestConfigFile | Class/ Method | ✔️ | ❌ |
| TestScenario | Class/ Method | ✔️ | ✔️ |
| TestScriptFile | Class/ Method | ✔️ | ❌ |
| ThreadDumpOnFailure | Class/ Method | ❌ | ✔️ |
| UserRight | Class/ Method | ✔️ | ✔️ |
Some annotations are repeatable, which means you can provide multiple values at the class or method level.
- If you provide these Repeatable annotations on both the class and method level, both are applied.
- If you provide non-Repeatable annotations on both the class and method level, the method-level annotation takes precedence.
- The enable annotations (
EnableDataDumpandEnableInMemoryTestAuthCache) do not support disabling at the method level once they have been enabled on the class level.
All annotations can be found in the global.genesis.testsupport.jupiter package.
CsvData
This annotation is used to load CSV data as part of a test and is also repeatable. Both individual file paths and folder paths are accepted. In terms of individual files, the DumpIt CSV format is supported in both .csv and .csv.gz extensions.
Alternatively, multi-table DumpIt format is supported in the following format:
#TABLE_NAME
COLUMN_NAME1, COLUMN_NAME2, COLUMN_NAME3
COLUMN_VALUE1, COLUMN_VALUE2, COLUMN_VALUE3
COLUMN_VALUE2, COLUMN_VALUE3, COLUMN_VALUE4
So, assuming two tables named FIRST_TABLE and SECOND_TABLE, both with String columns ID and TEXT, both containing 2 records each, a sample file would look like this:
#FIRST_TABLE
ID,TEXT
id1,text1
id2,text2
#SECOND_TABLE
ID,TEXT
id1,text1
id2,text2
- Kotlin
- Java
@GenesisTest
@CsvData("my-data.csv")
internal class CsvDataExamples {

    @Test
    fun loadCsvData() {
        // just uses "my-data.csv"
    }

    @Test
    @CsvData("other-data.csv.gz")
    fun loadCsvDataFromOtherDataFile() {
        // uses "my-data.csv" and "other-data.csv.gz"
    }

    @Test
    @CsvData("other-data.csv.gz")
    @CsvData("data-folder")
    fun loadCsvDataFromMultipleFiles() {
        // uses "my-data.csv", "other-data.csv.gz" and the "data-folder" folder
    }
}
@GenesisTest
@CsvData("my-data.csv")
public class CsvDataExamplesJavaTest {

    @Test
    public void loadCsvData() {
        // just uses "my-data.csv"
    }

    @Test
    @CsvData("other-data.csv")
    public void loadCsvDataFromOtherDataFile() {
        // uses "my-data.csv" and "other-data.csv"
    }

    @Test
    @CsvData("other-data.csv")
    @CsvData("more-data.csv")
    public void loadCsvDataFromMultipleFiles() {
        // uses "my-data.csv", "other-data.csv" and "more-data.csv"
    }
}
EnableDataDump
This annotation will enable the DATADUMP log level in the microservice. This will output any messages sent and received to the logger. You can apply this annotation on both classes and methods. However, once enabled on the class level, there is no way to disable on the method level.
- Kotlin
- Java
@GenesisTest
@EnableDataDump
class DataDumpTest {

    @Test
    @EnableDataDump
    fun myTest() {
        // ...
    }
}
@GenesisTest
@EnableDataDump
public class DataDumpTest {

    @Test
    @EnableDataDump
    public void myTest() {
        // ...
    }
}
EnableInMemoryTestAuthCache
This annotation enables the in-memory auth cache.
To set or remove entity authorisation, you will need to inject an InMemoryTestAuthCache into your class.
You can apply this annotation on both classes and methods.
However, once enabled on the class level, there is no way to disable on the method level.
- Kotlin
- Java
@GenesisTest
@EnableInMemoryTestAuthCache
internal class EnableInMemoryTestAuthCacheExamples {

    /**
     * inject [InMemoryTestAuthCache] to programmatically change authorisations
     */
    @Inject
    lateinit var authCache: InMemoryTestAuthCache

    @BeforeEach
    fun setUp() {
        // Clear the entire auth map before each test
        authCache.clear("TRADE_VISIBILITY")
    }

    @Test
    fun testAuthoriseAndRevokeAuthCache() {
        // to authorise:
        authCache.authorise(
            authMap = "TRADE_VISIBILITY",
            entityCode = "00000000001TRSP0",
            userName = "JohnDoe"
        )

        // and then revoke authorisation:
        authCache.revoke(
            authMap = "TRADE_VISIBILITY",
            entityCode = "00000000001TRSP0",
            userName = "JohnDoe"
        )
    }
}
@GenesisTest
@EnableInMemoryTestAuthCache
public class EnableInMemoryTestAuthCacheExamplesJavaTest {

    /**
     * inject InMemoryTestAuthCache to programmatically change authorisations
     */
    @Inject
    private InMemoryTestAuthCache authCache = null;

    @BeforeEach
    public void setUp() {
        // Clear the entire auth map before each test
        authCache.clear("TRADE_VISIBILITY");
    }

    @Test
    public void testAuthoriseAndRevokeAuthCache() {
        // to authorise:
        authCache.builder()
                .withAuthMap("TRADE_VISIBILITY")
                .withEntityCode("00000000001TRSP0")
                .withUserName("JohnDoe")
                .authorise();

        // and then to revoke authorisation:
        authCache.builder()
                .withAuthMap("TRADE_VISIBILITY")
                .withEntityCode("00000000001TRSP0")
                .withUserName("JohnDoe")
                .revoke();
    }
}
EnableLegacyXmlDictionary
This annotation enables the legacy XML dictionary from the provided Genesis home folder for the test. This is only necessary when testing against test-specific dictionaries. By default, an application's dictionary is loaded, ensuring consistency between production and test dictionaries without needing to duplicate the dictionary files.
- Kotlin
- Java
@GenesisTest
@EnableLegacyXmlDictionary
class LegacyXmlDictionaryTest {
    @Test
    fun myTest() {
        // legacy XML dictionary is enabled
    }
}
@GenesisTest
@EnableLegacyXmlDictionary
public class LegacyXmlDictionaryTest {
    @Test
    public void myTest() {
        // legacy XML dictionary is enabled
    }
}
EnableQuietMode
This annotation disables the update queue during the test. This annotation can be applied to classes or methods and is not Repeatable.
- Kotlin
- Java
@GenesisTest
@EnableQuietMode
class QuietModeTest {
    @Test
    fun myTest() {
        // test runs in quiet mode
    }
}
@GenesisTest
@EnableQuietMode
public class QuietModeTest {
    @Test
    public void myTest() {
        // test runs in quiet mode
    }
}
EnableTestClassLoader
This annotation enables the test class loader for the test. This is only needed in edge cases where a class may dynamically load classes. This annotation can be applied to classes or methods.
- Kotlin
- Java
@GenesisTest
@EnableTestClassLoader
class TestClassLoaderTest {
    @Test
    fun myTest() {
        // test class loader is enabled
    }
}
@GenesisTest
@EnableTestClassLoader
public class TestClassLoaderTest {
    @Test
    public void myTest() {
        // test class loader is enabled
    }
}
ExpectedExitCode
The ExpectedExitCode annotation provides a way to assert the expected exit code of a process after a test.
This is useful when testing failure scenarios. By default, a test will fail if a process tries to exit.
- Kotlin
- Java
@Test
@ExpectedExitCode(1)
fun `test expected exit code`() {
    // test code that should exit with code 1
}
@Test
@ExpectedExitCode(1)
public void testExpectedExitCode() {
    // test code that should exit with code 1
}
ExpectedProcessStatus
The ExpectedProcessStatus annotations provide a way to assert the end state of a process after a test. By default, GenesisJunit will assert that the process is healthy (ProcessState.UP).
- Kotlin
- Java
@Test
@ExpectedProcessStatus(ProcessState.DOWN)
fun `test status DOWN`() {
    ProcessStateChangeHandler("test").setProcessDown()
}
@Test
@ExpectedProcessStatus(ProcessState.DOWN)
public void testStatusDown() {
    new ProcessStateChangeHandler("test").setProcessDown();
}
GenesisDatabaseTest
Annotation used to enable a database-only context for faster tests. Provides DI and CSV loading but does not start a microservice. Non-repeatable.
- Kotlin
- Java
@GenesisDatabaseTest
class MyDbOnlyTest {
    @Test
    fun myTest() { /* ... */ }
}
@GenesisDatabaseTest
public class MyDbOnlyTest {
    @Test
    public void myTest() { /* ... */ }
}
GenesisHome
Annotation used to specify the Genesis home directory path.
It can be applied to classes or functions/methods.
If the annotation is not provided, genesis home will default to /genesisHome.
Providing this annotation at the method level will take precedence over the class level annotation.
- Kotlin
- Java
@GenesisTest
@GenesisHome("/genesisHomeA")
class GenesisHomeTest {

    @Test
    fun myTest() {
        // this test uses genesisHomeA
    }

    @Test
    @GenesisHome("/genesisHomeB")
    fun myOtherTest() {
        // this test uses genesisHomeB
    }
}
@GenesisTest
@GenesisHome("/genesisHomeA")
public class GenesisHomeTest {

    @Test
    public void myTest() {
        // this test uses genesisHomeA
    }

    @Test
    @GenesisHome("/genesisHomeB")
    public void myOtherTest() {
        // this test uses genesisHomeB
    }
}
GenesisSharedContextTest
Annotation used to enable the full microservice context that is shared between tests within a class.
Provides DI, package scanning, message client, and lifecycle management.
Non-repeatable.
In the example, the microservice is started only once, and used by both myTest and myOtherTest.
- Kotlin
- Java
@GenesisSharedContextTest
class MyGenesisTest {
    @Test
    fun myTest() { /* ... */ }
    @Test
    fun myOtherTest() { /* ... */ }
}
@GenesisSharedContextTest
public class MyGenesisTest {
    @Test
    public void myTest() { /* ... */ }
    @Test
    public void myOtherTest() { /* ... */ }
}
GenesisTemplateTest
Used with scenario testing to execute the same test method across one or more scenarios, and is used in combination with @TestScenario.
For more information see Scenario Testing
Apply at method level only.
- Kotlin
- Java
@GenesisDatabaseTest
@TestScenario(ScenarioA::class)
@TestScenario(ScenarioB::class)
class MyTemplateTests {
    @GenesisTemplateTest
    fun runAcrossScenarios() { /* ... */ }
}
@GenesisDatabaseTest
@TestScenario(ScenarioA.class)
@TestScenario(ScenarioB.class)
public class MyTemplateTests {
    @GenesisTemplateTest
    public void runAcrossScenarios() { /* ... */ }
}
GenesisTest
Annotation used to enable the full microservice context for a test. Provides DI, package scanning, message client, and lifecycle management. Non-repeatable.
- Kotlin
- Java
@GenesisTest
class MyGenesisTest {
    @Test
    fun myTest() { /* ... */ }
}
@GenesisTest
public class MyGenesisTest {
    @Test
    public void myTest() { /* ... */ }
}
PackageNameScan
Annotation used to specify package names for scanning.
Unlike @PackageScan, this annotation accepts String rather than Class.
This annotation should be used to mark classes or functions that require package scanning by name.
This annotation is Repeatable.
- Kotlin
- Java
@GenesisTest
@PackageNameScan("com.example.package")
internal class PackageNameScanTest {
    @Test
    fun myTest() {
        // scans the package "com.example.package"
    }
}
@GenesisTest
@PackageNameScan("com.example.package")
public class PackageNameScanTest {
    @Test
    public void myTest() {
        // scans the package "com.example.package"
    }
}
ProvidedSysDef
Annotation used to mark properties or methods as provided system definitions. Marked properties or methods can be used to provide system definition values during test runtime.
- Kotlin
- Java
@GenesisTest
internal class ProvidedSysDefTest {

    @ProvidedSysDef
    private val mySysDef: String = "test-value"

    @Test
    fun myTest() {
        // mySysDef is provided as a system definition
    }
}
@GenesisTest
public class ProvidedSysDefTest {

    @ProvidedSysDef
    private String mySysDef = "test-value";

    @Test
    public void myTest() {
        // mySysDef is provided as a system definition
    }
}
PackageScan
Annotation used to mark classes or functions for package scanning. This annotation should be used to mark classes or functions that require package scanning. It is used to specify the marker interface or class to be used for scanning packages. This annotation is Repeatable.
- Kotlin
- Java
@GenesisTest
@PackageScan(MyClass::class)
internal class PackageScanTest {
    @Test
    fun myTest() {
        // scans the package of MyClass
    }

    @Test
    @PackageScan(MyOtherClass::class)
    fun myOtherTest() {
        // scans the package of MyClass and MyOtherClass
    }

    @Test
    @PackageScan(MyOtherClass::class)
    @PackageScan(MyThirdClass::class)
    fun myThirdTest() {
        // scans the package of MyClass, MyOtherClass and MyThirdClass
    }
}
@GenesisTest
@PackageScan(MyClass.class)
public class PackageScanTest {
    @Test
    public void myTest() {
        // scans the package of MyClass
    }

    @Test
    @PackageScan(MyOtherClass.class)
    public void myOtherTest() {
        // scans the package of MyClass and MyOtherClass
    }

    @Test
    @PackageScan(MyOtherClass.class)
    @PackageScan(MyThirdClass.class)
    public void myThirdTest() {
        // scans the package of MyClass, MyOtherClass and MyThirdClass
    }
}
ProvidedInstance
Annotation used to mark properties or methods as provided instances. Marked properties or methods can be used to override predefined instances during test runtime.
For example, one could define an interface in production code called MyInterface with a default implementation MyInterfaceImpl.
- Kotlin
- Java
interface MyInterface

@Module
@ConditionalOnMissingClass(MyInterface::class)
class MyInterfaceImpl: MyInterface
interface MyInterface {
}

@Singleton
@ConditionalOnMissingClass(MyInterface.class)
public class MyInterfaceImpl implements MyInterface {
}
Then we can override the implementation at runtime using a fake/mock implementation:
- Kotlin
- Java
@GenesisTest
internal class ProvidedInstanceTest {

    /**
     * Will provide [MyClass] as an instance of [MyInterface] during the dependency injection phase.
     */
    @ProvidedInstance
    private val myInstance: MyInterface = FakeImpl()

    @Test
    fun myTest() {
        //
    }
}
@GenesisTest
public class ProvidedInstanceTest {
    /**
     * Provides a MyInterface instance during the dependency injection phase.
     */
    @ProvidedInstance
    private MyInterface myInstance = new FakeImpl();

    @Test
    public void myTest() {
        //
    }
}
ResetTableAfterTest
Annotation used to reset specific database tables after each test when using a shared-context test.
GenesisJunit will take a snapshot of the table before each test, and then revert it to its previous state.
Please note that there is a limit of 1,000 rows; the test will fail if a table has more rows than this.
The snapshot will be taken after any @CsvData is loaded, but before the test is run.
This annotation can be applied to classes or methods and is Repeatable.
- Kotlin
- Java
@GenesisSharedContextTest
@ResetTableAfterTest("TRADE")
@CsvData("trade.csv")
internal class ResetTableAfterTestExample {
    @Test
    fun myTest() {
        // TRADE table will be reset after this test
    }
    @Test
    fun myTest2() {
        // TRADE table will be reset after this test
    }
}
@GenesisSharedContextTest
@ResetTableAfterTest("TRADE")
@CsvData("trade.csv")
public class ResetTableAfterTestExample {
    @Test
    public void myTest() {
        // TRADE table will be reset after this test
    }
    @Test
    public void myTest2() {
        // TRADE table will be reset after this test
    }
}
RootLogLevel
This annotation will adjust the log level for the life of the test. You can apply this annotation on both classes and methods. Providing this annotation at the method level will take precedence over the class level annotation.
- Kotlin
- Java
@GenesisTest
@RootLogLevel(Level.INFO)
class LogLevelTest {

    @Test
    fun myTest() {
        // root log level set to INFO
    }

    @Test
    @RootLogLevel(Level.TRACE)
    fun myOtherTest() {
        // root log level set to TRACE
    }
}
@GenesisTest
@RootLogLevel(Level.INFO)
public class LogLevelTest {

    @Test
    public void myTest() {
        // root log level set to INFO
    }

    @Test
    @RootLogLevel(Level.TRACE)
    public void myOtherTest() {
        // root log level set to TRACE
    }
}
SysDefOverwrite
Annotation used to indicate that a specific system definition property should be overwritten. This annotation can be applied to classes or functions. When specifying this annotation on both the class and the function level, both will be taken into account, unless the same property is overwritten, in which case the method-level annotation will take precedence.
- Kotlin
- Java
@GenesisTest
@SysDefOverwrite("MY_VALUE", "ABC")
internal class OverwriteSysDefTest {

    @Test
    fun simpleExample() {
        // MY_VALUE is set to ABC
    }

    @Test
    @SysDefOverwrite("OTHER_VALUE", "DEF")
    fun multipleLevels() {
        // MY_VALUE is set to ABC, OTHER_VALUE is set to DEF
    }

    @Test
    @SysDefOverwrite("OTHER_VALUE", "DEF")
    @SysDefOverwrite("MY_VALUE", "GHI")
    fun overwritingClassLevelSysDef() {
        // MY_VALUE is set to GHI, OTHER_VALUE is set to DEF
    }
}
When running genesis integration tests, by default, all injecting modules will run on a process named UNIT_TEST_PROCESS.
However, in some cases, you may want to override this default process name to use a different one. You can do this by
simply overriding the PROCESS_NAME system definition property. The property will be picked up regardless of how
you choose to set up your system definitions.
@GenesisTest
class MyTest {
    @Test
    @SysDefOverwrite("PROCESS_NAME", "SOME_CUSTOM_PROCESS_NAME")
    fun `test`() {
        // Your test code here
    }
}
@GenesisTest
@SysDefOverwrite(key = "MY_VALUE", keyValue = "ABC")
public class OverwriteSysDefTest {

    @Test
    public void simpleExample() {
        // MY_VALUE is set to ABC
    }

    @Test
    @SysDefOverwrite(key = "OTHER_VALUE", keyValue = "DEF")
    public void multipleLevels() {
        // MY_VALUE is set to ABC, keyValue = OTHER_VALUE is set to DEF
    }

    @Test
    @SysDefOverwrite(key = "OTHER_VALUE", keyValue = "DEF")
    @SysDefOverwrite(key = "MY_VALUE", keyValue = "GHI")
    public void overwritingClassLevelSysDef() {
        // MY_VALUE is set to GHI, OTHER_VALUE is set to DEF
    }
}
TestConfigFile
Use this annotation to load a process config file as part of a test. This annotation is not Repeatable.
- Kotlin
- Java
@GenesisTest
@TestConfigFile("my-process-config.kts")
internal class ConfigFileExamples {

    @Test
    fun myProcessConfig() {
        // just uses "my-process-config.kts"
    }

    @Test
    @TestConfigFile("other-process-config.kts")
    fun otherProcessConfig() {
        // uses "other-process-config.kts"
    }
}
@GenesisTest
@TestConfigFile("my-process-config.kts")
public class ConfigFileExampleJavaTest {

    @Test
    public void myProcessConfig() {
        // just uses "my-process-config.kts"
    }

    @Test
    @TestConfigFile("other-process-config.kts")
    public void otherProcessConfig() {
        // uses "other-process-config.kts"
    }
}
TestScenario
Annotation used to define and share test scenarios, and is used in combination with @GenesisTemplateTest.
This annotation can be applied to classes or methods and is Repeatable.
For more information see Scenario Testing
- Kotlin
- Java
@GenesisTest
@TestScenario(MyScenarioA::class)
@TestScenario(MyScenarioB::class)
class TestScenarioExample {
    @GenesisTemplateTest
    fun myTest() {
        // test runs twice, once with MyScenarioA and once with MyScenarioB
    }
}
@GenesisTest
@TestScenario(MyScenarioA.class)
@TestScenario(MyScenarioB.class)
public class TestScenarioExample {
    @GenesisTemplateTest
    public void myTest() {
        // test runs twice, once with MyScenarioA and once with MyScenarioB
    }
}
TestScriptFile
Use this annotation to load a script file as part of the test. This annotation is Repeatable.
Alternatively, you can test using compiled GPAL definitions (classes extending GPalDataserver, GPalEventHandler, and so on). Ensure the definition's package is in the scan list (e.g. by providing an instance of the definition class). In that case no script file and no @TestScriptFile are required.
- Kotlin
- Java
@GenesisTest
@TestScriptFile("my-eventhandler.kts")
internal class ScriptFileExamples {

    @Test
    fun testScriptFileExamples() {
        // just uses "my-eventhandler.kts"
    }

    @Test
    @TestScriptFile("other-eventhandler.kts")
    fun testMoreScriptFiles() {
        // uses "my-eventhandler.kts" and "other-eventhandler.kts"
    }

    @Test
    @TestScriptFile("other-eventhandler.kts")
    @TestScriptFile("more-eventhandler.kts")
    fun testManyScriptFiles() {
        // uses "my-eventhandler.kts", "other-eventhandler.kts" and "more-eventhandler.kts"
    }
}
@GenesisTest
@TestScriptFile("my-eventhandler.kts")
public class ScriptFileJavaExample {

    @Test
    public void testScriptFileExamples() {
        // just uses "my-eventhandler.kts"
    }

    @Test
    @TestScriptFile("other-eventhandler.kts")
    public void testMoreScriptFiles() {
        // uses "my-eventhandler.kts" and "other-eventhandler.kts"
    }

    @Test
    @TestScriptFile("other-eventhandler.kts")
    @TestScriptFile("more-eventhandler.kts")
    public void testManyScriptFiles() {
        // uses "my-eventhandler.kts", "other-eventhandler.kts" and "more-eventhandler.kts"
    }
}
TestInject
Annotation used to inject test dependencies into test functions as parameters. This is useful where you might want to use and or instantiate classes for some tests but not others.
- Kotlin
- Java
@GenesisTest
class TestInjectExample {
    @Test
    fun myTest(@TestInject myTestDependency: MyTestDependency) {
        // MyTestDependency is injected
    }
}
@GenesisTest
public class TestInjectExample {
    @Test
    public void myTest(@TestInject MyTestDependency myTestDependency) {
        // MyTestDependency is injected
    }
}
UserRight
The UserRight annotation provides users with specific rights during a test.
To use this annotation, annotate any method or class with @UserRight and provide the user and right codes:
- Kotlin
- Java
@Test
@UserRight("John Doe", "LICENSE_TO_BILL")
fun `user has rights`() {
    client.sendRequest(
        workFlow = InstrumentDetailsFlow,
        request = ByAlternateTypeAlternateCode("RIC", "AMBV4"),
        username = "John Doe"
    )
}
@Test
@UserRight(user = "John Doe", rights = "LICENSE_TO_BILL")
public void testAnnotation() {
    client.sendRequest(
        InstrumentDetailsFlow,
        new ByAlternateTypeAlternateCode("RIC", "AMBV4"),
        "John Doe"
    );
}
Troubleshoot threading and coroutine issues in tests
To help troubleshoot threading and coroutine issues, GenesisJunit offers support for thread and coroutine dumps on test failure. To enable this, there are three annotations:
@ThreadDumpOnFailure- dumps threads on test failure@CoroutinesDumpOnFailure- dumps coroutines on test failure@FullDumpOnFailure- dumps both threads and coroutines on test failure
ThreadDumpOnFailure
Dumps all JVM threads to the test logs on test failure. Useful to troubleshoot deadlocks and blocked tests. Non-repeatable.
- Kotlin
- Java
@GenesisTest
class DumpOnFailureTest {
    @Test
    @ThreadDumpOnFailure
    fun myTest() { /* ... */ }
}
@GenesisTest
public class DumpOnFailureTest {
    @Test
    @ThreadDumpOnFailure
    public void myTest() { /* ... */ }
}
CoroutinesDumpOnFailure
Dumps Kotlin coroutines debug information to the test logs on failure. Useful for diagnosing coroutine leaks or stuck jobs. Non-repeatable.
- Kotlin
- Java
@GenesisTest
class CoroutinesDumpTest {
    @Test
    @CoroutinesDumpOnFailure
    fun myTest() { /* ... */ }
}
@GenesisTest
public class CoroutinesDumpTest {
    @Test
    @CoroutinesDumpOnFailure
    public void myTest() { /* ... */ }
}
FullDumpOnFailure
Combines thread and coroutine dumps on test failure. Non-repeatable.
- Kotlin
- Java
@GenesisTest
class FullDumpTest {
    @Test
    @FullDumpOnFailure
    fun myTest() { /* ... */ }
}
@GenesisTest
public class FullDumpTest {
    @Test
    @FullDumpOnFailure
    public void myTest() { /* ... */ }
}
Component testing
There are two easy ways of testing components in your application:
- using an API client
- using the
curltool from the command line
Before you start
Before you start, make sure your server is running. Then run mon to check that your particular component’s process is running. For example, if you want to test one or more requestReply codeblocks (i.e. resources) in your Request Server, check that the application_REQUEST_SERVER process is running.
For any testing, you need to know:
- the IP address or name of your server
- the username and password that will enable you to log in and authenticate yourself
Using an API client
This type of software offers an easy way of testing each of your resources.
Two clients that Genesis uses for component testing are:
Broadly speaking, Postman offers more features, but Insomnia is also good and is simpler to use.
Logging in
Whichever client you are using, you need to log in before you can send test requests to the server. This involves two things:
- providing a SOURCE_REF - this can be any string that identifies all your activity while you are logged in
- retrieving a SESSION_AUTH_TOKEN, which you can copy and use to authorise all your test requests
For example, to log in using Insomnia:
- Create a new query in Insomnia.
- In front of the URL, set the call to POST.
- For the URL, you need to supply your server instance, then :9064 (to route to the application's router), and then event-login-auth. For example: https://test-mynewapp:9064/event-login-auth
- Set the body to JSON and paste the request below (substituting your correct username and password) in the main body.
{
    "MESSAGE_TYPE": "TXN_LOGIN_AUTH",
    "SERVICE_NAME": "AUTH_MANAGER",
    "DETAILS": {
        "USER_NAME": "DonJuan",
        "PASSWORD": "Password123"
    }
}
- Click to view the headers, then add SOURCE_REF. For this field, you can use any string that will identify you. In the example below, we set SOURCE_REF to BAUDOIN1.
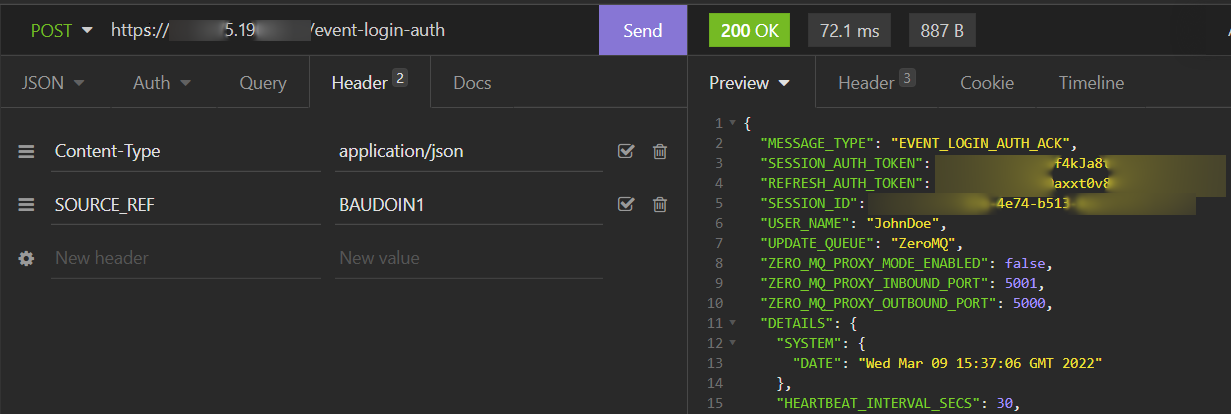
- When you have done this, click on the Send button.
This returns a set of details in the right side of the Insomnia window, where you can copy the SESSION_AUTH_TOKEN, which you will need for your test requests.
Testing with curl
You can use the curl tool to test a module from the command line.
The simple example below tests the resource event-account-validate-request. It sends a request to see if this resource in the Event Handler is able to validate an account.
curl --request POST 'localhost:9064/event-account-validate-request' \
--header 'SOURCE_REF: 1' \
--header "SESSION_AUTH_TOKEN: $1" \
--header 'Content-Type: application/json' \
-d '{"DETAILS": {"ACCOUNT_ID" : 9 }}'
Now let's look more closely at that.
-
At the beginning, we use the
--requestparameter, which specifies a custom request, followed by POST to indicate that we are posting data to the resource. The data itself comes later (in the-dparameter). -
The resource that you are accessing must be part of the URL. In this case, the resource is
event-account-validate-request. (Remember that the events you specify are transformed when you generate the objects. For example, EVENT_NAME becomes event-name.) -
Three
--headerparameters have been specified:-
The first header,
SOURCE_REF, uniquely identifies your message. In our example, this is simply 1. -
The
SESSION_AUTH_TOKENis required because, as is usually the case, the resource is non-public; you need to be logged in for access. -
The
Content-Type ...header indicates the media type of the content you are sending or requesting — for example, JSON or a PNG file. This tells the server how to handle your message. You can find more about content type.
-
-
The
-dparameter specifies the input for the resource. The request body is always JSON and should always be contained in theDETAILSfield. In this case, we are requesting to validate account ID 9.
Now here is a more complex example, which tests the ability to upsert to an eventHandler resource called event-upsert-inventory.
curl --request POST 'myserver-dev-fictional/ws/event-upsert-inventory' \
--header 'SOURCE_REF: 15' \
--header 'Content-Type: application/json' \
--header 'SESSION_AUTH_TOKEN: SnpTI4dvX9gcXDd4BQlOTkp4JSCrXR3t' \
--data-raw '{
    "MESSAGE_TYPE": "EVENT_UPSERT_INVENTORY",
    "SERVICE_NAME":"FOXTROT_EVENT_HANDLER",
    "DETAILS":{
        "INSTRUMENT_ID": "8200",
        "INSTRUMENT_ID_TYPE": "FOXTROT_ID",
        "UNIT_OFFER_PRICE":"102.55",
        "UNIT_OFFER_SIZE": "1000000",
        "UNIT_BID_PRICE":"100",
        "UNIT_BID_SIZE": "2000000",
        "PARTIAL_BID_ALLOWED": "TRUE",
        "PARTIAL_OFFER_ALLOWED": "TRUE",
        "IOI_ID" : "12345",
        "TRADER_NAME" : "Ronald.Zappa@madeup.com"
    }
}'
Note that the data to be upserted is specified using the --data-raw parameter. This is because the set of fields is reasonably complicated, and it includes an email address — you don't want that @ character to trigger any unwanted processing.
You can find more details about curl parameters online.
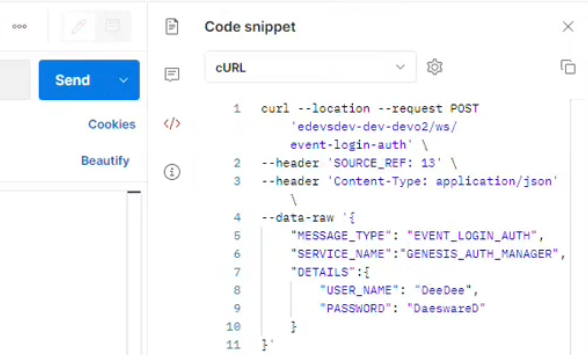
The Postman tool has a useful feature tucked away with the icons at the right of the screen. This enables you to automatically translate the query you have built into curl format (or many others).
In the area displayed, just select cURL as the code, and the code for your current query is displayed below for you to copy.