Developer training - Day one
import Tabs from '@theme/Tabs'; import TabItem from '@theme/TabItem';
This day covers:
Quick review of the platform
The Genesis low-code platform is the only low-code platform designed to build and run mission-critical systems for the financial markets, based on event-driven and microservice architecture.
The platform enables your application to handle events and distribute data in real time from the start by using its building blocks, such as Data Servers, Request Servers and Event Handlers. These resources are powered by Genesis Platform Abstraction Language (GPAL), which plugs into IntelliJ, allowing for code autocompletion, compilation and syntax highlighting as you code.
Genesis Low-Code Platform
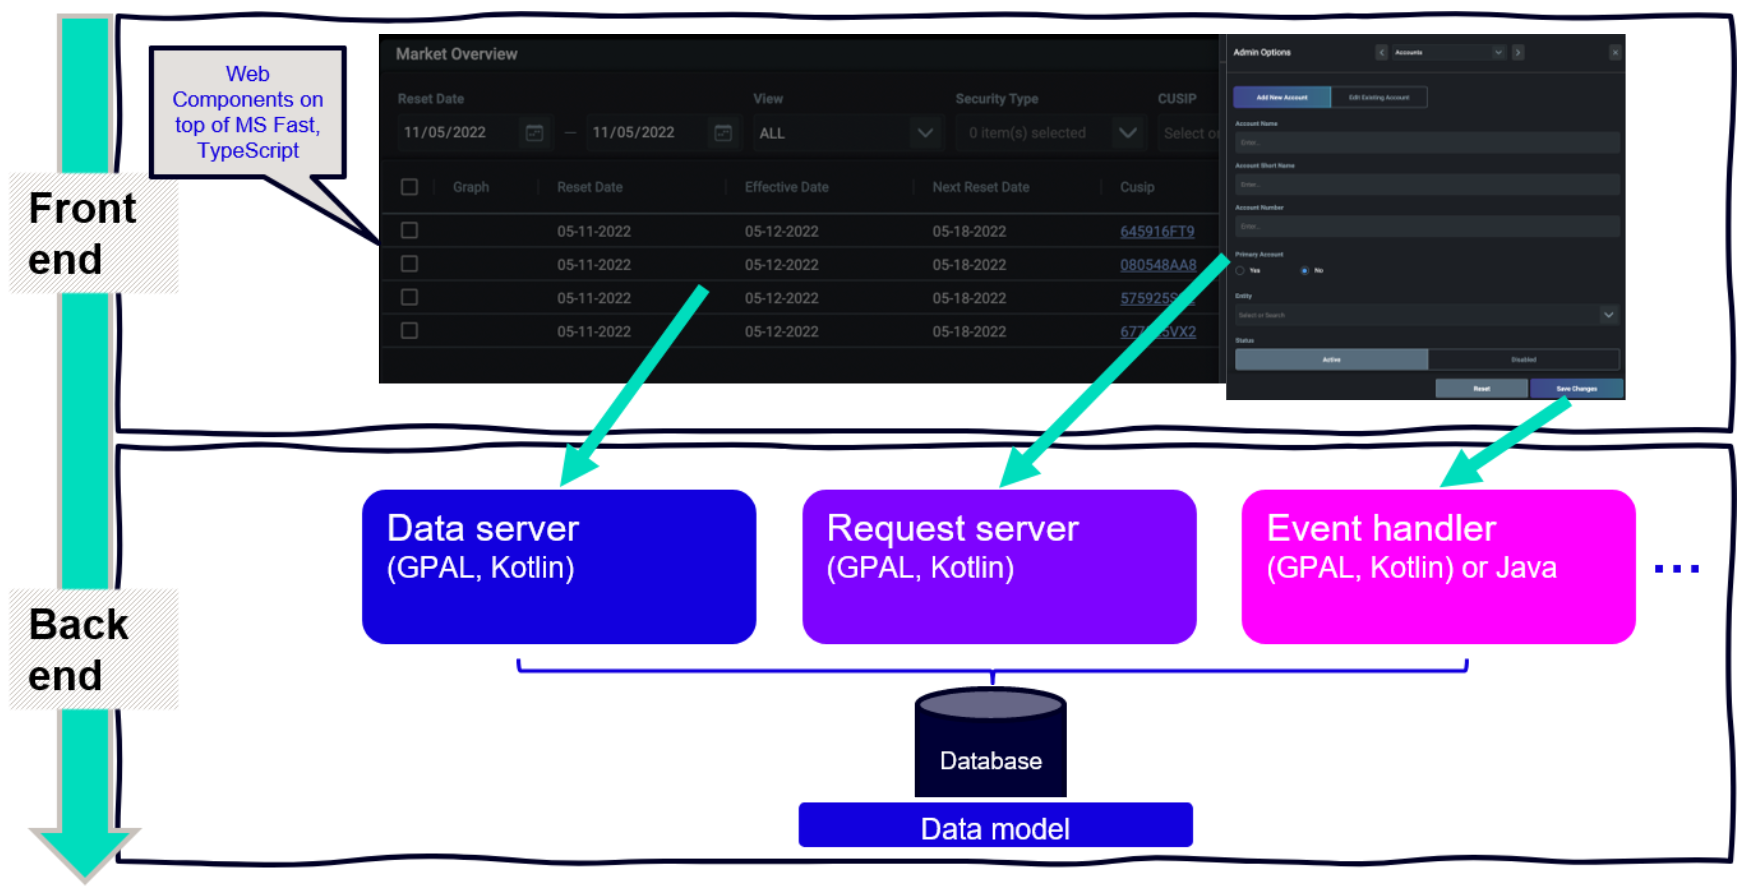
At the heart of the server is the data persistence layer and the data model. You model your data by defining fields, then tables, then views.
Once you have a data model defined, you can start bringing your application to life by creating events in an Event Handler process, which have access to the data layer importing auto-generated data repositories, to handle the business logic with code written in languages such as Kotlin and/or Java.
When it comes to displaying the data, you can configure a Data Server to distribute the data to the front end. The Data Server is a GPAL component that streams the data in real time to subscribers, such as a data grid component in the front end. You can also bind a button in the UI to an event (action) defined in your Event Handler.
All of this is managed by the Genesis low-code platform. You don't need to worry about inter-process communication or even how to connect the front end to the back end, as the Platform handles a web socket connection between the browser and the data server for you. Even defining something as simple as the example below will get you a data grid showing all trades in real time:
Back end
dataServer {
    query("ALL_TRADES", TRADE)
}
Front end
<zero-grid-pro rowHeight="45">
    <grid-pro-genesis-datasource resourceName="ALL_TRADES" orderBy="TRADE_DATETIME" />
</zero-grid-pro>
Now let's take a closer look at the server architecture.
Server Architecture
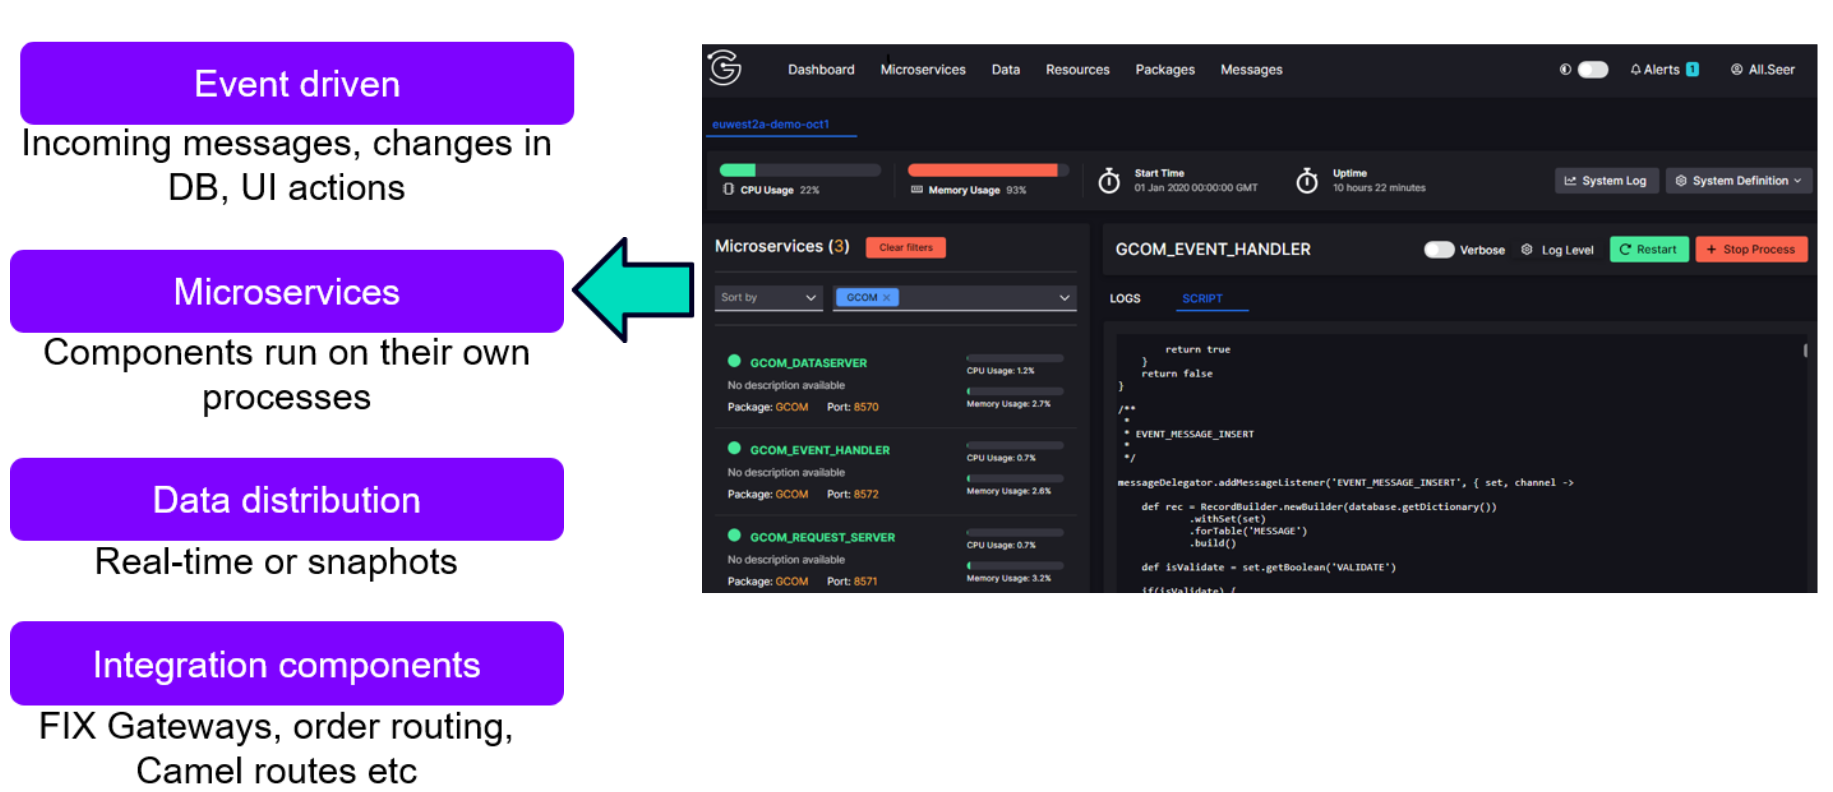
Surrounding the core, operational tools enable you to run and monitor the application, while cluster services enable you to run across multiple nodes. Auth and permissions enable you control access and build sophisticated and granular access to data and functions.
You will get familiar with all these concepts in the next lessons.
Developing your first application
This will enable you to see the basics of the Genesis low-code platform by starting with a very simple application. It is designed simply to get from start to finish as quickly as possible. It is in five main steps:
- Create a new project.
- Define the data model.
- Add business logic.
- Prepare the server.
- Build and Deploy process.
What you will build
The very simple application you will build will look like this:
- a simple table with 5 fields
- two front-end components: one to display data and one to insert data
Once you finish this lesson, you will extend this initial simple application into a full Trades & Positions app!
With a lack of imagination we hope you will find trustworthy, we are going to call this example application alpha. You will see this reflected in the file names throughout.
1. Create a new project
To create a new project, you can use the genx CLI tool, which enables you to seed projects. Further details can be found here.
In our case, we just want to extend a blank full-stack application project, so we are using the training seed. Hopefully, you have followed the Environment set-up and done the step Start the project baseline, where you cloned the repository locally.
Here's a quick overview of the repository that you cloned:
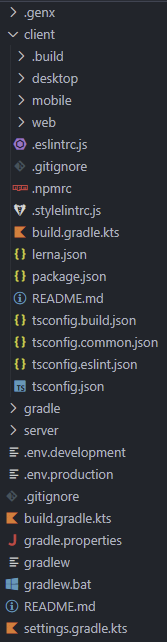
Above, we have expanded the client folder. This contains all the UI-related projects.
The server folder follows the same structure. This contains all the server-side projects.
2. Define the data model
Now you are ready to define the fields and tables that make up your data model. This model structures information in a simple way that can be viewed by users and processed by the application.
Open IntelliJ and open the alpha project (the devtraining-seed you cloned). After importing and indexing, you should see the files and project structure ready.
Add fields
You define your fields in the file alpha-fields-dictionary.kts.
Once the project is open, there are two easy ways to find this file quickly in Intellij:
- Press the Shift key twice, then type the name of the file you are looking for.
- Press Shift + Ctrl + N, then type the name of the file you are looking for.
For our simple example, we will add five fields:
fields {

    field("TRADE_ID", type = STRING)
    field("QUANTITY", type = INT)
    field("PRICE", type = DOUBLE)
    field("SYMBOL", type = STRING)
    field("DIRECTION", type = ENUM("BUY", "SELL", default = "BUY"))

}
After you have saved this file, run genesis-generated-fields as will be explained next.
generateFields
import GenerateFields from '/snippet/_generate_fields.mdx';
You are editing a kts file that needs to be compiled and built to be used from other places. In this case, we want the fields to be available to the tables (and with intellisense support from the IDE).
As we go, you'll see we have different Gradle tasks, depending on the artifact we want to build.
Add a table
Now we have our fields, let's define a table in the file alpha-tables-dictionary.kts.
We are defining one single table, containing all our fields.
TRADE_ID is the primaryKey, which will be auto-generated.
tables {

    table (name = "TRADE", id = 2000) {
        sequence(TRADE_ID, "TR")
        QUANTITY
        PRICE not null
        SYMBOL
        DIRECTION

        primaryKey {
            TRADE_ID
        }
    }

}
After you have saved this file, run genesis-generated-dao as will be explained next.
generateDao
import GenerateDao from '/snippet/_generate_DAO.mdx'
After running this, you have the DAOs (i.e. data repos) automatically generated from the tables and available to be imported in your code.
3. Add business logic
We have a table; now we want to be able to see its contents and create new entries.
Data Server
A Data Server enables data to be read in real time. You must define the Data Server in the file alpha-dataserver.kts.
dataServer {
    query("ALL_TRADES", TRADE)
}
Event Handler
Next, we want to be able to insert rows into our table. For this, you need to define an Event Handler in the file alpha-eventhandler.kts.
eventHandler {

    eventHandler<Trade>(name = "TRADE_INSERT") {
        schemaValidation = false
        onCommit { event ->
            entityDb.insert(event.details)
            ack()
        }
    }

}
The entityDb enables you to interact with the database layer. It's part of the Genesis Database API and we'll get into more details soon. For now, understand that this is the common way to access data from code. Feel free to use the intellisense of your IDE to explore the methods available from entityDb.
4. Prepare the server
So far we have created an Event Handler and Data Server - just their definitions, but there's nothing on the runtime configuration yet. Each microservice, such as Event Handler and Data Server, must run on their own process. To do that, we have to change the processes and the service definition files:
- alpha-processes.xml
- alpha-service-definitions.xml
At present, these files are empty. You need to insert the details of the Data Server and Event Handler that you have just created.
Add the following content to the alpha-processes.xml file.
<processes>
    <process name="ALPHA_DATASERVER">
        <groupId>ALPHA</groupId>
        <start>true</start>
        <options>-Xmx1024m -DXSD_VALIDATE=false</options>
        <module>genesis-pal-dataserver</module>
        <package>global.genesis.dataserver.pal</package>
        <script>alpha-dataserver.kts</script>
        <description>Displays real-time details</description>
        <language>pal</language>
        <loggingLevel>DEBUG,DATADUMP_ON</loggingLevel>
    </process>
    <process name="ALPHA_EVENT_HANDLER">
        <groupId>ALPHA</groupId>
        <start>true</start>
        <options>-Xmx256m -DRedirectStreamsToLog=true -DXSD_VALIDATE=false</options>
        <module>genesis-pal-eventhandler</module>
        <package>global.genesis.eventhandler.pal</package>
        <script>alpha-eventhandler.kts</script>
        <description>Handles events</description>
        <classpath>alpha-messages*,alpha-eventhandler*</classpath>
        <language>pal</language>
    </process>
</processes>
Add the following content to the alpha-service-definitions.xml file.
<configuration>
    <service host="localhost" name="ALPHA_DATASERVER" port="11000"/>
    <service host="localhost" name="ALPHA_EVENT_HANDLER" port="11001"/>
</configuration>
Please see here for a detailed description of the processes configuration.
5. The build and deploy process
Finally, you can build and deploy the server.
Build
In the Gradle menu on the right of IntelliJ, select:
genesisproduct-alpha
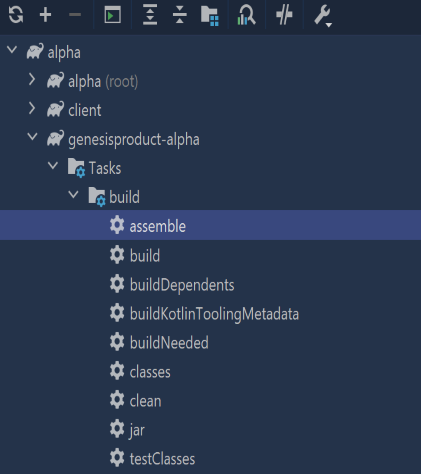
./gradlew :genesisproduct-alpha:assemble
Deploy
As soon as the Build is done, you need to deploy the application. Here are the three ways to deploy using different runtime environments.
<Tabs defaultValue="Intellij Plugin" values={[{ label: 'Intellij Plugin', value: 'Intellij Plugin', },{ label: 'Docker', value: 'Docker'} ,{ label: 'WSL', value: 'WSL'}]}>
Start up plugin
If you have already run the Install genesis, then you can skip this step.
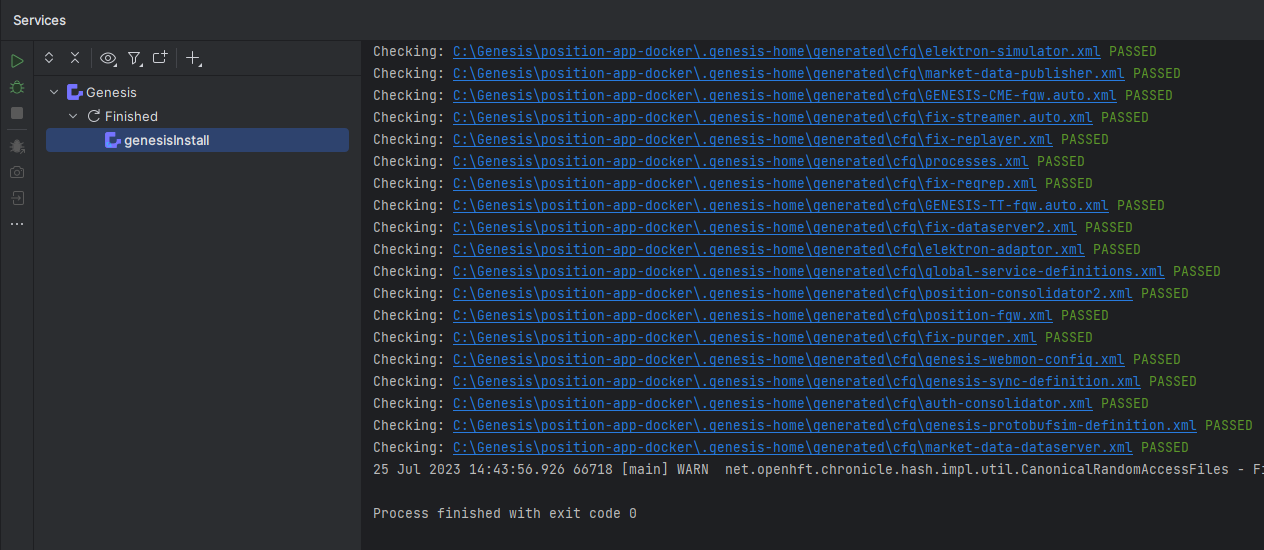
After the Gradle tasks, when first using the plugin with a project, you must create your genesis home folder; click on the Install Genesis button on the Tool window.

This generates a hidden folder called .genesis-home in your project root, ready to run your application's processes.
On the first run, this could take up to 20 minutes, because it performs a full build of your application.
Click on the Deploy Genesis button on the toolbar.
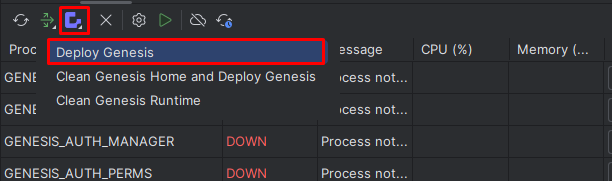
This starts the relevant processes and the logs will be shown below.
./gradlew assemble
docker-compose build
docker-compose up -d
The Genesis platform provides several tasks that help to set up the Genesis environment so that you can deploy a project to it. It can be used on Linux machines (local and over SSH) or Windows machines with WSL support.
Pre-requisites
Please add the last three highlighted lines in your gradle.properties file from the server/jvm folder. The final file should be like this:
kotlin.code.style=official
org.gradle.jvmargs=-Xmx6g -Xss512k -XX:+HeapDumpOnOutOfMemoryError -XX:+UseG1GC -XX:+UseStringDeduplication -XX:ReservedCodeCacheSize=512m -Dkotlin.daemon.jvm.options=-Xmx2g -Dfile.encoding=UTF-8
bundleGeneratedClasses=true
genesisVersion=6.4.2
authVersion=6.4.0
deployPluginVersion=6.4.2
genesisArtifactoryPath=https://genesisglobal.jfrog.io/genesisglobal/libs-release-client
genesis-home=/home/genesis/run
wsl-distro=TrainingCentOS
wsl-user=genesis
| Entry | Description |
|---|---|
genesis-home | This is a mandatory property that is a path on the WSL distribution. |
wsl-distro | This is a mandatory property that is the name of the WSL distribution. |
wsl-user | This is an optional property. If omitted, the default WSL user will be used. |
Deployment of the back end
Now we are going to install the Genesis Platform (i.e. Genesis distribution) on the server and then install the back end of our application on the same server. This is all done using the Genesis deploy plugin that comes with several tasks grouped under genesisdeploy and genesissetup.
Deploying to the server
We will run setupEnvironment first (we only need to run it once) to set up the platform on the server. This task executes install-genesis-distribution (copies and unzips the Genesis distribution specified as a dependency) and then configures the installed distribution. So, basically, it installs the Genesis Platform on your local server.
In the Gradle menu on the right of IntelliJ, select genesisproduct-alpha/alpha-deploy/Tasks/genesissetup/setupEnvironment.
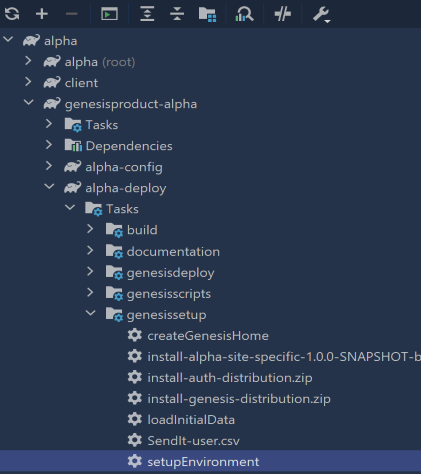
./gradlew :genesisproduct-alpha:alpha-deploy:setupEnvironment
After this command is completed, we will have a basic genesis server running.
Deploying the auth module
As our application requires [authentication](/server/access-control/introduction/), we have to install the Genesis Auth module.In the Gradle menu on the right of IntelliJ, select genesisproduct-alpha/alpha-deploy/Tasks/genesissetup/install-auth-distribution.zip.
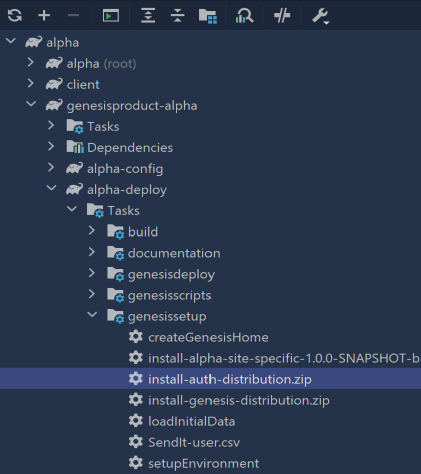
./gradlew :genesisproduct-alpha:alpha-deploy:install-auth-distribution.zip
Deploying the site-specific
As our application will override the standard definitions using the site-specific folder, we have to run this task.In the Gradle menu on the right of IntelliJ, select genesisproduct-alpha/alpha-deploy/Tasks/genesissetup/install-alpha-site-specific-1.0.0-SNAPSHOT-bin.zip-distribution.zip.
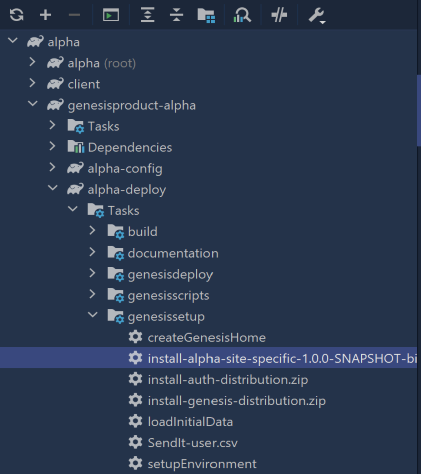
./gradlew :genesisproduct-alpha:alpha-deploy:install-alpha-site-specific-1.0.0-SNAPSHOT-bin.zip-distribution.zip
Deploying the alpha product
Now we have to deploy our application, the alpha product.
In the Gradle menu on the right of IntelliJ, select genesisproduct-alpha/alpha-deploy/Tasks/genesisdeploy/deploy-genesisproduct-alpha.zip.
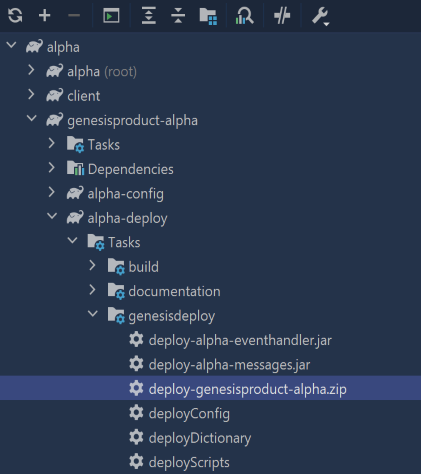
./gradlew :genesisproduct-alpha:alpha-deploy:deploy-genesisproduct-alpha.zip
Congratulations! You have built an application and you are running a database.
Credentials to login
By default the following will be your login details:
- Username: JaneDee
- Password: beONneON*74 (This is encrypted in the user.csv file.)
However, after the first Build and Deploy, you need to send the login information so you can access the application you have just created.
<Tabs defaultValue="Intellij Plugin" values={[{ label: 'Intellij Plugin', value: 'Intellij Plugin', },{ label: 'Docker', value: 'Docker'} ,{ label: 'WSL', value: 'WSL'}]}>
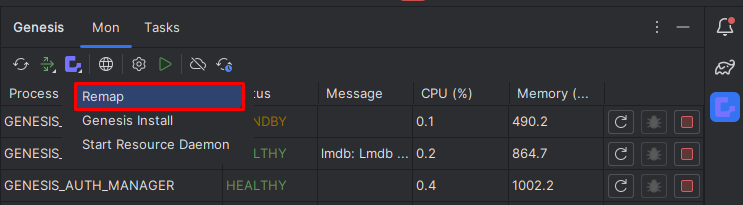
Create a new schema
Before you can run your application, you need to create a new schema for the database; this is where all tables will be created. To do that,
Run the remap.
Send data to genesis
Go to server/jvm/alpha-site-specific/src/main/resources/data/user.csv
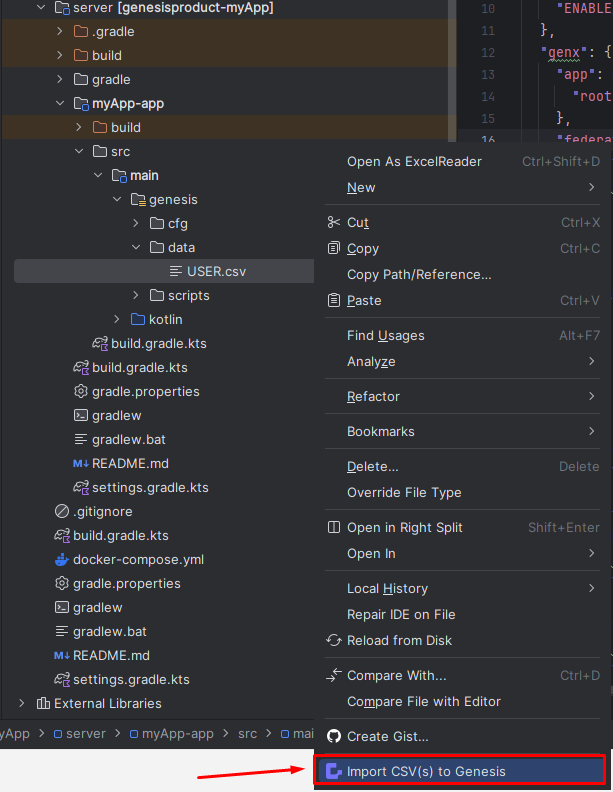
You will be prompted the following message. Type y to proceed.
WARNING: Are you sure you want to import all the tables from all the csv files to the database? (y/n)
After that, you have all the data to start the application.
Want to check if your data has been sent?

type table USER and then search 1 you will be displayed the following:
==================================
Genesis Database Monitor
Enter 'help' for a list of commands
==================================
DbMon>table USER
DbMon:USER>search 1
==================================
USER
==================================
Field Name                               Value                                    Type
===========================================================================================
TIMESTAMP                                2023-04-20 18:59:04.080(n:0,s:1428)      NANO_TIMESTAMP
COMPANY_ID                                                                        STRING
COMPANY_NAME                             GENESIS                                  STRING
DOMAIN                                                                            STRING
EMAIL_ADDRESS                            jane.dee@genesis.global                  STRING
FIRST_NAME                               Jane                                     STRING
LAST_LOGIN                               2016-04-28                               DATE
LAST_NAME                                Dee                                      STRING
ONLINE                                   false                                    BOOLEAN
PASSWORD                                 1cf46a0c2148f6399159ff576768d715b5207... STRING
PASSWORD_EXPIRY_DATETIME                                                          DATETIME
REFRESH_TOKEN                            dPbpA8ej38DzoEG44t0lyLrjeL80TMqR         STRING
STATUS                                   ENABLED                                  STRING
USER_NAME                                JaneDee                                  STRING
-------------------------------------------------------------------------------------------
-------------------------------------------------------------------------------------------
Total Results:  1
DbMon:USER>
We shall run the task loadInitialData. This adds the data in a file called USER.csv to be imported into the USER table in your database. The USER table, among other users and permissioning tables, is defined by the Genesis Auth module that we installed previously.
In the Gradle menu on the right of IntelliJ, select genesisproduct-alpha/alpha-deploy/Tasks/genesissetup/loadInitialData.
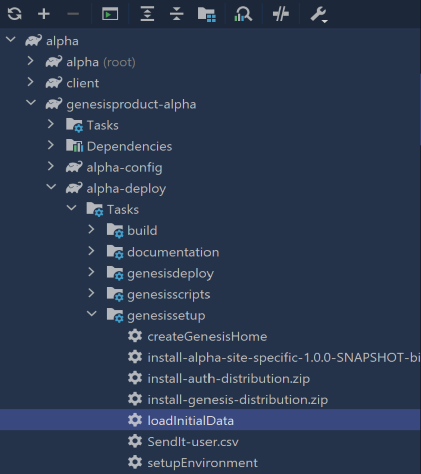
./gradlew :genesisproduct-alpha:alpha-deploy:loadInitialData
Want to check if your data has been sent?
To check your database, in the Gradle menu on the right of IntelliJ, select genesisproduct-alpha/alpha-deploy/Tasks/genesisscripts/DbMon.
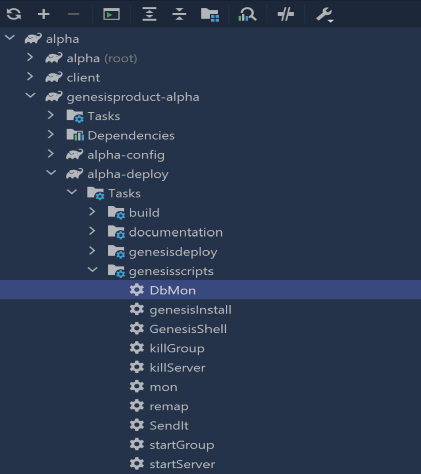
./gradlew :genesisproduct-alpha:alpha-deploy:DbMon
type table USER and then search 1 you will be displayed the following:
==================================
Genesis Database Monitor
Enter 'help' for a list of commands
==================================
DbMon>table USER
DbMon:USER>search 1
==================================
USER
==================================
Field Name                               Value                                    Type
===========================================================================================
TIMESTAMP                                2023-04-20 18:59:04.080(n:0,s:1428)      NANO_TIMESTAMP
COMPANY_ID                                                                        STRING
COMPANY_NAME                             GENESIS                                  STRING
DOMAIN                                                                            STRING
EMAIL_ADDRESS                            jane.dee@genesis.global                  STRING
FIRST_NAME                               Jane                                     STRING
LAST_LOGIN                               2016-04-28                               DATE
LAST_NAME                                Dee                                      STRING
ONLINE                                   false                                    BOOLEAN
PASSWORD                                 1cf46a0c2148f6399159ff576768d715b5207... STRING
PASSWORD_EXPIRY_DATETIME                                                          DATETIME
REFRESH_TOKEN                            dPbpA8ej38DzoEG44t0lyLrjeL80TMqR         STRING
STATUS                                   ENABLED                                  STRING
USER_NAME                                JaneDee                                  STRING
-------------------------------------------------------------------------------------------
-------------------------------------------------------------------------------------------
Total Results:  1
DbMon:USER>
We shall run the task loadInitialData. This adds the data in a file called USER.csv to be imported into the USER table in your database. The USER table, among other users and permissioning tables, is defined by the Genesis Auth module that we installed previously.
In the Gradle menu on the right of IntelliJ, select genesisproduct-alpha/alpha-deploy/Tasks/genesissetup/loadInitialData.
./gradlew :genesisproduct-alpha:alpha-deploy:loadInitialData
Want to check if your data has been sent?
To check your database, in the Gradle menu on the right of IntelliJ, select genesisproduct-alpha/alpha-deploy/Tasks/genesisscripts/DbMon.
./gradlew :genesisproduct-alpha:alpha-deploy:DbMon
type table USER and then search 1 you will be displayed the following:
==================================
Genesis Database Monitor
Enter 'help' for a list of commands
==================================
DbMon>table USER
DbMon:USER>search 1
==================================
USER
==================================
Field Name                               Value                                    Type
===========================================================================================
TIMESTAMP                                2023-04-20 18:59:04.080(n:0,s:1428)      NANO_TIMESTAMP
COMPANY_ID                                                                        STRING
COMPANY_NAME                             GENESIS                                  STRING
DOMAIN                                                                            STRING
EMAIL_ADDRESS                            jane.dee@genesis.global                  STRING
FIRST_NAME                               Jane                                     STRING
LAST_LOGIN                               2016-04-28                               DATE
LAST_NAME                                Dee                                      STRING
ONLINE                                   false                                    BOOLEAN
PASSWORD                                 1cf46a0c2148f6399159ff576768d715b5207... STRING
PASSWORD_EXPIRY_DATETIME                                                          DATETIME
REFRESH_TOKEN                            dPbpA8ej38DzoEG44t0lyLrjeL80TMqR         STRING
STATUS                                   ENABLED                                  STRING
USER_NAME                                JaneDee                                  STRING
-------------------------------------------------------------------------------------------
-------------------------------------------------------------------------------------------
Total Results:  1
DbMon:USER>
Starting the server
Now we need to start the servers. To do that, follow the structions below according to your environment configuration.
<Tabs defaultValue="Intellij Plugin" values={[{ label: 'Intellij Plugin', value: 'Intellij Plugin', },{ label: 'Docker', value: 'Docker'} ,{ label: 'WSL', value: 'WSL'}]}>
-
Start the resource deamon.
-
Once your resource deamon has started, you can see your Genesis processes listed. Click on the start button for each process to start it.
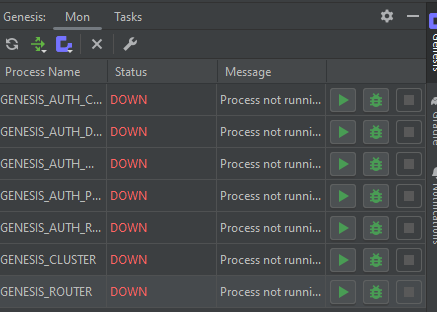
Wait for all the processes to be healthy (it may take a few minutes for the first run).
If you are running on docker, your processes has already been started. Now, let's run the Genesis command mon to see if all processes are up and running on the server:
In the Gradle menu on the right of IntelliJ, select genesisproduct-alpha/alpha-deploy/Tasks/genesisscripts/mon.
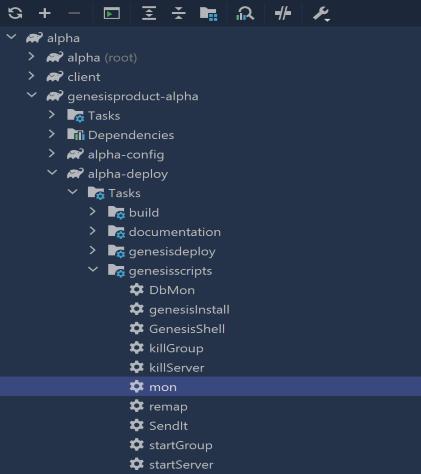
./gradlew :genesisproduct-alpha:alpha-deploy:mon
we should see something like this
PID     Process Name                  Port        Status         CPU       Memory    Message
===============================================================================================
426     GENESIS_AUTH_CONSOLIDATOR     8005        STANDBY        36.30     1.30
350     GENESIS_AUTH_DATASERVER       8002        RUNNING        56.70     1.70
334     GENESIS_AUTH_MANAGER          8001        RUNNING        61.50     1.70
368     GENESIS_AUTH_PERMS            8003        RUNNING        65.70     1.90
403     GENESIS_AUTH_REQUEST_SERVER   8004        RUNNING        56.80     1.60
490     GENESIS_CLUSTER               9000        RUNNING        84.30     2.50
570     GENESIS_ROUTER                9017        RUNNING        54.70     2.00
534     GENESIS_WEBMON                9011        RUNNING        51.30     2.50
===============================================================================================
664     ALPHA_DATASERVER              11000       RUNNING        58.10     1.50
703     ALPHA_EVENT_HANDLER           11001       RUNNING        71.30     2.20
Try to run mon from the command line as well!
If you are running on wsl, your processes has already been started. Now, let's run the Genesis command mon to see if all processes are up and running on the server:
In the Gradle menu on the right of IntelliJ, select genesisproduct-alpha/alpha-deploy/Tasks/genesisscripts/mon.
./gradlew :genesisproduct-alpha:alpha-deploy:mon
we should see something like this
PID     Process Name                  Port        Status         CPU       Memory    Message
===============================================================================================
426     GENESIS_AUTH_CONSOLIDATOR     8005        STANDBY        36.30     1.30
350     GENESIS_AUTH_DATASERVER       8002        RUNNING        56.70     1.70
334     GENESIS_AUTH_MANAGER          8001        RUNNING        61.50     1.70
368     GENESIS_AUTH_PERMS            8003        RUNNING        65.70     1.90
403     GENESIS_AUTH_REQUEST_SERVER   8004        RUNNING        56.80     1.60
490     GENESIS_CLUSTER               9000        RUNNING        84.30     2.50
570     GENESIS_ROUTER                9017        RUNNING        54.70     2.00
534     GENESIS_WEBMON                9011        RUNNING        51.30     2.50
===============================================================================================
664     ALPHA_DATASERVER              11000       RUNNING        58.10     1.50
703     ALPHA_EVENT_HANDLER           11001       RUNNING        71.30     2.20
Try to run mon from the command line as well!
See here for extra details on how to configure the Genesis deploy plugin.
Testing the back end
There are multiple ways you can test the back end of your application. It's important to note that most resources, such as Event Handlers and Data Servers, are exposed as HTTP endpoints automatically by the Genesis low-code platform - without any additional code. This enables you to test those resources from HTTP clients, such as Postman.
Alternatively, you can use Genesis Console, which gives you a simple way of testing components from a nice web UI.
Genesis Console
- Open a new incognito/private browser (this avoids any cache issues) and go to http://genesislcap.com/console/console-local/?host=localhost:9064.
Some browsers automatically change http to https - which will cause a fail. Make sure the url starts with http before submitting.
- Enter the IP address of your server, in this case localhost port 9064, as we are using GENESIS_ROUTER locally through the Genesis plugin. So, the value to be entered here is
localhost:9064 - Log in with your user name and password as defined previously. This starts Genesis Console, and you will see a list of tabs along the top of the screen.
- Click on the RESOURCES tab.
- Filter the Resource type to show only Event Handlers.
For example:
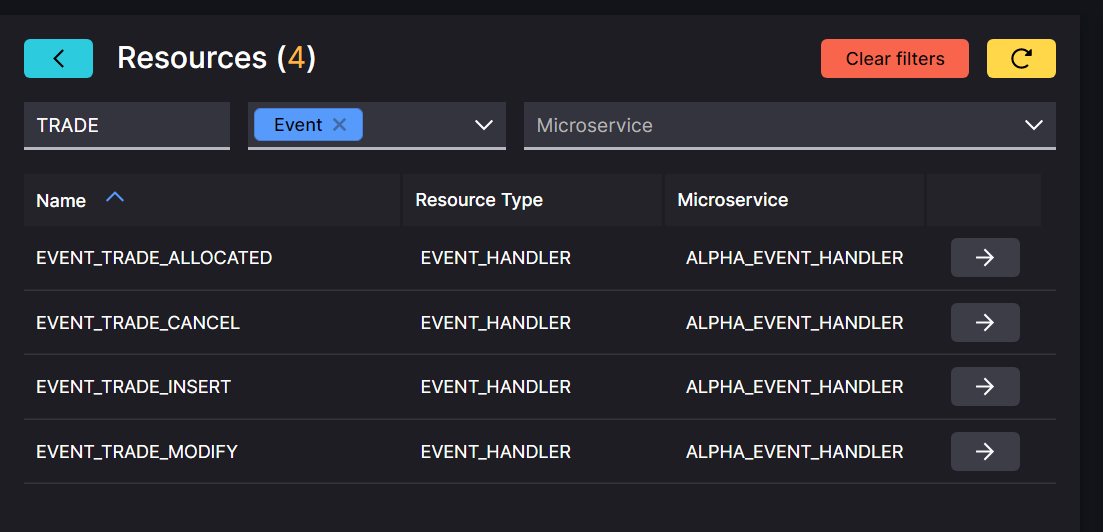
As well as the Event Handlers that you have defined yourself, you will also see other Event Handlers that have been generated automatically by the platform: anything that is a GENESIS_CLUSTER service, for example.
If you click on any Event Handler in the list, the fields relevant to the event are displayed to the right.
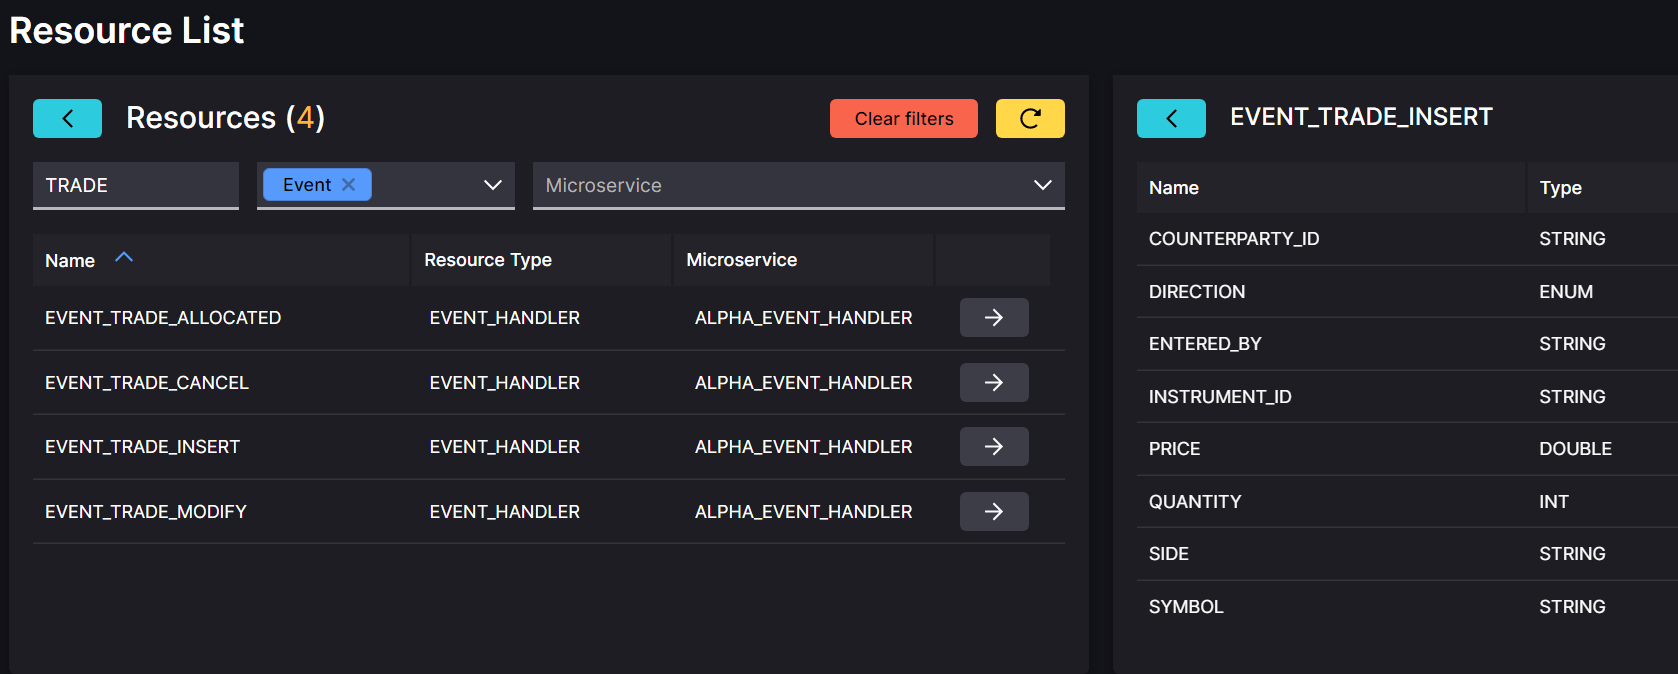
Now you need to pick the Event Handler you want to test. So, let's look up EVENT_TRADE_INSERT.
- Find the Event Handler in the list, then click on the arrow beside it. On the right, this displays the relevant input fields for the event. Some are mandatory, while others are optional - depending on how the Event Handler was set up.
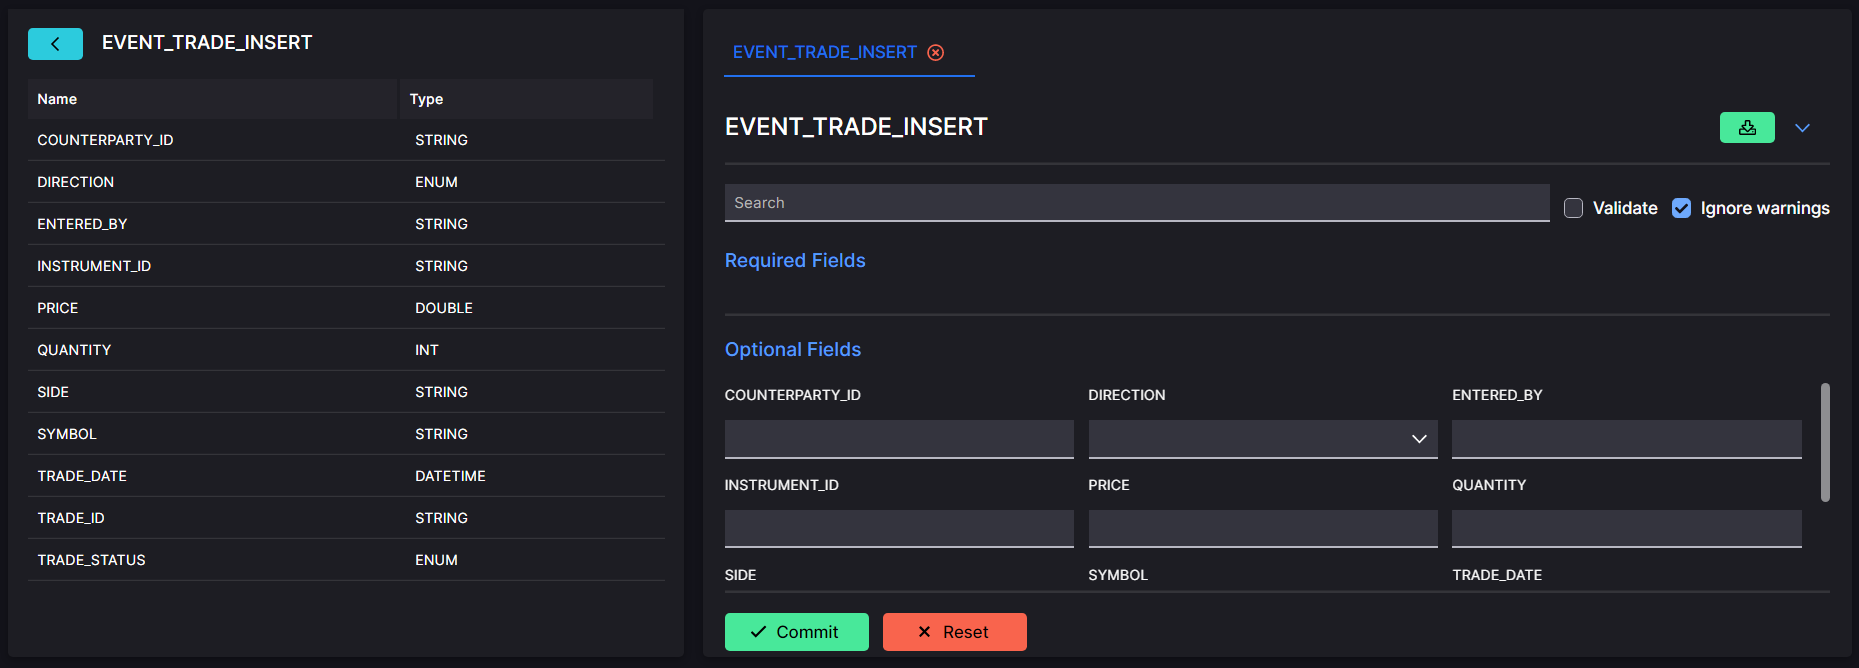
- Enter the details of the new trade in the fields then click on COMMIT:
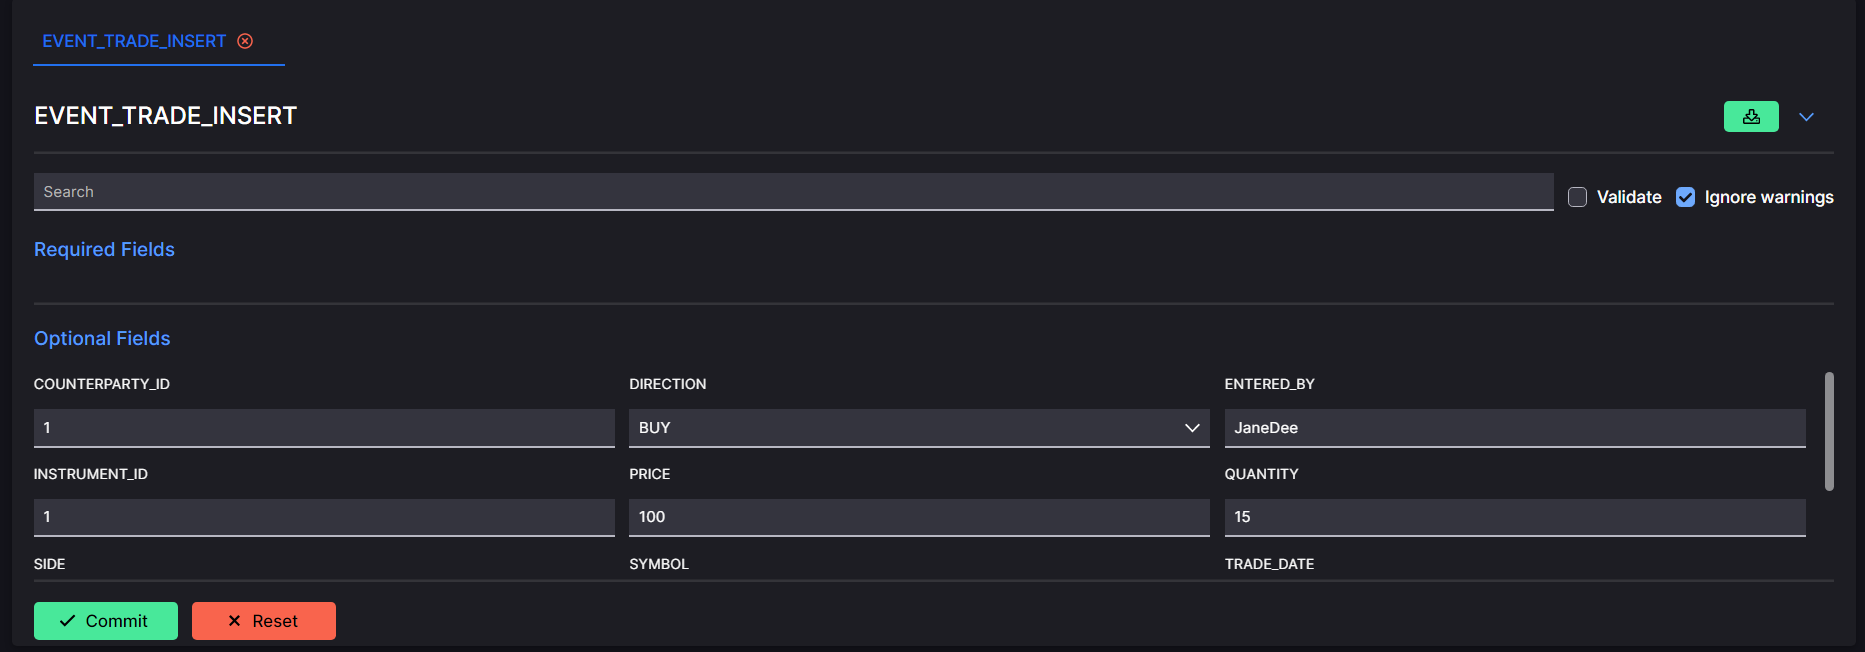
If the Event Handler is working correctly, you will receive an ACK.

Checking the insertion
You can go on to check the TRADE table to see if your insert is there.
-
Filter the list of services to show only Data Servers (these are the components that distribute the data).
-
Search for the relevant resource - in our case TRADE.

- Click on the arrow beside the relevant resource. You should now see the new trade in the list displayed on the right.

Exercise 1.1: Data Servers
30 mins
Look at the Data Server documentation and see if you are able to modify our Data Server defined previously:
- add a new query called "ALL_PRICES" on the TRADE table
- make ALL_PRICES display only SYMBOL and PRICE fields
- add a
whereclause so it displays only trades whose PRICE are higher than 0.0
Remember to insert a few trades using Genesis Console to test it.
Exercise 1.2: Event Handlers
20 mins
Look at the Event Handler documentation and see if you are able to modify our Event Handler defined previously:
- return
nack("Quantity must be positive")if the quantity is lower than 0.
Test it with Genesis Console.
This is the end of the day 1 of our training. To help your training journey, check out how your application should look at the end of day 1 here.