Genesis Start
Genesis Start enables you to run and preview an application on your local desktop. This is useful when you are developing locally.
From the command line, go to your project's server directory and run:
- Windows
- Mac OSX / Linux
.\gradlew.bat genesisStart
./gradlew genesisStart
If the command fails, you probably need to enable Genesis Start
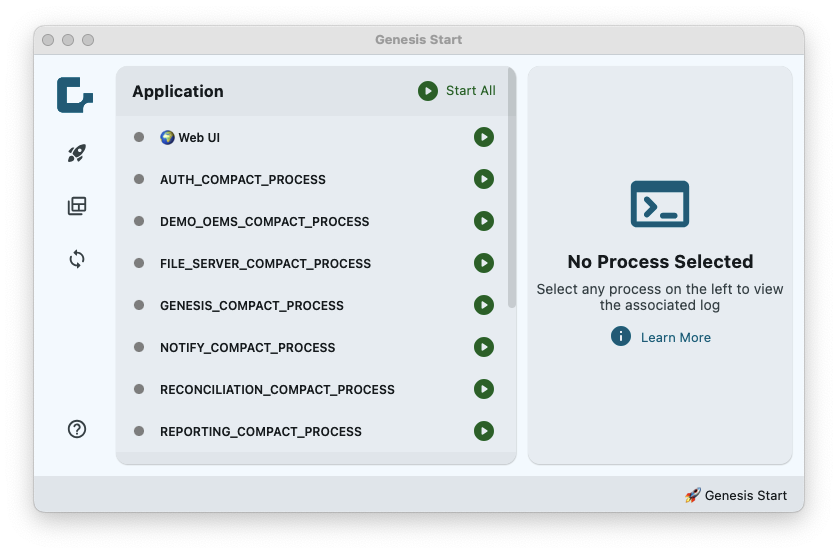
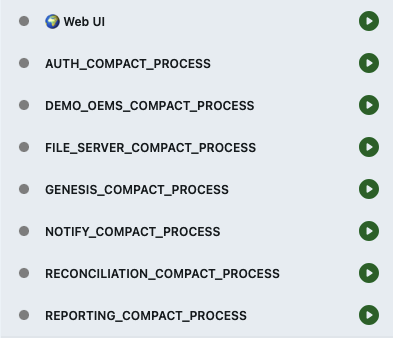
Genesis Start provides a simple UI to run your app.
A list of processes is displayed in the main area, and a side toolbar provides buttons for selecting different actions.
Using Genesis Start
Bootstrap and launch
![]()
This button bootstraps the application with a single click.
It is helpful when:
- starting an application for the first time
- starting an application after you have made changes to the database schema
Bootstrap first runs remap, imports the project data, then runs ConsolidateRights, and finally Start All.
Automatic test data loading (since 8.14)
If you have a testData folder in the genesis resource folder within your main module's src/main directory (see project structure for details), CSV files in this folder will automatically be loaded after remap is executed in a local environment.
The folder structure should be:
<application_name>-app/
└── src/
    └── main/
        └── genesis/
            └── testData/
                ├── RIGHT.csv
                ├── PROFILE.csv
                └── ...
The testData folder will not be loaded in a production environment. It is only used for local development and testing purposes.
Import data
![]()
This button enables you to select csv files to import into your application's database. It uses the Genesis SendIt command to do this.
Sync processes
![]()
This button synchronises any changes made to the project's process configuration.
Where File -> Settings -> Use Genesis Sync is enabled (which it is by default), project changes are synchronised automatically. You can then use this button to force synchronisation.
Start all

This button starts all processes and the web UI. This is the quickest way of starting your app if you haven't made any changes to the schema.
Controlling individual processes
You can stop and start individual processes using the button next to the process name.
To view a real-time log of a process that is running, click on the process in the list.
Compacting processes
The Process Profile menu allows you to select process configuration.
Dev Compactcompacts processes efficiently to run more server capabilities under single processes and save on processing and memory overheads. It is the recommended option for efficiently previewing your application.Compactcompacts processes in such a way that they would still run in a clusterProductionsets process configuration per the project set-up. See process configuration for more details on configuring processes.
If you need to cut down on memory usage when you build and run locally, select File -> Settings -> Use Compact Processes before you start.
System definition property overrides
Genesis Start supports overriding Genesis system definition properties locally. This lets you adjust configuration (e.g., database, ports) without changing the project's system definition.
Where to put override files
- User-level (recommended for shared local settings across projects)
~/.genesis/development-system-definition.properties~/.genesis/{service_name}-system-definition.properties- Project-level (for project-specific dev settings)
<server root>/.genesis/development-system-definition.properties<server root>/.genesis/{service_name}-system-definition.properties
Notes:
- The project
.genesis/folder lives under the server project root. - Use
{service_name}to target only that service’s properties.
Precedence (highest wins)
- Project-level
{service_name}-system-definition.properties - User-level
{service_name}-system-definition.properties - Project-level
development-system-definition.properties - User-level
development-system-definition.properties
Put differently: project properties overwrite user properties, and service-specific properties overwrite values defined in development-system-definition.properties.
Recommendations and version control
- Use
~/.genesis/for shared dev settings: Put environment-wide values (e.g., database host/port, common credentials) in your user home so they seamlessly apply across multiple Genesis projects on your machine. - Use project
.genesis/for project-specific dev settings: These can be shared with your team if appropriate by committing the folder to source control. Avoid committing machine-specific or secret values. - If you commit the project
.genesis/directory, consider.gitignorerules for sensitive or host-specific files.
Enabling Genesis Start
An older existing project can be enabled to use Genesis Start if it uses:
- the simplified structure; this includes any project generated through Create
- the Genesis Gradle Settings plugin
If you need to enable Genesis Start, there are two things that you need to do:
- Amend the settings file.
- Amend the build file.
Amending the settings file
In your project's server/settings.gradle.kts file, add google() to repositories under pluginManagement.
// in repositories under plugin management, add google() at the end:
pluginManagement {
    repositories {
        // other repositories
        google() // <- add this
    }
}
Amending the build file
In your project's server/build.gradle.kts file, add the plugin:
// add Genesis Start to plugins
plugins {
    // other plugins..
    id("global.genesis.genesis-start-gui") version "0.1.6"
}