Data Server - testing
GenesisJunit is only available from version 8 of the Genesis Server Framework (GSF).
If you are testing against a previous version of the framework, go to the legacy section.
Integration testing
This document looks at the basics of testing Data Servers.
We shall use a very simple example and work through the communication between our tests and the Data Server we are testing. This example relies on GenesisJunit, which is designed to make testing easy.
Preparation
There are some simple steps to follow in order to set up yor test.
1. Create the test class
Create the test class using the code provided below.
- Kotlin
- Java
@ExtendWith(GenesisJunit::class)
@ScriptFile("positions-app-tutorial-dataserver.kts")
@CsvData("seed-data.csv")
class DataServerTest {

    // our tests go here ...
}
@ExtendWith(GenesisJunit.class)
@ScriptFile("positions-app-tutorial-dataserver.kts")
@CsvData("seed-data.csv")
public class DataServerTest {

    // our tests go here ...
}
This test class does three things:
- It enables GenesisJunit.
- It identifies the Data Server script that we want to test, using the
ScriptFileannotation. - It identifies the source data for our test, using the
CsvDataannotation.
There is more information about GenesisJunit and the various annotations in the section on Integration testing.
2. Load test data
Create a CSV file called seed-data.csv in the root of the resources folder for your tests. Add the data below, which contains three records, to this file.
#POSITION
POSITION_ID,INSTRUMENT_ID,QUANTITY,NOTIONAL,VALUE,PNL
000000000000001PSLO1,INSTRUMENT_TEST1,1,1111.11,1111.11,1111.11
000000000000001PSLO2,INSTRUMENT_TEST2,1,2222.22,2222.22,2222.22
000000000000001PSLO3,INSTRUMENT_TEST3,1,3333.33,3333.33,3333.33
3. Inject references
Before we can begin writing tests for our Data Server, we need to inject references to the database and the Data Server client:
- Kotlin
- Java
@ExtendWith(GenesisJunit::class)
@ScriptFile("positions-app-tutorial-dataserver.kts")
@CsvData("seed-data.csv")
class DataServerTest {

    @Inject
    private lateinit var db: SyncEntityDb

    @Inject
    private lateinit var dataServerClient: DataServerQueryViewClient

    // our test will go here ...
}
@ExtendWith(GenesisJunit.class)
@ScriptFile("positions-app-tutorial-dataserver.kts")
@CsvData("seed-data.csv")
public class DataServerTest {

    @Inject
    private SyncEntityDb db = null;

    @Inject
    private DataServerQueryViewClient dataServerClient = null;

    // our test will go here ...
}
A first test
The test below is designed to make sure that a Data Server returns the right number of records.
- Kotlin
- Java
@Test
fun testViewHas3Records() {
    val view = dataServerClient.queryView<Position>(
        datasourceName = "ALL_POSITIONS"
    )

    await untilCallTo { view } has { size == 3 }
}
@Test
void testViewHas3Records() {
    var view = dataServerClient.queryViewBuilder()
        .withDatasourceName("ALL_POSITIONS")
        .withClass(Position.class).connect();

    await().until(() -> view, (it) -> it.getSize() == 3);
}
As you can see here, to connect to our Data Server, you need to provide the datasource name. We have also provided the type or class that the query returns. This is optional; if no type is provided, the view will be of type GenesisSet.
For Java developers, we provide a fluent interface. In Kotlin, you can use named parameters. The test is the same regardless.
Once you connect, the client will provide a QueryView, which connects to the resource in the Data Server and recieves updates.
At this point, we are just making sure we have received 3 records.
Create collections from QueryView
In addition to the size/getSize() property, there are also utility methods to represent the view as a collection.
These methods take a snapshot, and are not updated.
- Kotlin
- Java
@Test
fun buildCollections() {
    val view = dataServerClient.queryView<Position>(
        datasourceName = "ALL_POSITIONS"
    )

    val list = view.toList();
    val byId = view.associateBy { it.positionId };
    val byCurrency = view.groupBy { it.currency };
}
@Test
public void buildCollections() {
    var view = dataServerClient.queryViewBuilder()
        .withClass(Position.class)
        .withDatasourceName("ALL_POSITIONS").connect();

    var list = view.toList();
    var byId = view.associateBy(Position::getPositionId);
    var byCurrency = view.groupBy(Position::getCurrency);
}
Dynamic authorisation
For this test, we have amended our Data Server to enable authorisation:
dataServer {
    query("ALL_TRADES_AUTH", TRADE) {
        permissioning {
            auth("TRADE_VISIBILITY") {
                fields {
                    TRADE_ID
                }
            }
        }
    }
}
Once you add the auth block to the code, you need to amend the test.
To test dynamic authorisation, add @EnableInMemoryTestAuthCache to your class or method. This makes InMemoryTestAuthCache available for injection in your test class.
- Kotlin
- Java
@ExtendWith(GenesisJunit::class)
@EnableInMemoryTestAuthCache
@ScriptFile("hello-world-dataserver.kts")
@CsvData("SystemTest/simple-data-load.csv")
class DataServerTest {

    @Inject
    lateinit var client: DataServerQueryViewClient

    @Inject
    lateinit var authCache: InMemoryTestAuthCache

    @Test
    fun testGetTradesDynamicAuth() {
        val view = client.queryView<Trade>(
            datasourceName = "ALL_TRADES_AUTH",
            userName = "JohnDoe"
        )


        authCache.authorise(
            authMap = "TRADE_VISIBILITY",
            entityCode = "00000000001TRSP0",
            userName = "JohnDoe"
        )

        await untilCallTo { view } has { size == 1 }

        authCache.authorise(
            authMap = "TRADE_VISIBILITY",
            entityCode = "00000000002TRSP0",
            userName = "JohnDoe"
        )

        await untilCallTo { view } has { size == 2 }

        authCache.authorise(
            authMap = "TRADE_VISIBILITY",
            entityCode = "00000000001TRSP0",
            userName = "JohnDoe"
        )

        authCache.revoke(
            authMap = "TRADE_VISIBILITY",
            entityCode = "00000000002TRSP0",
            userName = "JohnDoe"
        )

        await untilCallTo { view } has { size == 0 }
    }
}
@ExtendWith(GenesisJunit.class)
@EnableInMemoryTestAuthCache
@ScriptFile("hello-world-dataserver.kts")
@CsvData("SystemTest/simple-data-load.csv")
public class DataServerTest {

    @Inject
    private DataServerQueryViewClient client = null;

    @Inject
    private InMemoryTestAuthCache authCache = null;

    @Test
    void testGetTradesDynamicAuth() {
        var view = client.queryViewBuilder()
                .withDatasourceName("ALL_TRADES_AUTH")
                .withClass(Trade.class)
                .withUserName("JohnDoe")
                .connect();

        authCache.builder()
                .withAuthMap("TRADE_VISIBILITY")
                .withEntityCode("00000000001TRSP0")
                .withUserName("JohnDoe")
                .authorise();

        await().until(() -> view, (v) -> v.getSize() == 1);

        authCache.builder()
                .withAuthMap("TRADE_VISIBILITY")
                .withEntityCode("00000000002TRSP0")
                .withUserName("JohnDoe")
                .authorise();

        await().until(() -> view, (v) -> v.getSize() == 2);

        authCache.builder()
                .withAuthMap("TRADE_VISIBILITY")
                .withEntityCode("00000000001TRSP0")
                .withUserName("JohnDoe")
                .revoke();

        authCache.builder()
                .withAuthMap("TRADE_VISIBILITY")
                .withEntityCode("00000000002TRSP0")
                .withUserName("JohnDoe")
                .revoke();

        await().until(() -> view, (v) -> v.getSize() == 0);
    }
}
Await methods
Finally, QueryView has some methods to help with making assertions on the data. With the view itself being updated in the background, these methods will have a timeout.
- Kotlin
- Java
@Test
fun testUsdPositions()  {
    val view = dataServerClient.queryView<Position>(
        datasourceName = "USD_POSITIONS"
    )

    val list = db.getRange(Position.byCurrencyId("USD"))

    view.awaitUntilEqual(list)
    view.awaitUntilContains(list.first())
}
@Test
void testUsdPositions() {
    var view = dataServerClient.queryViewBuilder()
        .withClass(Position.class)
        .withDatasourceName("ALL_POSITIONS").connect();

    var list = db.getRange(Position.byCurrencyId("USD"));

    view.awaitUntilEqual(list);
    view.awaitUntilContains(list.get(0));
}
Integration testing (legacy)
This section covers testing your Data Server if you are using any version of the Genesis Server Framework before GSF v8.
The Genesis platform provides the AbstractGenesisTestSupport abstract class, which enables end-to-end testing of specific areas of your application.
In this case, we want to ensure that we have a database seeded with information. And we want to check that our Data Server configuration is used to create our Data Server. We also need to add the required packages and genesis home.
class DataServerTests : AbstractGenesisTestSupport<Reply<*>>(
    GenesisTestConfig {
        addPackageName("global.genesis.dataserver.pal")
        genesisHome = "/GenesisHome/"
        scriptFileName = "positions-app-tutorial-dataserver.kts"
        initialDataFile = "seed-data.csv"
    }
) {

    private var ackReceived = false
    private var initialData: GenesisSet = GenesisSet()
    private var updateData: GenesisSet = GenesisSet()

    @Before
    fun before() {
        ackReceived = false
        initialData = GenesisSet()
        updateData = GenesisSet()

        messageClient.handler.addListener { set, _ ->
            println(set)
            if ("LOGON_ACK" == set.getString(MessageType.MESSAGE_TYPE)) {
                ackReceived = true
            }
            if ("QUERY_UPDATE" == set.getString(MessageType.MESSAGE_TYPE)) {
                if (initialData.isEmpty) {
                    initialData = set
                } else {
                    updateData = set
                }
            }
        }
    }
For more information about AbstractGenesisTestSupport, see the Testing pages.
Let's load some test data into the seed-data.csv in the root of the resources folder for your tests.
#POSITION
POSITION_ID,INSTRUMENT_ID,QUANTITY,NOTIONAL,VALUE,PNL
000000000000001PSLO1,INSTRUMENT_TEST1,1,1111.11,1111.11,1111.11
000000000000001PSLO2,INSTRUMENT_TEST2,1,2222.22,2222.22,2222.22
000000000000001PSLO3,INSTRUMENT_TEST3,1,3333.33,3333.33,3333.33
We are now ready to begin writing tests for our Data Server.
First, we send a DATA_LOGON message to our Data Server; our Data Server should then respond with the current snapshot of data. Any changes will then be automatically sent to us as a consumer.
We then need to trigger a change on the database. Our Data Server will see this change and send the update to us.
@Test
fun `data server passes update`(): Unit = runBlocking {
        messageClient.sendMessage(
            GenesisSet.genesisSet {
                MessageType.MESSAGE_TYPE with "DATA_LOGON"
                MessageType.DETAILS with GenesisSet.genesisSet {
                    MessageType.DATASOURCE_NAME with "ALL_POSITIONS"
                }
            }
        )
        Awaitility.waitAtMost(30, TimeUnit.SECONDS).until(ackAndDataReceived())

        // We pull out the initial data
        val rows = initialData.getArray<GenesisSet>("ROW")!!.sortedBy { it?.getString("POSITION_ID") }
        val firstRow = rows.first() ?: fail("Missing first row in initial data")
        val firstRowRef = firstRow.getGenesisSet("DETAILS")!!.getString("ROW_REF")!!
        assertEquals(3, rows.size)
        assertEquals("000000000000001PSLO1", firstRow.getString("POSITION_ID")!!)
        assertEquals(1111.11, firstRow.getDouble("VALUE")!!)

        // We update the database to trigger our Data Server into action
        entityDb.updateBy(Position.byId("000000000000001PSLO1")) {
            value = 1234.56
        }
        Awaitility.await().until(ackDataAndUpdateReceived())

        // We consume the update
        val updateRows = updateData.getArray<GenesisSet>("ROW")!!
        val updateRow = updateRows.first()!!

        assertEquals(1, updateRows.size)
        val updateRowRef = firstRow.getGenesisSet("DETAILS")?.getString("ROW_REF")!!
        assertEquals(firstRowRef, updateRowRef)
        assertEquals(1234.56, updateRow.getDouble("VALUE")!!)
    }

/**
 * Check ack and initial data received.
 *
 * @return true if ack and initial data received
 */
private fun ackAndDataReceived(): Callable<Boolean>? {
    return Callable { ackReceived && !initialData.isEmpty }
}
private fun ackDataAndUpdateReceived(): Callable<Boolean> {
    return Callable { ackReceived && !initialData.isEmpty && !updateData.isEmpty }
}
Manual testing
Testing with Console
If you use Genesis Console, this gives you a simple way of testing components.
- In your browser, go to http://genesislcap.com/console/console-next2/.
- Enter the IP address of your server. If you get a blank page without any response, then this is probably because you don't have NGINX configured.
- Log in with your user name and password. This starts Genesis Console, and you will see a list of tabs along the top of the screen.
- Click on the RESOURCES tab.
- Filter the Resource type to show only Data Servers.
For example:
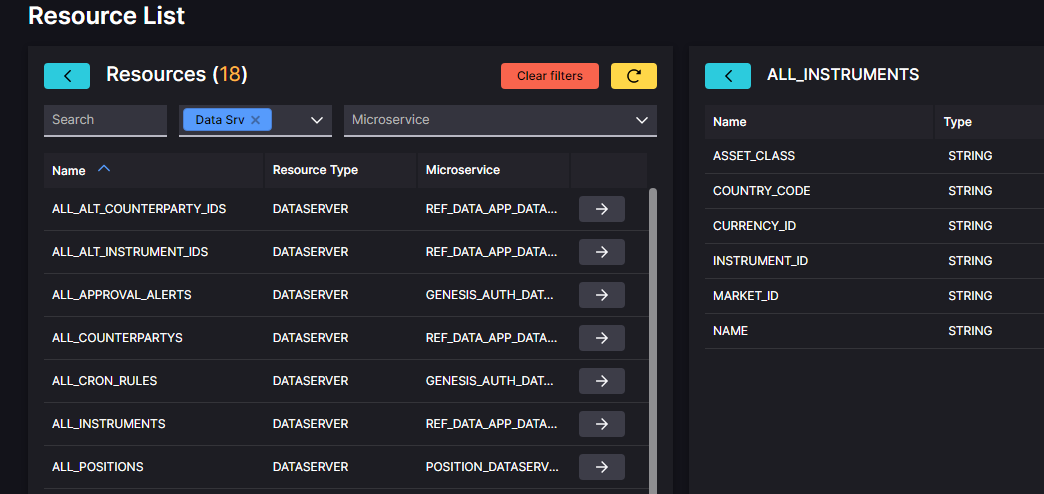
As well as the Data Servers that you have defined yourself, you will also see other Data Servers that have been generated automatically by the platform, anything that is a GENESIS_AUTH service, for example.
-
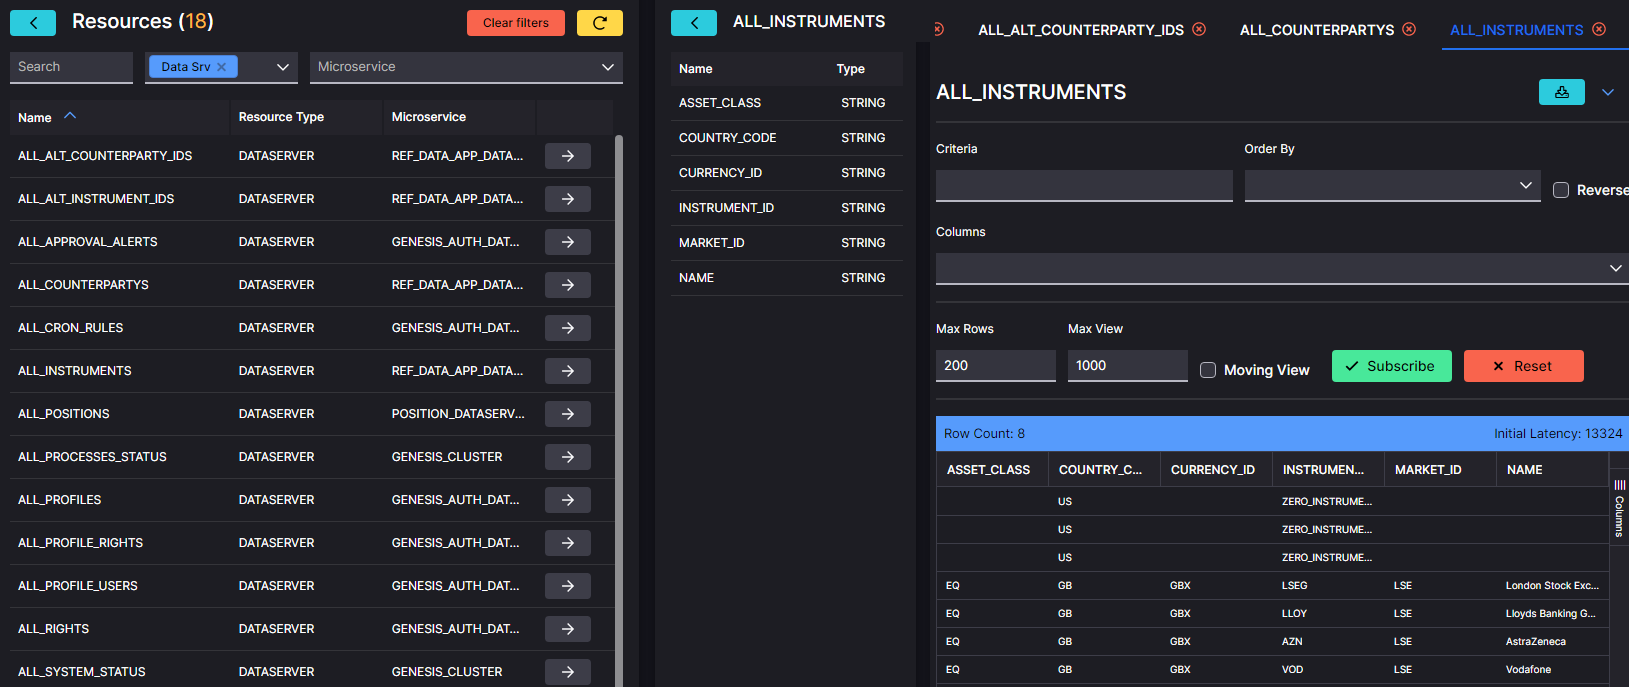
In the list, click on the Data Server you want to test. This displays the fields for that Data Server.
-
Click on the arrow beside the Data Server that you want to test. This displays the current contents of the table or view that provides the data for that Data Server. If you can see that content, you have connected successfully to the resource.
Testing with an API client
An API client is useful way of testing components. As a client, it is effectively a front end seeking information from the server.
The API client enables you to create calls to the resources in your server - Data Servers, Request Servers and Event Handlers. Then you can just click to run a call and see what response you get.
Before you can make any calls on these resources, you will have to permission yourself by obtaining a SESSION_AUTH_TOKEN. The details of how to do this are on our separate Testing page.
Once you have the SESSION_AUTH_TOKEN, keep a copy that you can paste into each request as you make your test call.
In the example below, we are using Insomnia as the client API.
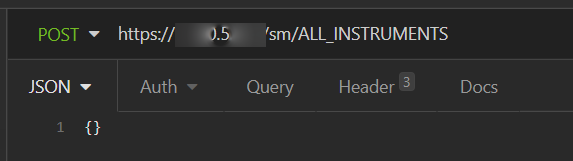
url and Body
In front of the url, set the call to POST.
The url consists of:
- the address or hostname of the server
- if necessary, some extra routing; in this case sm uses a proxy to access the server
- the name of the Data Server
Set the body to JSON. In the body, simply insert opening and closing curly brackets - nothing else.
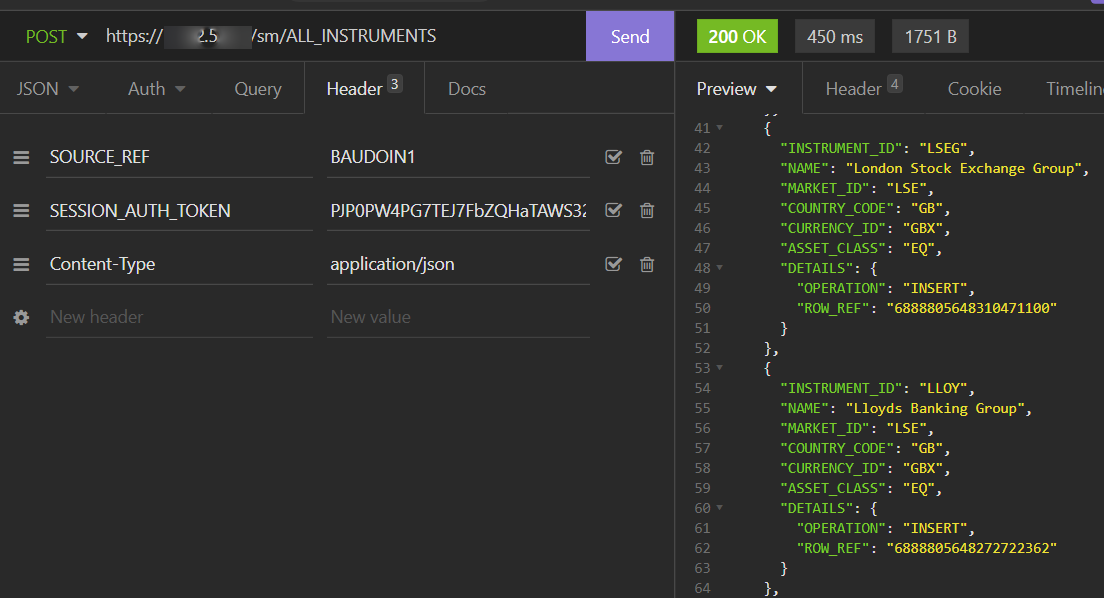
Header
In the header, you need to supply:
- a SOURCE_REF (always), which identifies you; you can use any string value that suits you
- the SESSION_AUTH_TOKEN that permissions you to access the server
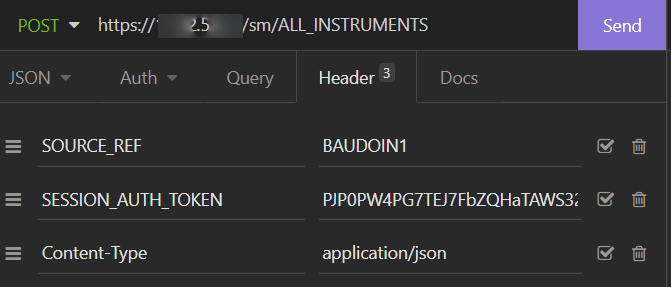
When you have all these elements in place, click on Send to make the call. You can see that the fields for the instruments have been returned on the right of the screen.