Server Developer Training - Day one
This day covers:
System definitions
The system definition file genesis-system-definition.kts is the basis of all configurations, scripts, data model, etc. This section explains all the different items that are contained in the file.
Here is an example of a genesis-system-definition.kts file for an application:
package genesis.cfg

systemDefinition {
    global {
        item(name = "MqLayer", value = "ZeroMQ")
        item(name = "DbLayer", value = "FDB")
        item(name = "DictionarySource", value = "DB")
        item(name = "AliasSource", value = "DB")
        item(name = "MetricsEnabled", value = "false")
        item(name = "ZeroMQProxyInboundPort", value = "5001")
        item(name = "ZeroMQProxyOutboundPort", value = "5000")
        item(name = "DbHost", value = "localhost")
        item(name = "DbSqlMaxPoolSize", value = "4")
        item(name = "DbMode", value = "VANILLA")
        item(name = "GenesisNetProtocol", value = "V2")
        item(name = "ResourcePollerTimeout", value = "5")
        item(name = "ReqRepTimeout", value = "60")
        item(name = "MetadataChronicleMapAverageKeySizeBytes", value = "128")
        item(name = "MetadataChronicleMapAverageValueSizeBytes", value = "1024")
        item(name = "MetadataChronicleMapEntriesCount", value = "512")
        item(name = "DaemonServerPort", value = "4568")
        item(
            name = "JVM_OPTIONS",
            value = "-XX:MaxHeapFreeRatio=70 -XX:MinHeapFreeRatio=30 -XX:+UseG1GC -XX:+UseStringDeduplication -XX:OnOutOfMemoryError=\"handleOutOfMemoryError.sh %p\""
        )
    }

    systems {
        system(name = "DEV") {
            hosts {
                host(name = "genesis-serv")
            }

            item(name = "DbNamespace", value = "genesis")
            item(name = "ClusterPort", value = "6000")
            item(name = "Location", value = "LO")
            item(name = "LogFramework", value = "LOG4J2")
            item(name = "LogFrameworkConfig", value = "log4j2-default.xml")
        }
    }
}
Global, System and Host levels
As you can see from the example, you can define items at global, system and host level.
- Global: These properties will be available to all systems.
- System: These properties contain information about a particular system and can have a free text field. Each system is associated with a host or hosts. The content should specify the type of environment the system is running in. Local values can be specified in this block. These values override the global values.
- Host: In this section you can define properties of host or hosts (if running in a cluster environment). Host block can exist under the system section as shown in the above example. The host name defines what environment you are running in. By default, only one host will be used, and you must change its value to the current machine hostname.
Items defined
In the system definitions file, there are several items to be used as default values. You can also change important configurations for your application.
For instance, to change the database configuration to any one of the technologies supported, you should change the items DbLayer, DbHost, and possibly system/hosts. The code below shows us how we could do this.
package genesis.cfg

systemDefinition {
    global {
        ...
        item(name = "DbLayer", value = "SQL")
        ...
        item(name = "DbHost", value = "jdbc:postgresql://localhost:5432/?user=postgres&password=")
        ...
    }

    systems {
        system(name = "DEV") {
            hosts {
                host(LOCAL_HOST)
            }
            ...
        }
    }
}
Additionally, you can create a global custom definition like this:
systemDefinition {
    global {
        ...
        item(name = "ADMIN_PERMISSION_ENTITY_FIELD", value = "COUNTERPARTY_ID")
        ...
    }
    ...
}
The custom definition value will be available globally and can be accessed like this.
val permissionsField = SysDef.ADMIN_PERMISSION_ENTITY_FIELD
Further information regarding the system definitions such as items defined, HashiCorp Vault, and more can be found here.
Saving resources
There are some important settings that enable you to optimise your usage of resources such as memory and CPU.
-
In your system definitions, you can include the
DbSqlMaxPoolSizesetting. For each JVM process (Data Server, Request Server, etc.) connecting to the database, this setting determines the maximum number of SQL connections held by the SQL connection pool. -
When you use the
genesisInstall command, you can use the option--compactProcesses, which consolidates compatible services (like DataServer, RequestServer, Notify, EventHandler, Streamer) into a single process, called GENESIS_COMPACT_PROCESS, reducing the number of services running in the container. To do this, go to the Genesis Intellij plugin; and under the tab tasks, click on Setup. There you will find a script called: genesisInstall --ignoreHooks --compactProcesses as you can see below:
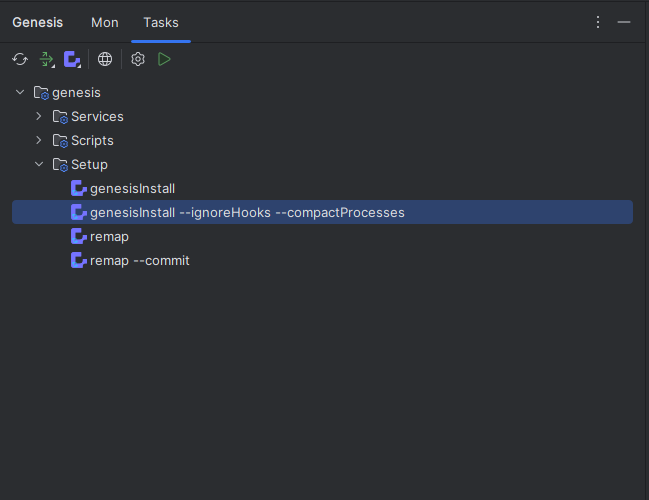
The System definition is already included in the Server Developer Training starting repository that you cloned. But please ensure that you modify the genesisInstall command to include the --compactProcesses option.
This will certainly save memory and start-up time. However, keep in mind that drawbacks include increased process restart time and, in some cases, potential difficulty in managing SQL connections. For this training, where multiple processes are added locally, we recommend using both approaches to optimise resources and start-up time.
Exercise 1.1 System definitions
20 mins
Let's start the first exercise. We are going to create a global custom definition to set the nullability for the Trade table fields.
Create a new item in the system definition file and use it in the fields definition file. You should edit the local system definition file to do that.
To do this exercise, go to the file alpha-system-definition.kts and make the changes. Then, go to the fields definition file and set nullable using SysDef.
After the changes, don't forget to run build and deploy.
Advanced Event Handlers
The Genesis low-code platform has a real-time event-driven architecture.
Applications built on the system must respond immediately to different types of input such as: inputs from users, messages from other systems, market-data updates and internally calculated analytic signals. These inputs are events.
All the business logic for applications built on the platform is structured around these events. When an event occurs, the business logic immediately fires into action.
As a rough guide, many of the tables you have created need Insert, Modify and Delete events, so that you can specify the processing that these events require.
The vast majority of applications include business workflow. Event Handlers are conventionally defined in the file application-name-eventhandler.kts.
In the Developer Training we defined the application Event Handler in a Kotlin script file; this included basic things like enabling the application to write to the database.
There are more things we can explore now, such as Database API, Exception handling, and Custom reply message type. These are described in the next sections.
Database API
The entityDb enables you to interact with the database layer; you can use any generated type-safe entities for tables and views. The interface supports the same operations as the generated repositories, but will accept any entity. It supports read operations for views and tables and write operations for tables only.
The entityDb differs from the generated repositories in that it can handle any table and most view entities. The entityDb is available in the kotlin Event Handler.
When referring to indices in the database operations, the database accepts index classes or entity class in combination with index references. Further details and conventions can be found here.
EntityDb offers Read and Write Operations. Using Read Operations it is possible to get a simple lookup on the database through the method get, or even create a Flow or Flowable of the whole table as the code below.
Syntax
- Kotlin
- Java
// we can pass in Trade as a type parameter
val flow = db.getBulk<Trade>()
// we can pass in the TRADE object
val flow = db.getBulk(TRADE)
// or we can pass in an index reference
val flow = db.getBulk(Trade.ByTypeId)
// we can pass in Trade as a type parameter
final var flowable = db.getBulk(Trade.class);
// we can pass in the TRADE object
final var flowable = db.getBulk(TRADE.INSTACE);
// or we can pass in an index reference
final var flowable = db.getBulk(Trade.ById.Companion);
On the other hand, Write Operations have versions that take a single entity and versions that take multiple entries. The return values for these operations are type-safe (see details below), provided all entries are of the same type. There are Default and generated values, as well as CRUD methods and variations: Insert, Modify, Upsert, Delete, Update as the code below.
- Kotlin
- Java
db.updateBy(Trade.byId("xxxxx")) {
    price = 15.0
}

db.updateByRange(Trade.byOrderId("xxxx")) {
    orderStatus = OrderStatus.CANCELLED
}

db.updateByRange(Trade.byOrderId("xxxx"), Trade.byOrderId("yyyy") {
    orderStatus = OrderStatus.CANCELLED
}

db.updateAll<Trade> {
    orderStatus = OrderStatus.CANCELLED
}
db.updateBy(Trade.byId("xxx"), trade -> {
    trade.setPrice(15.0);
}).blockingGet();

db.updateByRange(Trade.byOrderId("xxxx"), trade -> {
    trade.setTradeType(OrderStatus.CANCELLED);
}).blockingGet();

db.updateByRange(Trade.byOrderId("xxxx"), Trade.byOrderId("yyyy"), trade -> {
    trade.setTradeType(OrderStatus.CANCELLED);
}).blockingGet();

db.updateAll(Trade.class, trade -> {
    trade.setTradeType(OrderStatus.CANCELLED);
}).blockingGet();
If the underlying database supports transactions, then the entityDb provides type-safe access to these. A read transaction will support the same read operations as the entity db, and a write transaction will support the same read and write operations. If a write transaction fails, all operations will be reverted. Subscribe operations are not supported within transactions. Currently, transactions are supported on FoundationDb and Postgresql. Further details regarding transactions can be found here.
Using entityDb, it is also possible to subscribe operations, starting a database listener that receives updates to tables or views. When subscribing to view updates, only updates to the root table will be published. Further details regarding subscribe operations can be found here.
Exercise 1.2 entityDb ReadOperation getBulk
40 mins
Create a new event called TRADE_STANDARDIZATION to perform a standardization in the Trade table, setting all negative Trade.Price records to zero. This method can use the ReadOperation getBulk method to list all Trades and then use the filter method that the Kotlin Flow class offers.
After selecting the Trade records you can use the forEach method to set the prices to zero, and then use entityDb method modifyAll to update everything.
Exception handling
In order to handle exceptions in Event Handlers, the traditional try and catch options are available and ready for usage.
For instance, handling exceptions in EVENT_TRADE_INSERT can be something like this:
eventHandler {
    eventHandler<Trade>(name = "TRADE_INSERT") {
        onCommit { event ->
            try {
                entityDb.insert(event.details)
                ack()
            }
            catch (e: Exception) {
                LOG.error("Error: $e")
                nack(e)
            }
        }
    }
}
Exercise 1.3 Exception handling
30 mins
Add an exception handler in EVENT_COUNTERPARTY_INSERT, enriching the error message with the message as well as the cause and event name.
Don't forget the returns, in this case ack() for success, and nack(e) for exceptions.
Context Event Handler
The context eventHandler is a special use of the eventHandler where you want to create a context for your onCommit code block; the onValidate results are the context for the onCommit.
This feature is valuable when you want to reduce the database request, for example, or when you want to inject more information to be committed, and much more.
    contextEventHandler<Company, String>(name = "CONTEXT_COMPANY_INSERT") {
        onValidate {
            val company = it.details
            if(company.companyName == "MY_COMPANY") {
                validationAck(validationContext = "Best company in the world")
            } else {
                validationAck()
            }
        }
        onCommit { event, context ->
            val parsedContext = context ?: "Missing context"
            val company = event.details
            val result = entityDb.insert(company)
            ack(listOf(mapOf("VALUE" to parsedContext)))
        }
    }
As the example shows, there is an additional type defined for the contextEventHandler. This is a String. It gives you the option of returning a String value from the onValidate block (see validationAck logic), which can then be captured in the onCommit block (see context lambda parameter).
Because the example creates a validation context, the function validationAck() is used at the end of the onValidate block; do not use ack().
Exercise 1.4 Context Event Handler
Implement a cascade delete for the counterparty table. This must check if there are any trades using this counterparty, and delete them as well. You should also implement the onException code block; if there are more than 10 trades to be deleted, throw an exception.
Create the onValidate block for this new eventhandler, and return a List<trades> to list the trades that are using that counterparty.
Custom reply message type
If you use a custom reply message type, you cannot use the default ack() or validationAck() functions. The custom message type needs to be returned from the method.
For a class called TradeEvent built with your fields and tables defined as:
data class TradeEvent(
    val price: Double,
    val quantity: Int,
){
    init{
        require(price > 0) { "Price cannot be negative "}
        require(quantity > 0) { "Quantity cannot be negative "}
    }
}
... and a custom message reply type called CustomTradeEventReply added under {app-name}-messages defined as:
sealed class CustomTradeEventReply : Outbound() {
    class TradeEventValidateAck : CustomTradeEventReply()
    data class TradeEventAck(val tradeId: String) : CustomTradeEventReply()
    data class TradeEventNack(val error: String) : CustomTradeEventReply()
}
... you could use the example eventHandler below:
    eventHandler<TradeEvent, CustomTradeEventReply>(name = "CUSTOM_TRADE_EVENT") {
        onException { event, throwable ->
            TradeEventNack(throwable.message!!)
        }
        onValidate {
            val tradeEvent = it.details
            require((tradeEvent.price * tradeEvent.quantity.toDouble()) < 1_000_000) { "Trade notional is too high" }
            TradeEventValidateAck()
        }
        onCommit { event ->
            val trade = event.details
            val result = entityDb.insert(trade)
            TradeEventAck(result.record.tradeId)
        }
    }
onException
The onException block can capture any exceptions thrown by the onValidate and onCommit blocks and returns the expected reply message type (as shown in the last example). This function is particularly useful if you are using a custom message type; by default, eventHandler codeblocks will attempt to translate exceptions automatically to an EventNack message, which might cause compatibility problems if you are using custom replies.
Exercise 1.5 Event Handler custom message
30 mins
Now let's change the EVENT_INSTRUMENT_INSERT to use a custom reply message type. Create the classes CustomInstrumentEventReply and add it under alpha-messages package global.genesis.alpha.message.event. The Event Handler onValidate statement should ensure that instrumentName has at least 3 characters.