Day two
Day one recap
This day covers:
Introducing the UI
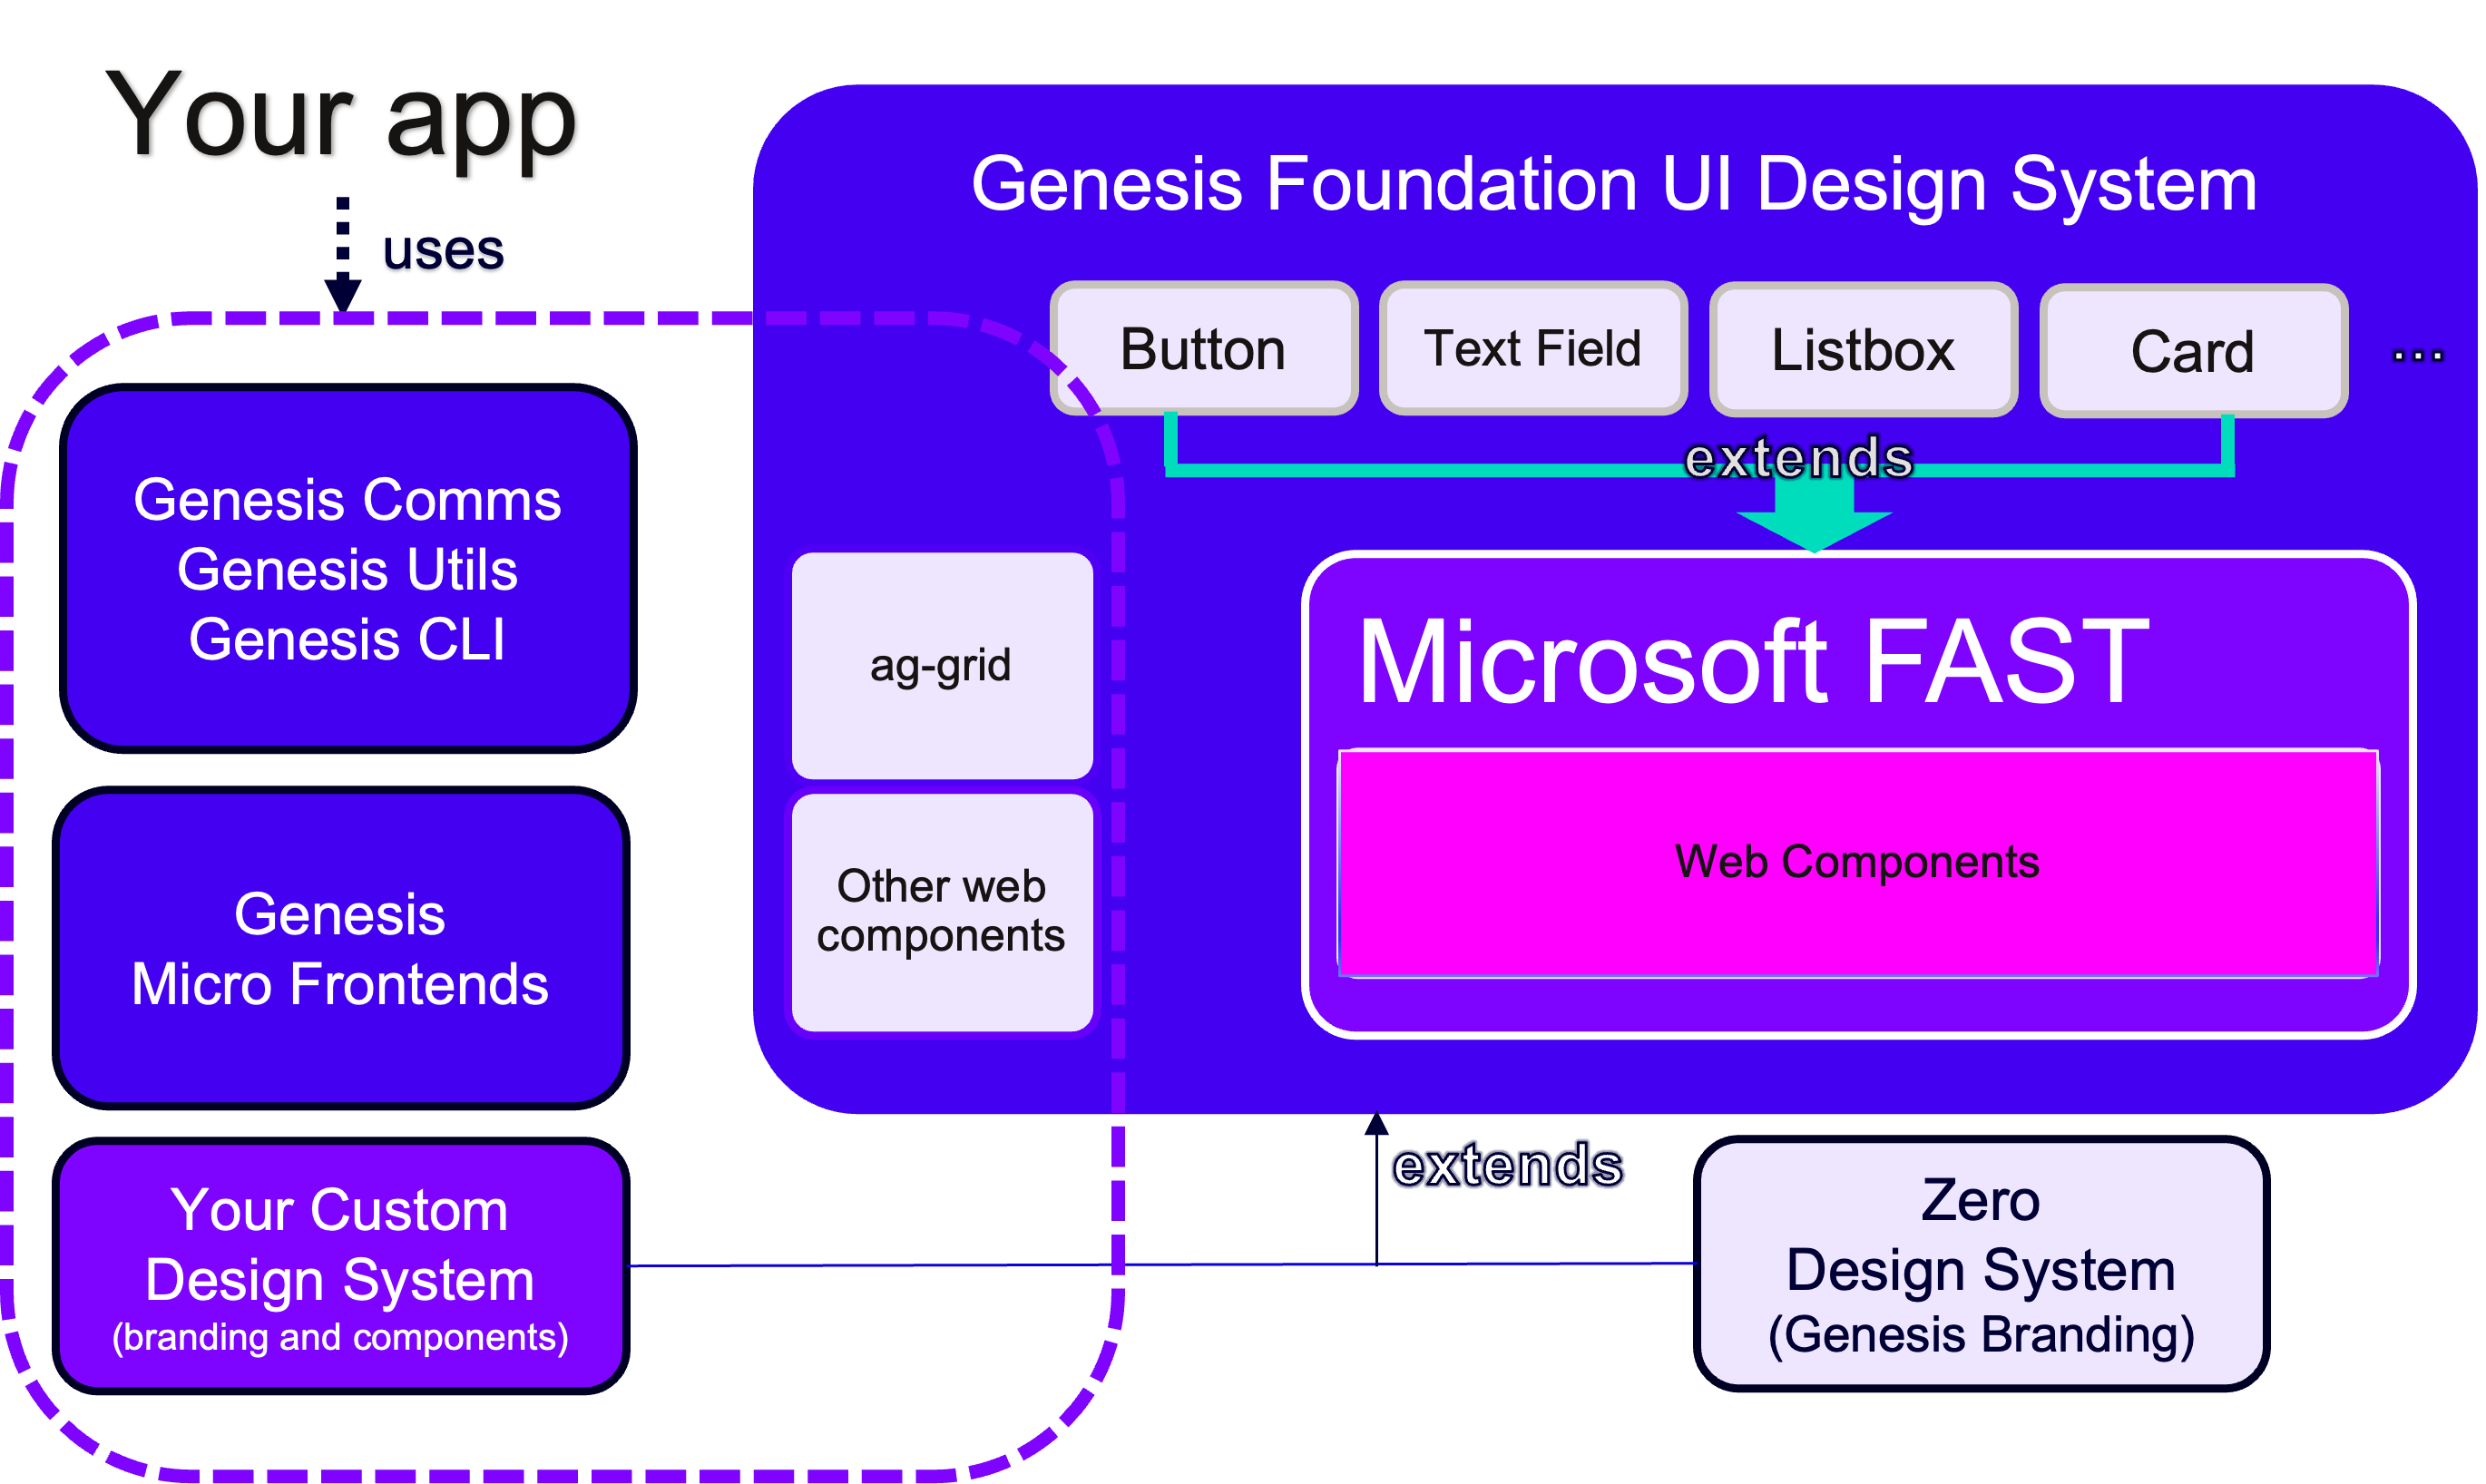
Genesis provides a modern future-proofed web stack on top of Microsoft FAST, which is a lightweight abstraction that enables you to easily build performant, memory-efficient, standards-compliant Web Components. You can find more about Microsoft FAST and fast-foundation at its main documentation website, which includes an API reference.
Web Components
Web Components are at the very heart of our strategy, based on native browsers and a standards-based component model.
Web Components are custom html elements that completely encapsulate their logic to create self-contained reusable components, which do not clash or interfere with the rest of application. They are future-proof and interoperable with traditional web frameworks such as Angular, React and Vue.
We currently offer around 40 Web Components such as Button and Text Field, which are ready to go. That number is growing (and we can work with you if you need to create bespoke web components for specific needs).
Frameworks like React, Angular, Vue and so on, have traditionally offered component models to developers. However, Web Components are literally the standard component model of the web, written into the html specification. Applications themselves can be fully encapsulated web components too; for example, YouTube is a Web Component, made up of many smaller Web Components.
Micro front-ends
On a higher level, the Genesis low-code platform also offers a number of re-usable micro front-ends for common functions, such as user management, entity management (CRUD), reporting and so on.
This architecture is a design approach in which a front-end app is decomposed into individual, semi-independent micro applications working loosely together. The micro-front-end concept is vaguely inspired by, and named after, microservices. Independent development teams can collaborate on a front-end app more easily using this approach, and can each have their own release cadence.
At Genesis, we use a number of technologies to enable this functionality, including Webpack 5 Module Federation.
Genesis packages
Our components are distributed as npm packages, such as:
@genesislcap/foundation-ui
When you generate a design system using the CLI, it automatically extends a base design system that we have provided. This highly configurable design system is called Genesis Foundation UI. It is made up of a set of Web Components and accompanying design tokens. The visual design can be impacted in myriad ways using the tokens, CSS, element templates and shadow DOM options to provide everything you need for your application.
@genesislcap/foundation-zero
Our design system variant is called Zero Design System. This provides the standard components, such as buttons and data grids (wrappers around Microsoft FAST components); these can be easily integrated with the back end using component attributes such as 'resourceName', which displays and updates data in real time from a Data Server resource.
@genesislcap/foundation-utils
These are useful components like loggers, formatters, environment related components etc to be used in your templates.
@genesislcap/foundation-comms
This is the core Foundation UI communication system with the server. It provides, among other things, connection components that you can use to connect to the server and do things like subscribing to data streams, commit events or request data.
There are many more packages, but that's what we need for now to develop our application.
Web UI design
Please look at the complete UI reference for more details about the Web UI. In this training, we're going to use the micro front-ends, which are the easiest way to start working with the UI.
Create a user interface
Now let's create a single page with a grid and a form for entering data.
Before you start, check if you have set a valid API_HOST in client/package.json.
The syntax for the API_HOST is:
- protocol (followed by a colon delimiter)
- secure websocketshost (followed by a colon delimiter)
- port
for example: ws://localhost:9064
For your user interface, the our training repo has the following files:
- home.template.ts
- home.ts
- home.styles.ts
We are going to update the files home.template.ts and home.ts, under the folder client/src/routes/home/, so the application will be able to display a single page and enable you to insert a new trade. As we are using micro front-ends, there is no need to change the file home.styles.ts; the styles will be inherited from the base components.
EntityManagement
We want to be able to insert a Trade grid with data into our project. For this, we will use the micro front-end called EntityManagement.
First, open the file home.ts to import the micro front-ends needed, as well as declaring EntityManagement after the imports.
import {customElement, FASTElement, observable} from '@microsoft/fast-element';
...
import {EntityManagement} from '@genesislcap/foundation-entity-management';

EntityManagement; //imported from '@genesislcap/foundation-entity-management' to display Trade grid

const name = 'home-route';
...
Now, still in the home.ts file, let's add two constants to define:
- the columns config (defaultColumnConfig)
- the fields available (COLUMNS).
We need to declare the columns and permissions in the Home class as well.
...
const name = 'home-route';

//describes the default config for the grid columns
const defaultColumnConfig = {
  enableCellChangeFlash: true,
  enableRowGroup: true,
  enablePivot: true,
  enableValue: true,
};

//grid columns that will be showed
const COLUMNS = [
  {
    ...defaultColumnConfig,
    field: 'TRADE_ID',
    headerName: 'Id',
  },
  {
    ...defaultColumnConfig,
    field: 'QUANTITY',
    headerName: 'Quantity',
  },
  {
    ...defaultColumnConfig,
    field: 'PRICE',
    headerName: 'Price',
  },
  {
    ...defaultColumnConfig,
    field: 'SYMBOL',
    headerName: 'Symbol',
  },
  {
    ...defaultColumnConfig,
    field: 'DIRECTION',
    headerName: 'Direction',
  },
];

@customElement({
  name,
  template,
  styles,
})
export class Home extends FASTElement {
  @observable columns: any = COLUMNS;

  constructor() {
    super();
  }
}
We can now insert the grid into our page. Open the file home.template.ts and insert the entity-management tag using the class attributes we just created.
import {html, } from '@microsoft/fast-element';
import type {Home} from './home';

export const HomeTemplate = html<Home>`
  <entity-management
      resourceName="ALL_TRADES"
      title = "Trades"
      entityLabel="Trades"
      createEvent = "EVENT_TRADE_INSERT"
      :columns=${(x) => x.columns}
  ></entity-management>
`;
At this point, the application is now able to display and insert data.
Running the application locally
Now you are ready to run the application you have created for the front end.
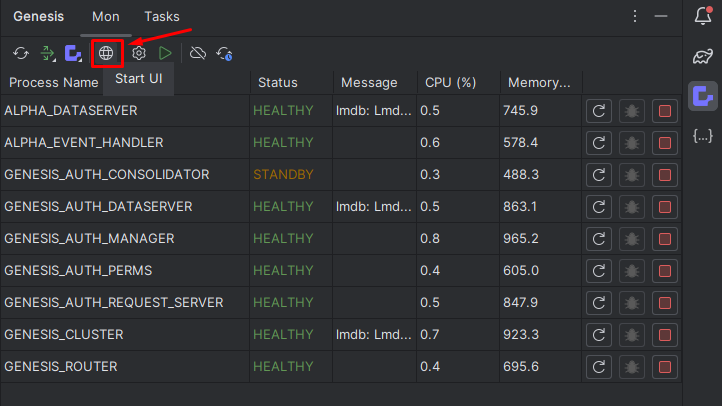
Using the Genesis IntelliJ plugin, click the Start UI button on the toolbar as shown below. This builds your front-end codebase and starts the webpack webserver in development mode.
Alternatively, you can start the UI manually from the workspace alpha/client folder by running the commands below.
npm run bootstrap
npm run dev
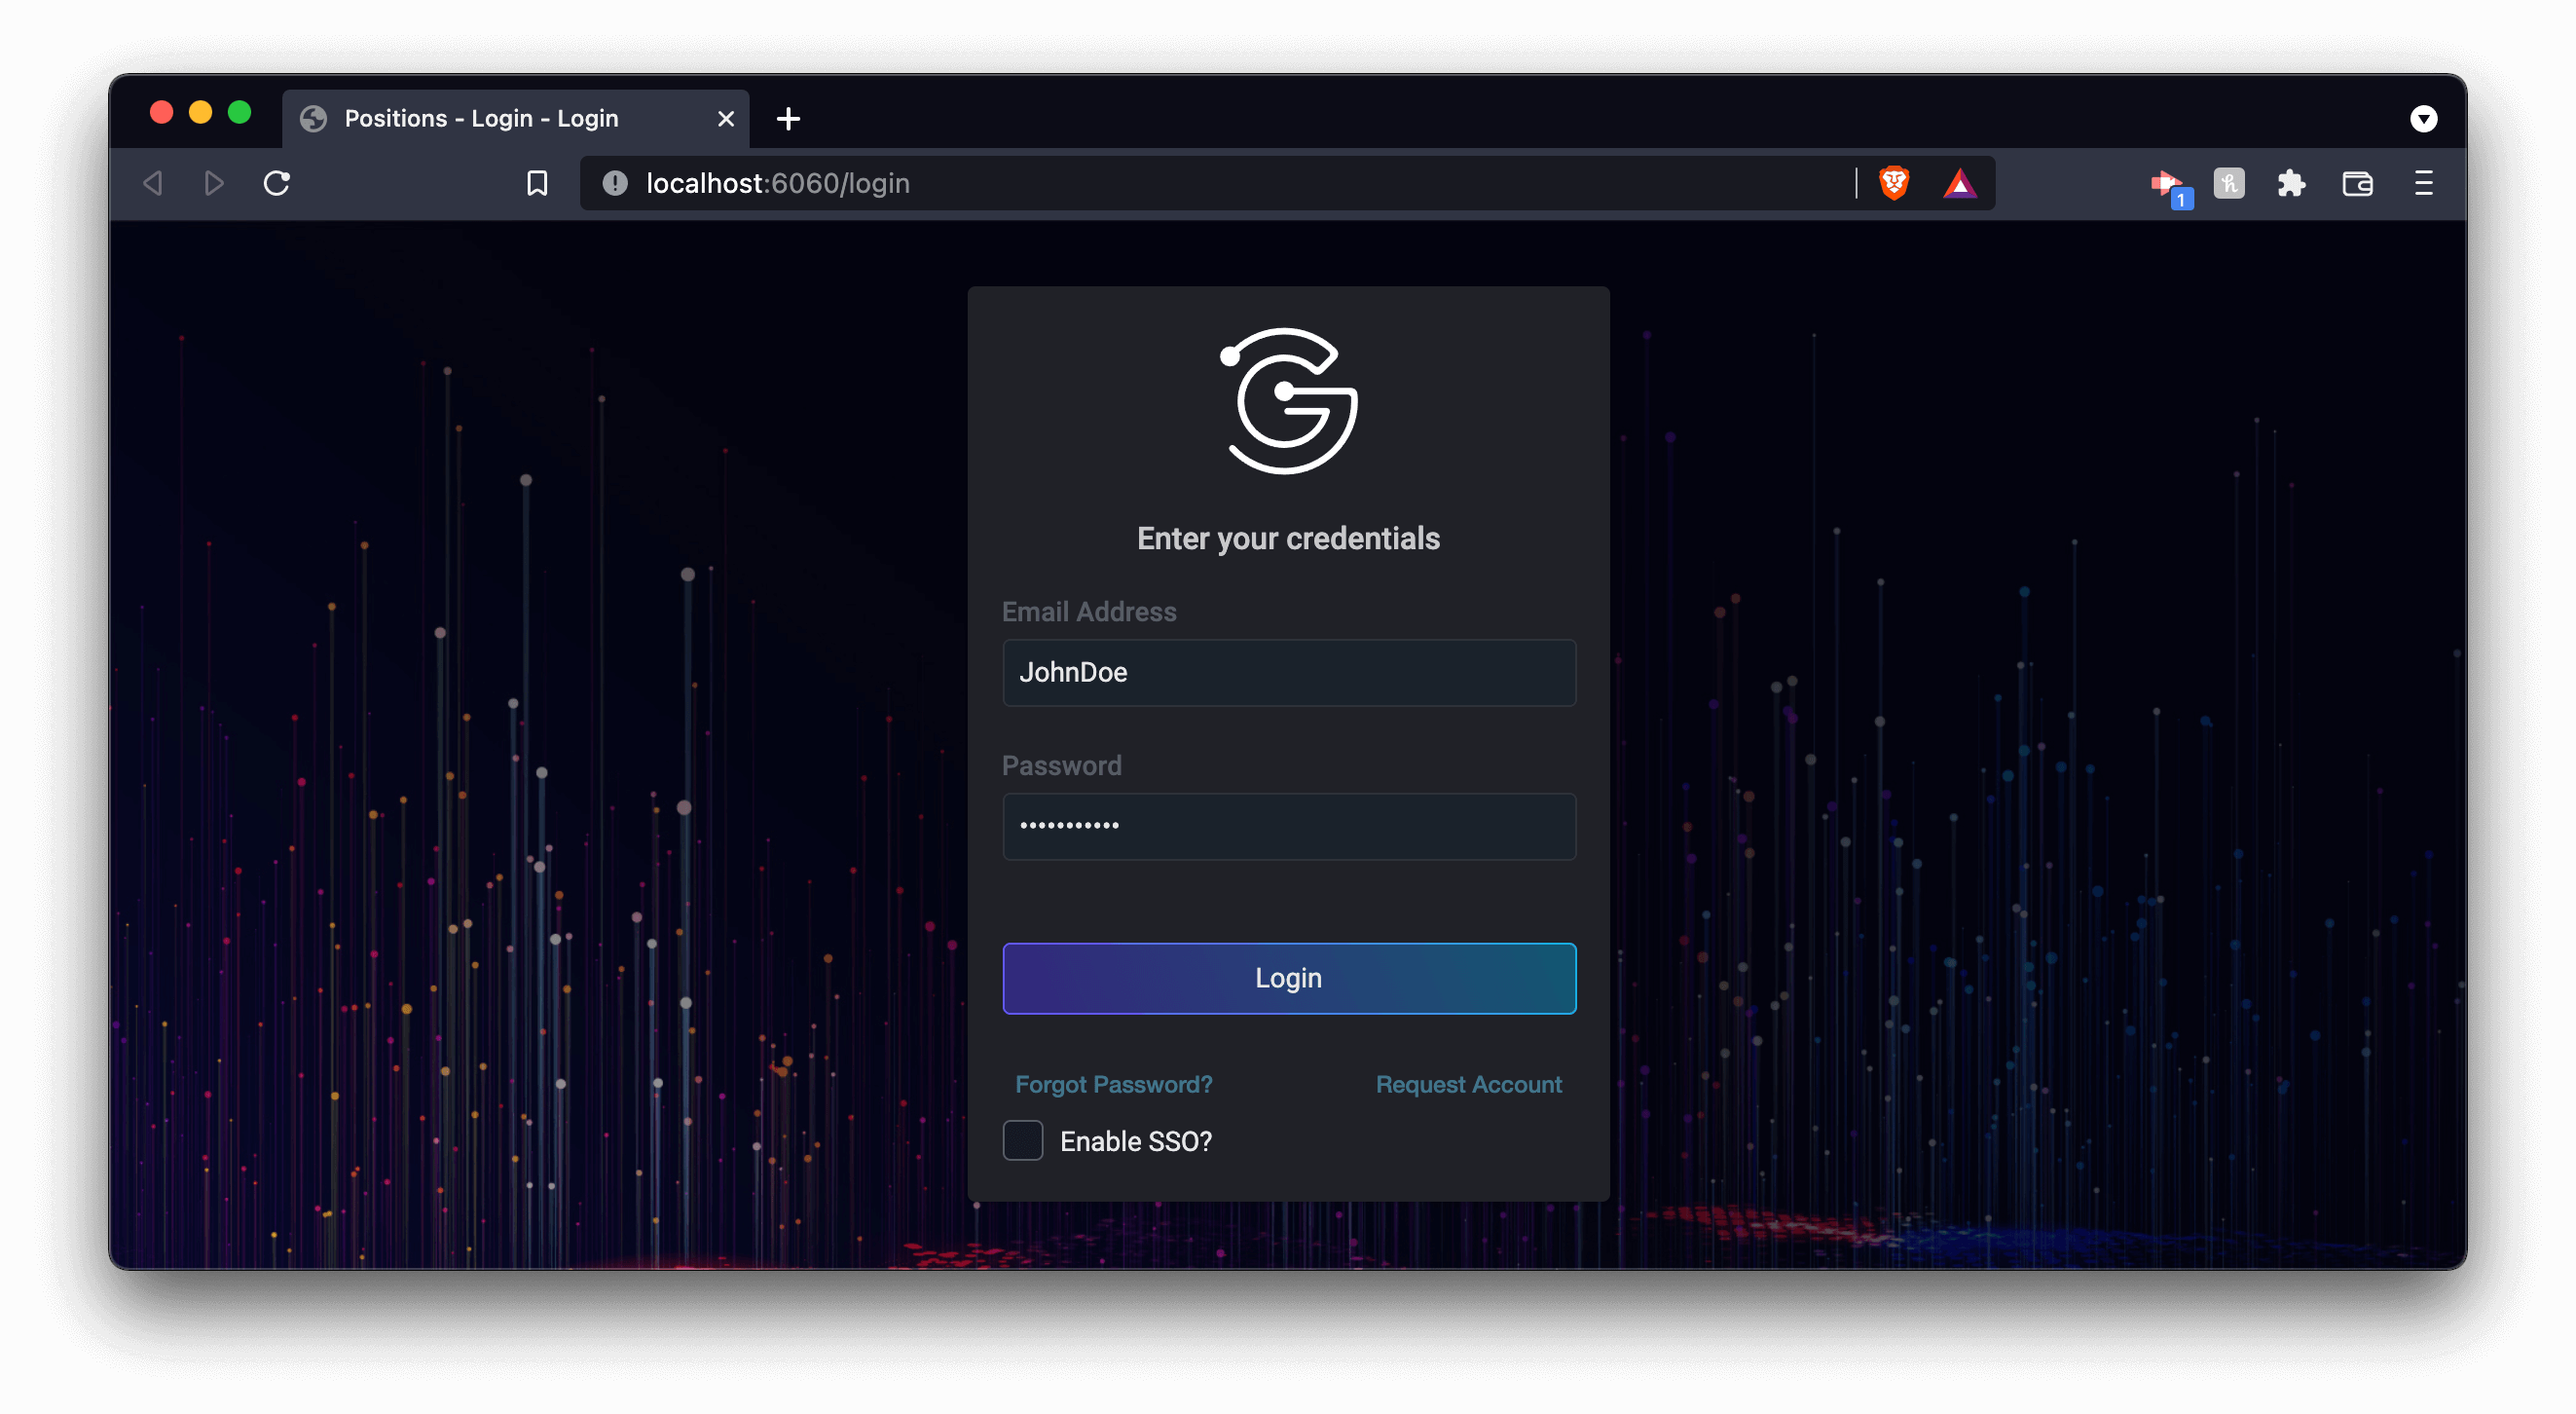
The application will open at http://localhost:6060/login.
If you try to run the application and there is already a process using the same port, check the process. If you are certain that it should not be running (for example, if it is the result of caching or old runs), you can run the command-line below as Administrator to search for the process and kill it.
netstat -ano | findstr :<yourPortNumber>
taskkill /PID <typeyourPIDhere> /F
CONGRATULATIONS
You have completed your first application with the Genesis Platform!
Now take some time to enjoy it, play with your application for a few minutes.
Exercise 2.1: inspecting the messages between the UI and the server
30 mins
The communication between the UI and the server happens through messages sent via a web socket connection, all managed by the Genesis low-code platform.
But did you know that you can inspect these messages using Chrome DevTools? That's very useful for debugging what's happening behind the scenes and capturing the data transferred for troubleshooting.
Now, using the Network tab, try to insert a trade and see if you can find the data being sent to the server:
- Log out of the application.
- Press F12 to open the Dev Tools, click on the
Networktab and selectWS(keep it open during this exercise). - Navigate to your app http://localhost:6060 and in the Dev Tools, click on the
localhostMessages tab. - Log in and try to insert a new trade.
- Try to find the message containing the new trade data.
Extending our initial application
We want to build a real-time positions application, where trades can be entered, and will be aggregated to maintain positions.
Exercise 2.2: extending the application
60 mins
Let's extend the data model and create a CRUD. You will:
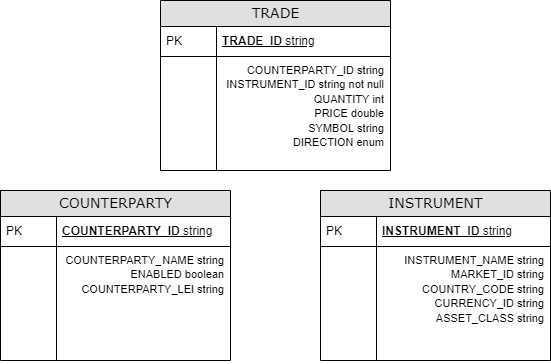
- add the tables Counterparty and Instrument as per the definition below.
- add the fields COUNTERPARTY_ID and INSTRUMENT_ID to the Trade table.
Use all the previous knowledge you've got.
As a reminder, these are the steps needed to complete this task:
- Remove all TRADE records using the DropTable server command. To do that, use the Tasks view on the Genesis plugin and run the DropTable script as explained here.
- Edit alpha-fields-dictionary.kts first, and don't forget to run the generateFields gradle task when you finish this. Remember that fields are defined separately from tables, so that they (including their meta-data) can be re-used across multiple tables and show linkage.
- Then edit alpha-tables-dictionary.kts to add the new tables and the fields that you created in the previous step. Don't forget to add COUNTERPARTY_ID and INSTRUMENT_ID in the TRADE table. When you finish, remember to run generateDao.
- Add queries to the Data Server. These must point to the new tables in the alpha-dataserver.kts file.
- Create INSERT, MODIFY and DELETE (CRUD) events for all entities, using Event Handlers. When you finish, remember to build and deploy.
eventHandler blockExample on how to add additional blocks in the eventHandler:
eventHandler {
    eventHandler<Trade>(name = "TRADE_INSERT") {
        onCommit { event ->
            entityDb.insert(event.details)
            ack()
        }
    }

    eventHandler<Trade>(name = "TRADE_MODIFY") {
        onCommit { event ->
            entityDb.modify(event.details)
            ack()
        }
    }

    eventHandler<Trade>(name = "TRADE_DELETE") {
      onCommit { event ->
          entityDb.delete(event.details)
          ack()
      }
    }
}
- Build and deploy. You can test by using Postman or Console (see more details in the next section) to insert:
- a new counterparty
- a new instrument
- a new trade
UI formatting new fields
We have just added new fields into our data model. To format them better, so you can insert and update data, we can define form UI schemas. Using EntityManagement, there are two properties called createFormUiSchema and updateFormUiSchema that can be declared. So, let's do it.
First, create a new file schemas.ts in the same folder as the home.ts file, and copy the content below.
const conditionalSchemaEntry = (predicate: boolean, entry) => {
  return predicate ? [entry] : [];
};

export const tradeFormSchema = (editing?: boolean) => ({
  type: 'VerticalLayout',
  elements: [
    ...conditionalSchemaEntry(editing, {
      type: 'Control',
      label: 'ID',
      scope: '#/properties/TRADE_ID',
      options: {
        readonly: true,
      },
    }),
	{
		"type": "Control",
		"label": "Counterparty",
		"scope": "#/properties/COUNTERPARTY_ID",
        "options": {
            allOptionsResourceName: "ALL_COUNTERPARTIES",
            valueField: "COUNTERPARTY_ID",
            labelField: "COUNTERPARTY_NAME",
            data: null,
        },
	},
	{
		"type": "Control",
		"label": "Direction",
		"scope": "#/properties/DIRECTION"
	},
	{
		"type": "Control",
		"label": "Instrument",
		"scope": "#/properties/INSTRUMENT_ID",
        "options": {
            allOptionsResourceName: "ALL_INSTRUMENTS",
            valueField: "INSTRUMENT_ID",
            labelField: "INSTRUMENT_NAME",
            data: null,
        },
	},
	{
		"type": "Control",
		"label": "Price",
		"scope": "#/properties/PRICE"
	},
	{
		"type": "Control",
		"label": "Quantity",
		"scope": "#/properties/QUANTITY"
	},
	{
		"type": "Control",
		"label": "Symbol",
		"scope": "#/properties/SYMBOL"
	}
  ],
});

export const tradeFormCreateSchema = tradeFormSchema(false);
export const tradeFormUpdateSchema = tradeFormSchema(true);
Note that the tradeFormSchema variable, declared above, pretty much describes the JSON schema for the endpoints defined including the fields and definitions. It is also possible to add filling using Request Server or Data Server queries (like Instrument and Counterparty ones), and further validation by way of annotation or custom validations on data classes.
Go back to the home.template.ts file to import the variables schema and add the properties createFormUiSchema updateFormUiSchema.
import {html, repeat, when, ref} from '@microsoft/fast-element';
import type {Home} from './home';
import { tradeFormCreateSchema, tradeFormUpdateSchema } from './schemas';
...
export const HomeTemplate = html<Home>`
  <entity-management
    resourceName="ALL_TRADES"
    title = "Trades"
    entityLabel="Trades"
    createEvent = "EVENT_TRADE_INSERT"
    updateEvent = "EVENT_TRADE_MODIFY"
    deleteEvent = "EVENT_TRADE_DELETE"
    :columns=${(x) => x.columns}
    :createFormUiSchema=${() => tradeFormCreateSchema}
    :updateFormUiSchema=${() => tradeFormUpdateSchema}
  ></entity-management>
`;
Take some time again to play with your application for a few minutes inserting new Trades. You will see that there is a better look and feel to selecting and seeing data.
API testing with auto-generated REST endpoints
As an alternative to Genesis Console, take this opportunity to test your work with an HTTP client such as Postman or Insomnia.
When we test our resources using an HTTP client as described here, we're taking advantage of the REST endpoints provided by the platform. Without any additional code from you, it automatically exposes all configured resources, such as Data Server queries and Event Handlers, as HTTP endpoints via the GENESIS_ROUTER service. This enables you to do some API testing automation for all your back-end components.
Logging in
Whichever client you are using, you need to log in before you can send test requests to the server. This involves two things:
- providing a SOURCE_REF - this can be any string that identifies all your activity while you are logged in
- retrieving a SESSION_AUTH_TOKEN, which you can copy and use to authorise all your test requests
For example, to log in using Postman:
- Create a new query in Postman.
- In front of the URL, set the call to POST.
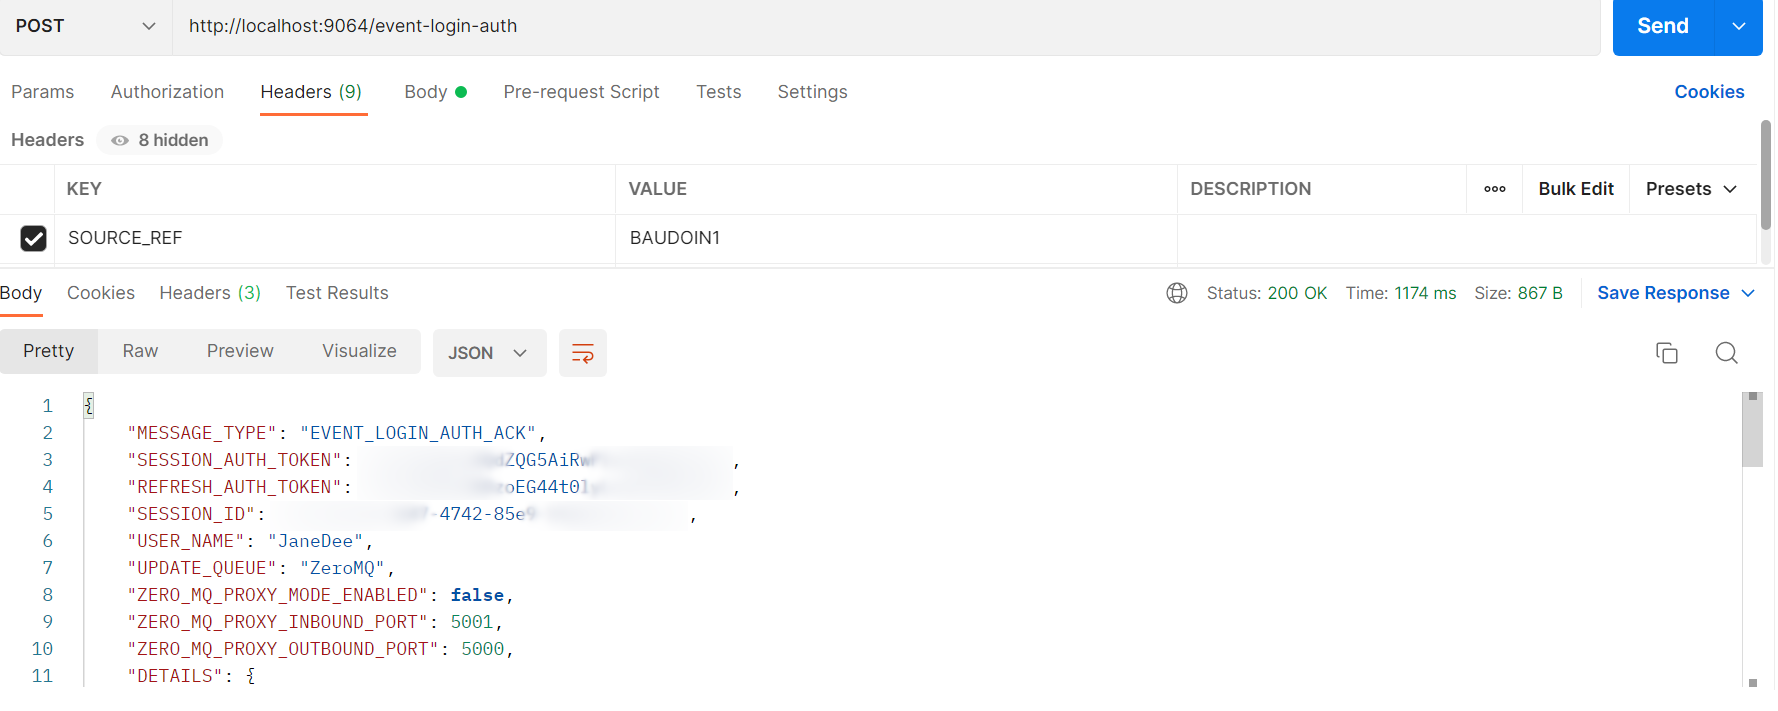
- For the URL, you need to supply your server instance, then :9064 (which sends you to the application's Router), and then event-login-auth. For example: http://localhost:9064/event-login-auth.
- Set the Body to JSON and insert the message below (substituting your correct user name and password) in the main body.
{
    "MESSAGE_TYPE": "EVENT_LOGIN_AUTH",
    "SERVICE_NAME": "AUTH_MANAGER",
    "DETAILS": {
        "USER_NAME": "JaneDee",
        "PASSWORD": "beONneON*74"
    }
}
-
Click to view the header, then insert SOURCE_REF in the header. For this field, you can use any string that identifies you (in effect). In the example below, we have set SOURCE_REF to BAUDOIN1 (for no particular reason).    
-
When you have done this, click on the Send button.
This returns a set of details at the bottom of the Postman window, where you can copy the SESSION_AUTH_TOKEN; you will need this for your test requests.
Once you have the SESSION_AUTH_TOKEN, keep a copy that you can paste into each request as you make your test call.
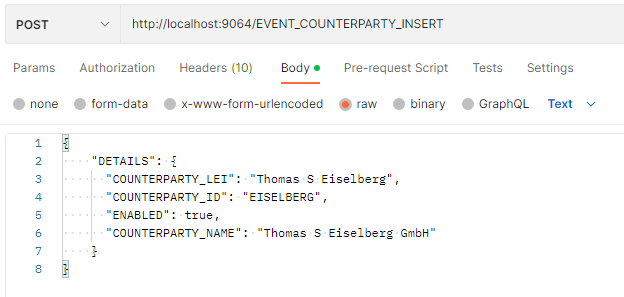
In the example below, we are using Postman as the client API. We are going to test the EVENT_COUNTERPARTY_INSERT Event Handler by adding a new counterparty.
url and Body
In front of the url, set the call to POST.
The url consists of:
- the address or hostname of the server
- if necessary, some extra routing
- the name of the event handler
http://localhost:9064/EVENT_COUNTERPARTY_INSERT
Set the body to JSON. In the body, you need to insert the details of the fields for the new counterparty, as shown below:
{
    "DETAILS": {
      "COUNTERPARTY_LEI": "Thomas S Eiselberg",
      "COUNTERPARTY_ID": "EISELBERG",
      "ENABLED": true,
      "COUNTERPARTY_NAME": "Thomas S Eiselberg GmbH"
    }
}
Header
In the header, you need to supply:
- a SOURCE_REF (always), which identifies you; you can use any string value that suits you
- the SESSION_AUTH_TOKEN that permissions you to access the server
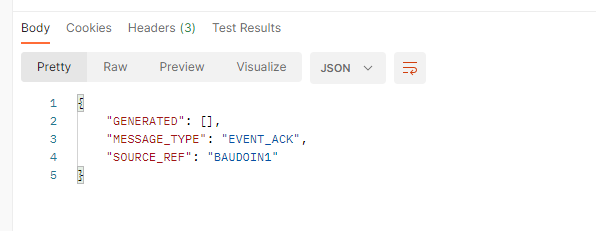
When you have all these elements in place, click on Send to make the call. If the event is a success, you will receive an ACK message.
Checking the insertion
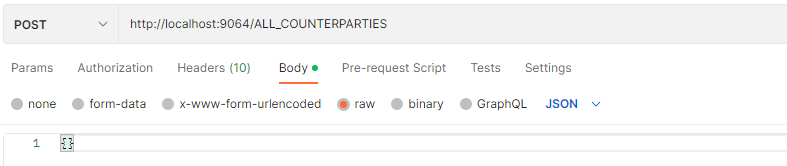
Now you can check that the new counterparty you inserted is in the correct table of the database. The resource you need to check is the Request Server called ALL_COUNTERPARTIES.
In front of the url, set the call to POST.
The url consists of:
- the address or hostname of the server
- if necessary, some extra routing
- the name of the request server
Set the body to JSON. There is no need for any information in the body. Simply insert a pair of curly brackets .
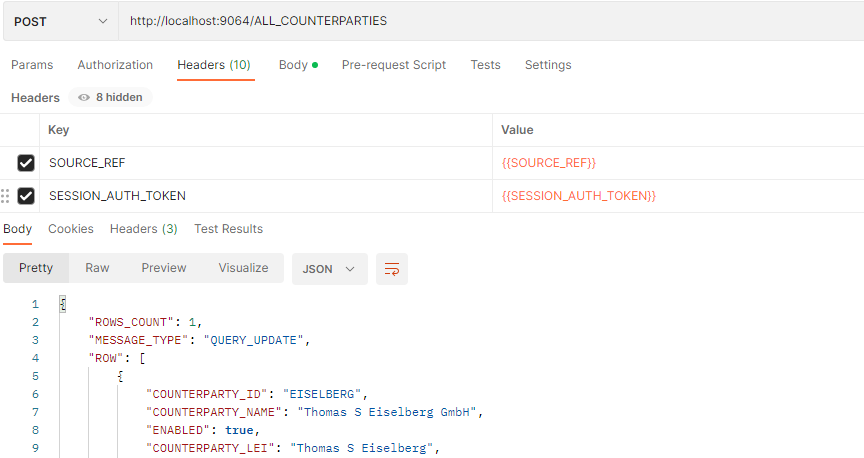
In the header, you need to supply:
- a SOURCE_REF (always), which identifies you; you can use any string value that suits you
- the SESSION_AUTH_TOKEN that permissions you to access the server
When you have this in place, click on Send to make the call. You can see that the fields for the instruments have been returned on the right of the screen.
Exercise 2.3: testing with Postman
30 mins
Create requests on POSTMAN for all the events created so far.
To help trainees with postman, we have created a public environment. Remember to send the login request first. This automatically populates all environment variables, so you can use the other requests.
This is the end of the day 2 of our training. To help your training journey, check out how your application should look at the end of day 2 here.