Day five
Day four recap
This day covers:
Schedulers
You can use the Evaluator to schedule the production of EOD reports (for example), or to send warnings when a defined limit is breached.
In system terms, Evaluators enable you to connect Event Handlers to two different kinds of event: dynamic and static (cron rules):
- Cron Rules are scheduling rules; these are defined as quartz cron expressions.
- Dynamic Rules, also known as Dynamic Events, are defined as groovy expression, which respond to changes to database table entries.
In both cases, you define the rule in a table in the database: CRON_RULES for static rules and DYNAMIC_RULES for dynamic rules. In this training, we're going to use Cron Rules, but if you're interested in the Dynamic Rules please look at Defining a dynamic rule.
Cron rules (static events)
Let's create a cron rule that triggers a batch job to run once every minute.
The batch job will generate a position report as a csv for each counterparty. This will be stored in runtime/position-minute-report. The file name of each report written will have the form COUNTERPARTY_ID-DATE.csv.
The rule
Our cron rule takes the following form:
| CRON_EXPRESSION | DESCRIPTION | TIME_ZONE | RULE_STATUS | NAME | USER_NAME | PROCESS_NAME | MESSAGE_TYPE | RESULT_EXPRESSION |
|---|---|---|---|---|---|---|---|---|
| 0 45 7 ? * MON,TUE,WED,THU,FRI * | It’s a rule | Europe/London | ENABLED | A rule | JaneDee | ALPHA_EVENTHANDLER | EVENT_POSITION_REPORT |
Let's look at the most important fields:
- RULE_STATUS can be ENABLED or DISABLED.
- CRON_EXPRESSION determines when the rule is evaluated.
- PROCESS_NAME is the target process for the rule. When the rule is triggered, it will send a message to the process specified here.
- MESSAGE_TYPE is the message that needs to be sent to the specified PROCESS_NAME.
- RESULT_EXPRESSION is the value or values that will be sent as part of the transaction to the target PROCESS_NAME; we can leave RESULT_EXPRESSION empty, as we are going to generate a report for all positions anyway.
1. Configure the Evaluator
An Evaluator is a process that runs cron jobs. To start, create a process called ALPHA_EVALUATOR and add it to the file alpha-processes.xml inside your project folder server/jvm/alpha-config/src/main/resources/cfg as the code below.
<processes>
    ...
    <process name="ALPHA_EVALUATOR">
        <start>true</start>
        <groupId>ALPHA</groupId>
        <options>-Xmx512m -DXSD_VALIDATE=false</options>
        <module>genesis-evaluator</module>
        <primaryOnly>true</primaryOnly>
        <package>global.genesis.eventhandler,global.genesis.evaluator</package>
        <description>Dynamic/time rules engine</description>
        <loggingLevel>DEBUG,DATADUMP_ON</loggingLevel>
    </process>
</processes>
Add the ALPHA_EVALUATOR in the file alpha-service-definitions.xml inside your project folder server/alpha-app/src/main/genesis/cfg/ with the code below.
<configuration>
    ...
    <service host="localhost" name="ALPHA_EVALUATOR" port="11003"/>
</configuration>
Run build and deploy to verify that the new process works as expected.
Double-check your Resource daemon using the Genesis IntelliJ plugin. You should be able to see the ALPHA_EVALUATOR process is present, but on Standby.
This is because the Evaluator process is set to run only on the primary node. Our application only has one node, but we still have to identify it as the Primary node.
Run SetPrimary script as explained here and you should be able to see all processes running.
2. Create a new class
When the evaluator is running, create a PositionReport kotlin class to trigger the new event. This class should be created inside your project folder server/alpha-app/src/main/kotlin/genesis/global/message/event/ as the code below.
package genesis.global.message.event

class PositionReport {}
3. Create an event handler
Create an event handler that will write the csv files to the runtime/position-minute-report folder. Call it EVENT_POSITION_REPORT.
Open the file alpha-eventhandler.kts and add an event handler to generate the csv file:
import genesis.global.message.event.TradeAllocated
import genesis.global.message.event.TradeCancelled
import global.genesis.TradeStateMachine
import global.genesis.gen.dao.Trade
import genesis.global.message.event.PositionReport
import global.genesis.jackson.core.GenesisJacksonMapper
import java.io.File
import java.time.LocalDate
import global.genesis.commons.standards.GenesisPaths

eventHandler {
 //... other event handlers removed for clarity

    eventHandler<PositionReport> (name="POSITION_REPORT"){
        onCommit {
            val mapper = GenesisJacksonMapper.csvWriter<TradeView>()
            val today = LocalDate.now().toString()
            val positionReportFolder = File(GenesisPaths.runtime()).resolve("position-minute-report")
            if (!positionReportFolder.exists()) positionReportFolder.mkdirs()

            entityDb.getBulk(TRADE_VIEW)
                .toList()
                .groupBy { it.counterpartyName }
                .forEach { (counterParty, trades) ->
                    val file = positionReportFolder.resolve("${counterParty}_$today.csv")
                    if (file.exists()) file.delete()
                    mapper.writeValues(file).use { it.writeAll(trades) }
                }

            ack()
        }
    }
}
4.Load the cron rule on to the database
Load the cron rule csv below into the database, CRON_RULE Table.
Create a new file in the same folder as USER.csv and name it as CRON_RULE.csv. Copy the content below into the file that you just created.
CRON_EXPRESSION,DESCRIPTION,TIME_ZONE,RULE_STATUS,NAME,USER_NAME,PROCESS_NAME,MESSAGE_TYPE
"*/30 * * ? * *","It’s a rule","Europe/London","ENABLED","A rule","JaneDee","ALPHA_EVENT_HANDLER","EVENT_POSITION_REPORT"
Then import the local csv using the Genesis plugin as we saw here.
Exercise 5.1: using the Evaluator
10 mins
Now we want to run PositionReport every 10 seconds. To do that, remove the row you just inserted in CRON_RULE table, and insert a new rule changing the CRON_EXPRESSION value.
Permissions
At this stage, the app has a Consolidator to calculate the positions, Event Handlers to control changes to the database and Data Servers to distribute the data to the front end.
For this part of the tutorial, you want to permission users so that each one has access to the correct parts of the system.
Authorisation
Authorisation is achieved by permissioning dynamically. This means you can control access to information in increasingly precise ways, for example:
- The whole entity
- Specific rows
- Specific columns
Effectively, you have two levels of control:
High-level
You could hide an entire grid from the UI, for example. So, one group of users could view reference data, but other groups would not see this. Or, you could hide an entire data server. To achieve this, you use RIGHT_CODE. This is like a switch – you can either see it or not, depending on whether the code is TRUE or FALSE.
Entity-level
This is row- or column-level access to information. Different users can all view the same grid, but each one sees different data. This is best explained with these simple examples:
- You can have user A, user B and user C all having the RIGHT_CODE to view a specific grid, but each one sees different trades in that grid. This enables you to separate different trading desks, for example.
- Each user might only have access to trades for specific customers.
By including these permissions in an Event Handler, user A can only enter a trade on behalf of a specific set of clients, and user B can only enter trades on behalf of a different set of clients.
Similarly, you can have different users seeing different columns in the same grid. This could be used for a support function, for example. You can prevent the support team from seeing specific columns of sensitive data, such as who the client for a trade is. This can be specified by using GPAL.
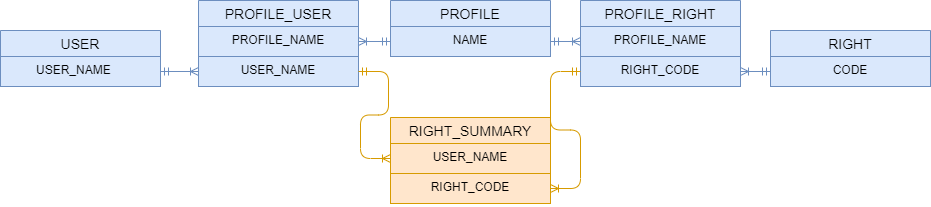
Users, profiles and right codes
Genesis has the concept of users, profiles and right codes. For each one, there is a table to store the related entity data:
- USER
- PROFILE
- RIGHT
Users gain rights via profiles. So we have tables to determine which users and rights belong to each given profile. Note that you cannot allocate right codes directly to a specific user. However, a user can have multiple profiles.
A profile can have zero or more rights and zero or more users.
These relationships are held in the following tables:
- PROFILE_RIGHT
- PROFILE_USER
Related to these tables, we have the RIGHT_SUMMARY table, which contains the superset of rights any given user has. These are based on the profiles assigned to them. This is the key table used when checking rights, and it exists to allow the efficient checking of a user's rights.
The RIGHT_SUMMARY table entries are automatically maintained by the system in real time. In this way, the rights are easily accessible at speed. The GENESIS_AUTH_MANAGER process manages this table's entries automatically. So if you add a new user or you update a profile with new rights, the RIGHT_SUMMARY table is updated immediately and all the users in that profile receive the new right automatically.
This table is only maintained automatically when profile user/right entries are maintained via GENESIS_AUTH_MANAGER business events. If you update the data in the tables PROFILE_USER or PROFILE_RIGHT via other means (e.g. DbMon or SendIt) then the RIGHT_SUMMARY table will not be maintained automatically.
In such situations (e.g. setting up a brand new environment and bulk loading data into the tables) then the ~/run/auth/scripts/ConsolidateRights.sh script must be run. This scans all entries in PROFILE_USER and PROFILE_RIGHT and populates RIGHT_SUMMARY with the correct data.
Further information as well as a sample system set-up can be found here
The objective
The objective is to use dynamic permissions and permission codes so that specific users have access to specific parts of the application – both functions and data.
Set up generic permissions
First, you are going to make the COUNTERPARTY table and COUNTERPARTY_ID field part of the generic permissions system.
Starting with the server, set up the USER and USER_ATTRIBUTES records for the system user JaneDee.
Set two new key values in server/alpha-app/src/main/genesis/cfg/alpha-system-definition.kts file in systemDefinition-global block This enables the COUNTERPARTY table and COUNTERPARTY_ID field to become part of the generic permissions system:
...
systemDefinition {
    global {
        ...
        item(name = "ADMIN_PERMISSION_ENTITY_TABLE", value = "COUNTERPARTY")
        item(name = "ADMIN_PERMISSION_ENTITY_FIELD", value = "COUNTERPARTY_ID")
    }
    ...
}
Run build and deploy to apply these changes.
How to configure dynamic permissions
You can configure dynamic permissions for trades in our IDE. You need to make these changes to the code for the Request Server, Data Server and Event Handler. For example, here we add permissioning to a query in the data server file - alpha-dataserver.kts:
dataServer {
    query("ALL_TRADES", TRADE_VIEW) {
        permissioning {
            auth(mapName = "ENTITY_VISIBILITY") {
                TRADE_VIEW.COUNTERPARTY_ID
            }
        }
    }
}
You can add similar code to the queries in your Request Server - alpha-reqrep.kts.
requestReplies {
    requestReply("TRADE", TRADE_VIEW) {
        permissioning {
            auth(mapName = "ENTITY_VISIBILITY") {
                TRADE_VIEW.COUNTERPARTY_ID
            }
        }
    }
}
Event Handlers are slightly different, because the input data class can be customised. The code would look like this (taking the TRADE_INSERT eventHandler codeblock as an example):
  eventHandler<Trade>(name = "TRADE_INSERT") {
    permissions {
      auth(mapName = "ENTITY_VISIBILITY") {
        field { counterpartyId }
      }
    }
    onValidate { event ->
      val message = event.details
      verify {
        entityDb hasEntry Counterparty.ById(message.counterpartyId)
        entityDb hasEntry Instrument.ById(message.instrumentId)
      }
      ack()
    }
    onCommit { event ->
      val trade = event.details
      stateMachine.insert(trade)
      ack()
    }
  }
Permissioning and permissionCodes
As with other GPAL files (e.g. Request Server and Data Server), you can use a permissioning block to define both dynamic permissions (AUTH) and fixed permissions (based on RIGHT_SUMMARY rights) if the event message type is a generated database entity. See the example below:
    eventHandler<Company>(name = "AUTH_COMPANY_INSERT") {
        permissioning {
            auth(mapName = "COMPANY"){
                COMPANY.COMPANY_NAME
            }
        }

        onCommit { event ->
            val company = event.details
            val result = entityDb.insert(company)
            ack(listOf(mapOf("VALUE" to result.record.companyId)))
        }
    }
If your message type is not a database-generated entity, you can still define fixed permissionCodes outside the permissioning block:
    eventHandler<Company>(name = "AUTH_COMPANY_INSERT") {
        permissionCodes = listOf("INSERT_TRADE")
        onCommit { event ->
            val company = event.details
            val result = entityDb.insert(company)
            ack(listOf(mapOf("VALUE" to result.record.companyId)))
        }
    }
See here for more details on authorisation.
Exercise 5.2: using permissions
30 mins
Set up a permission code for Trade inserting. The permission code should be called TRADE_INSERT and be part of the alpha-eventhandler.kts file accordingly.
Using the command SendIt, make the following three configurations below.
- Add the permission to the user JaneDee to use the table USER_ATTRIBUTES.
USER_NAME,USER_TYPE,ACCESS_TYPE,COUNTERPARTY_ID
JaneDee,USER,ENTITY,1
- Add the association between User and Counterparty to the table USER_COUNTERPARTY_MAP.
USER_NAME,COUNTERPARTY_ID
JaneDee,2
- Add the authorization code to the table RIGHT_SUMMARY.
USER_NAME,RIGHT_CODE
JaneDee,INSERT_TRADE
That is it! You can now insert some trades and see the permissions happening in the application.
Remember to change the alpha-eventhandler.kts file, as well as inserting the record via SendIt command in the configuration table RIGHT_SUMMARY too.
After the configurations, you should run build and deploy again to deploy the new version.
The application is complete!
Congratulations! You have finished the Positions & Trades app! Check out the final application example here.
Operating the Genesis low-code platform
Now that our application code is complete, let's take a look at the operations side of the platform on the server.
Basic file structure
~/server/alpha-app/build/genesis-home/
├── auth
│        ├── bin
│        ├── cfg
│        ├── data
│        ├── lib
│        └── scripts
├── alpha
│        ├── cfg
│        └── scripts
├── genesis
│        ├── bin
│        ├── cfg
│        ├── lib
│        ├── scripts
│        └── util
├── generated
│        ├── cfg
│        ├── classes
│        ├── genesis-generated-[...]
│        └── sources
├── runtime
│        ├── [...]
│        ├── logs
└── site-specific
    ├── bin
    ├── cfg
    ├── lib
    ├── data
    └── scripts
Understanding the file structure:
- genesis-home is the runtime folder of your local application. This stores all generated files required for your local application to run.
- auth, alpha, genesis are application modules, and they contain the same structure, with sub-folders like bin, cfg, lib and scripts. If you add a new module, market_data for example, this would be another folder under run with the same structure as the other modules. You can deploy a new module by unzipping the module's distribution zip file into the run folder and running
genesisInstall. - generated contains files processed and installed by the platform. Do not change its content manually (use the
genesisInstallcommand instead). - runtime contains important files used by the platform at run time. Do not change its content manually, but use commands like
ClearCodegenCache(if you run into problems updating the data model) to manage some of its content. Thelogsfolder contains all the logs, including logs from your modules (such asalpha) and from the platform itself. - site-specific is very useful when you want to override files from standard modules, such as
genesisandauth.
Key server commands
So far, we've used commands such as mon, DbMon, SendIt and LogLevel. There are quite a few more important commands to help you operate the Genesis Platform:
Practising the commands
Let's do a manual deployment of the tables dictionary as an example of how to run the server commands.
From the terminal, go to the folder /server/alpha-app/build/genesis-home/alpha/cfg/, edit the file alpha-tables-dictionary.kts and add any existing fields to table INSTRUMENT_PRICE.
Now, go to the generated folder; run 'cd $GC` (an alias to the generated folder). Compare the content between the file you edited previously and the one you see in the generated folder. The one in $GC does not contain your change.
Next, run genesisInstall and then compare again the files - you'll notice now they are identical, because genesisInstall processed and installed the changes into the generated folder. Without running genesisInstall, it would use an older version of the file.
Since this is a table change, we need to install the changes in the database. So, let's stop the server, back up the table data and run remap:
cd /tmp
killServer --all
DumpIt -t INSTRUMENT_PRICE
remap --commit
DbMon
 >table INSTRUMENT_PRICE
 >show
 >exit
startServer
When deploying files manually like this, remember to push the change to version control as well, otherwise the next deployment will override the changes. Ideally, you'd change the file first in your IDE and then copy it to the server and run the commands.
An exhaustive list of commands can be found here.
How to get help
Remember that the Search function in the documentation is your friend.
You can also ask questions by visiting our Stack Overflow.
Stay tuned!