Entity Management
The entity-management micro front-end gives you a grid and a form that you can add to your pages and configure.
- The grid takes its data from a specified resource in the back end - a Data Server
queryor a Request ServerrequestReply. - You can then add Create and Edit events to the definition; each event automatically generates a form from the metadata of the back-end resource; it also adds buttons to the grid automatically so that the user can click to access the forms. You can also add a Delete event to the definition, which automatically displays a Delete button, which the user can click on to delete the relevant record.
The event buttons are accessed conditionally. For example, if the current user is only able to edit the entities, then you should only set the edit event on the entity-manager - you need to set the events so that they are conditional on user authorisations.
Set-up
- Add
@genesislcap/foundation-entity-managementas a dependency in your package.json file. Whenever you change the dependencies of your project, run the$ npm run bootstrapcommand again.
{
  ...
  "dependencies": {
    "@genesislcap/foundation-entity-management": "latest"
  },
  ...
}
- Import and declare the class in the page of the class where you wish to use the Entity Manager.
// Import
import { EntityManagement, } from '@genesislcap/foundation-entity-management';

// Declare class
EntityManagement;
Now you are ready to implement entity-management in the relevant template html.
Implementing
Here is a simple example of entity-management, which can be inserted into a page.
    <entity-management
          resourceName="ALL_INSTRUMENTS"
          title = "Instruments"
          createEvent = "EVENT_INSTRUMENT_INSERT"
      ></entity-management>
`;
In this example, we have used three attributes when declaring the entity-management micro front-end:
resourceName="ALL_INSTRUMENTS"defines the source of the data for the grid: a Data Server query called ALL INSTRUMENTS.title = "Instruments"displays this text as the title of the grid.createEvent = "EVENT_TRADE_INSERT"generates a form with all the fields from the metadata of the event and adds a button at the top of the grid so that the user can access this form.
As long as your back end has the correct resources, you can now see the grid in the Home page if you run the application locally.

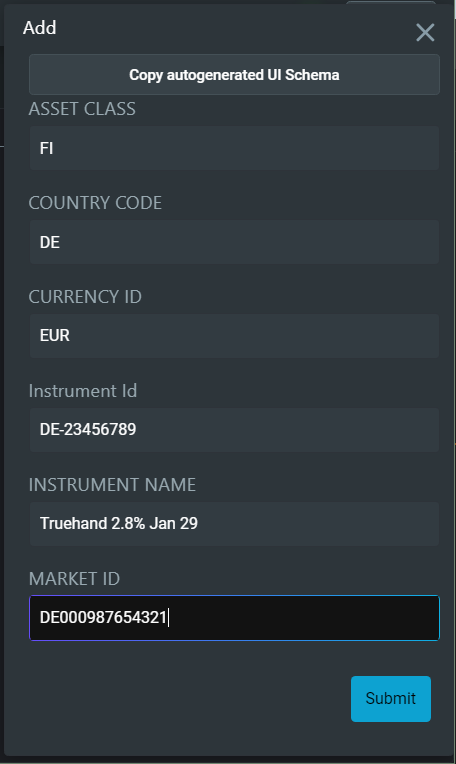
And you can click on the Add button to view the form.
Common attributes
The most common attributes you can configure for entity-management are listed below. Note that it is not mandatory to specify an event, but if you don't specify a createEvent or an updateEvent, then you won't have a form created - which defeats the point of using this micro front-end. It would be simpler to use a grid-pro or data grid.
| Attribute | Description | Mandatory |
|---|---|---|
title | customises the title of the entity list so that the user can see what resource they are managing. | Yes |
resourceName | specifies the name of a resource on the server: a query in the Data Server, a ReqRep in the Request Server or an eventHandler in the Event Handler. | Yes |
createEvent | specifies an event on the back end for adding a record to the table; once specified, this displays an Add button above the grid. | No |
updateEvent | specifies an event on the back end for modifying a record in the table; once specified, this displays an Edit button to the right of every record in the grid. | No |
deleteEvent | specifies an event on the back end for deleting a record in the table; once specified, this displays a Delete button to the right of every record in the grid. | No |
datasourceConfig | configures the interaction with the back-end resource. | No |
persist-column-state-key | the user can change columns (the width, for example); if you want the column states to be persisted when the user navigates away from the page, specify a unique string value. By default, changes are not persisted, and the grid returns to its default state every time the user navigates away from it. | No |
columns | enables you to supply an array of ColDef[] properties to configure the grid. | No |
createFormUiSchema | enables you to supply a schema to configure an insert form. | No |
updateFormUiSchema | enables you to supply a schema to configure an update form. | No |
The persist-column-state-key string defines the key where the serialised state of the columns is stored, as an object in session storage.
If you set multiple entity-management components in your application, you must use unique keys to persist the state - otherwise, the user experience will be unpredictable.
For a full list of attributes and properties, see the API documents.
Customising
By default, you get a grid and a form based directly on the back-end resource that you are connecting to; you get all the fields (columns) from that resource. Equally, you get a form based on the metadata of the event you have specified.
Customising the grid
If you want to control the appearance of the grid, use the columns attribute. This enables you to supply an array of ColDef[] properties to configure the columns that are displayed, their width and many other properties; these are the same properties that are used by the Grid Pro component.
Customising the form
If you want to control the content of a form - for example, you might want to use different forms for inserting a new record and for modifying an existing record - use either the createFormUiSchema attribute or the updateFormUiSchema attribute. These enable you to provide a schema that configures the form. There is more information about using these attributes in the API documentation
Customising colours, fonts and more
Your designtokens.js contains the details of the default fonts, colours, borders and padding, all of which control the appearance of your user interface.
The easiest way to change this file is to run the Design System Configurator, where you can change settings and instantly see how they look on screen. Once you have made changes that suit you, you can click on the Save button to save the settings directly to the designtokens.js file in your repo.
To run the Design System Configurator, make sure your project is running; from the client directory of your app, run:
npm run dsconfig
User Management
The User Management business component has been built using the Entity Management micro front-end.
It is designed to enable you to configure user access to the system with the minimum of effort.
Profile Management
The Profile Management micro front-end provides a way of managing manage the profiles on the front end. This has been built using the Entity Management micro front-end.
It is designed to enable you to configure the user profiles with the minimum of effort. These user profiles control access to specific functions and information in your application.